Thanks mate.
I was wondering about the requirements for the drill bit.
Appreciate the tip.


Thanks mate.
I was wondering about the requirements for the drill bit.
Appreciate the tip.
Hey everyone.
An update and some questions.
Since the last report, I have gone ahead with the wipe on poly for the top, and Tru-Oil for the neck and the back of the body.
I've also added waterslide decals for the headstock logo and the top, with one coat of poly and Tru-Oil over the top of the decals.
I'm getting down to the neck fitting and this is where I'll need to ask for some advice.
First I found that the neck tenon had some bulges which made the pocket VERY tight and the bottom of the tenon did not sit flat in the pocket.
So, some hours of cautious sanding has made the fit snug and maximum contact between neck and body.
This is the join.
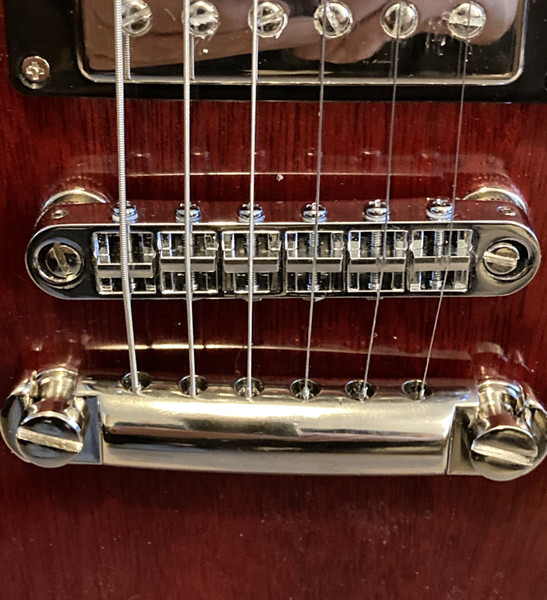
I put the bridge on so I could check the neck angle and found 2 problems.
1) String height is way too high, so I am sanding the neck tenon at an angle to bring it down. I need to bring the string height down by about 5mm to have enough adjustability in the bridge. Question to you guys is do you think I have enough meat on the tenon? (I think I do.) Or is there another way to achieve the same effect?
2) The posts for the bridge are a little far apart and I can't get the bridge to settle on it comfortably.
Any solutions?

Last edited by Grug; 02-11-2020 at 05:14 PM.

You really need to solve 2) before making any final decisions on 1).
2) looks to have been caused by the post holes being drilled at right angles to the curved top, rather than at right angles to the plane of the body, so that the posts splay outwards,rather than remaining parallel.
Have you screwed both posts right down to the floor to see if the bridge just fits on then? The lower the posts are, the smaller the distance between the posts will be and the more likely the posts will fit.
Short of filling the post holes in and re-drilling them vertically (for which you really need a drill press), the only other solution is to take a small round file and elongate the holes in the bridge.
I just had to do this on my GSM-1 build, though in that instance the posts were too close together.
To reduce the amount of metal removed, you'll want to file at an angle that mimics the angle the posts sit at. You'll need to be careful as there is less metal on the outer edges of the hole that can be safely removed than on the inside.
Once you can fit the bridge on and know what height the strings/neck angle will need to be (a straight edge run across the top of the neck will hit the bridge about 2mm below the top of the saddles when its at the right height for a decent action), then you can think of adjusting the heel angle. You estimate the neck angle gives 5mm too much height at the bridge. Judging that the neck tenon length is about 1/3 of the distance from the heel to the bridge, the body end of the tenon needs to be reduced by 1/3 of 5mm (so approx 1.5mm) if you keep the neck end of the heel the same height, so you just alter the angle. If you simply take 5mm off the bottom of the heel all over, you'll get the same end result. but you could well run into problems with string height above the neck pickup, and the tenon will be very thin. It will still add some extra strength, but I'd prefer to keep as much thickness as possible there, as with the double-cut shape, there's not a lot of glue area for the neck otherwise.
So I'd strongly suggest changing the heel angle rather than just sanding 5mm off overall.
Thanks again Simon.
I agree that solving 2) is the first priority, and your post offers a solution or 2 I hadn't thought of.
Once the sleeves are put in, are the removable?
Happy to report the bridge pin problem sorted.
Thanks Simon.
Really appreciate your input and generosity.
Yes, the posts are removable. You just need the right-sized bit of round wooden dowel (6mm) and cut a short length that fits down the hole leaving a few mm of the internal thread showing. The thread is M8, so easiest to use an M8 bolt. but you can use a post from the stop tail (or use a spare post if you have one lying around), though there's always a risk of marring the screw slot if you don't use a large enough screwdriver. Just wind the bolt into the insert, and the insert will get pulled out of the slot. The splines that really do the holding are only about 1cm deep, so you don't have to wind the post out too far before it becomes loose.
Time for a progress check.
Thanks again to Simon, I was able to resolve the above issues and move forward.
Before gluing the neck, I straightened it using the truss rod, then proceeded to level, crown and polish the frets.
I installed a bone nut to replace the plastic original.
I also gave the fretboard a couple of applications of Lemon Oil.
In the absence of one, I had to drill a 10mm hole from the switch cavity to the neck pickup cavity to put wiring through. Was fortunate to be accurate enough to land in the right spot the second time. The first attempt was harmless and caused no damage.
After a significant amount of time sanding the heel of the neck to create a useable angle, I finally glued the neck into the body with Titebond 1.
The little gaps around the joint I taped off and filled with Maple Timbermate and then added a few more layers of Tru Oil over the neck and back of the body.
I also polished the Poly top with an car polish product, the name of which escapes me at the moment.
Then I started adding some bits to it.
The Tuners are genuine PRS tuners (off an SE I think)

ToneRider Alnico IV zebra Humbuckers.
920d Custom Lp50-split Upgraded Les Paul Wiring Harness W/ Coil Split and Pure Tone output Jack.
Note that the tone pot shafts stick way up. I would like to lower them obviously but the the switch itself wouldn't fit into the control cavity.


Switchcraft 3 way switch.
Which brings me to asking if there are any solutions to putting flat switches on sloping surfaces?
Next step is to sort and solder the Spaghetti vomit.
I'm taking time to think this through as there are some inconsistencies within the supplied wiring diagrams, across the manufacturers.
I think I have it now sorted and will spend time on the upcoming weekend to put it all together.
Last edited by Grug; 26-11-2020 at 07:32 AM.
Sloping surfaces really require the slope of the wood behind the top to match the slope of the top. Which requires some forethought to get right. If the distance between the rout and the top itself is quite thick, then the holes also need to be drilled perpendicular to the plane of the top.
You could make a thin wooden wedge, drill a hole in the middle and fit that in the selector rout to get that switch angled correctly. You may then need to use an extended Switchcraft knurled nut as this will reduce the amount of thread showing, but this type of nut is common fitment on Les Pauls and other guitars where the top is over 2mm thick.
Your long pots just need some nuts and washers fitting on the cavity side to get them to the right height. Those long shaft pots are ridiculously long, Ive never known a guitar that actually needed them, and the medium length shafts are always sufficient for my needs, but I expect the 920 lot use them as they should fit all scenarios, even if it does leave the pot body in mid-air.
Situations like this are where making your own harness is so much better than buying one as you can choose your own components to fit the space you have. CTS certainly do switched pots that are a bit shorter in the body, but it looks more like you need switched pots with shorter shafts as well. So you may well have to modify that harness with some new components and end up practically making your own.

This similar to what I did on my PRS-1TS, except I made mine with 2 x 12mm diameter fibre washers (red ones used in plumbing).You could make a thin wooden wedge, drill a hole in the middle and fit that in the selector rout to get that switch angled correctly.
I superglued the two together, then filed and sanded them down on one side so it became a "wedge-shaped washer".
I can't recall what thickness it finished up being, but it was easier to manage as a washer in the small cavity than trying deal with a single wedge under one side of the switch (which was my original attempt).
The little wedge kept shifting and falling out whilst I was trying to position the switch and focusing on the front & back at once.
Making the world a better place; one guitar at a time...
And she is done.
Turns out I made the right decisions about where the wires go and all the push/pull pots work as advertised. Switch has a very positive feel to it and selects the correct pickup accordingly.

The set up of the truss rod, nut, bridge and intonation have worked out well. Good string height and comfortable neck.
I really like the way it plays and sounds but I went and got a second opinion.
Good friend has a Gibson Les Paul and so I sort him out to help me with the debugging.
We both liked;
the action,
the feel,
the playability,
the look,
the range of tones, both clean and driven sounded great,
the sustaaaaaaaaaaaaaiiiiiiiiiiiinnnnnnnnnnnn was remarked on most favourably,
no extraneous noises or buzzes,
taking fingers off the strings made no discernible change,
the balance between pickups.
What we didn't like;
As surprised as I am about how it turned out...nothing beyond a couple of finishing imperfections.

Thanks to Simon and McCreed for getting involved and helping out.
 Posting Permissions

 Reply With Quote