Page 1 of 5 1 2 3 ... LastLast
Results 1 to 10 of 48

Thread: 1st Biuld - HB-4S violin bass

  1. #1

    1st Biuld - HB-4S violin bass

    Hi everyone

    Apologies in advance, this may be a bit long...

    My kit arrived, and upon opening, looked at all the nice stuff, then the scramble to find the instructions, only to find a piece of paper saying "You what? no instructions here sunshine, try the website, look at some pretty videos, and check out some forum". I was somewhat disappointed. I have built a number of things in kit form, now don't get me wrong, the hardware and guitar parts were all nice and seemed quality, but the kit *as a kit* could do with some work. A bit of labelling and a few pictures of what goes where would be nice .

    With that in mind I'm hoping this thread will help other new builders facing this particular kit for the first time. There will be mistakes. My experience with forums such as these is that others with more experience will point out these mistakes, what was done wrong, and how it *should* have been done. This constructive advice is always helpful .

    To quote "Only an idiot learns from his mistakes. A wise man learns from *other* people's mistakes" . Now I was sure I got that from Plato or Einstein, or some other notable geek. Sadly, it's from Otto von Bismarck . <raises hand> Yeh.... I'll be that idiot .

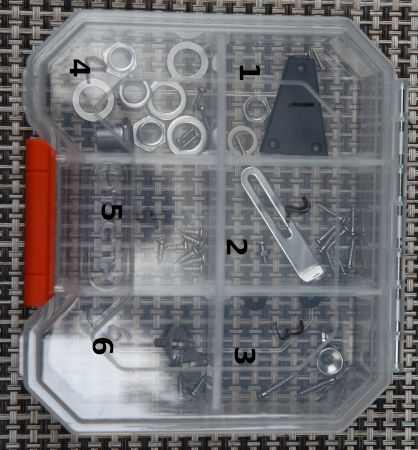
    So, first thing that struck me was that the bag with all the screws wasn't marked, so no indication what screws were for what hardware. I think I figured it out...here's a picture of them in the same groupings , only in a box:


    As far as I could work out, 1. is the nut and washer for the output jack and the little plastic bit and screws for it that goes just in front of the nut, covering some of the rod adjustment hollow on the neck, 2. is the screws for the two pickups, a mystery bracket and machine screw with nut. Any ideas where the heck that goes? 3. is hardware and screws for the strap buttons. Still haven't worked out where the one at the front goes
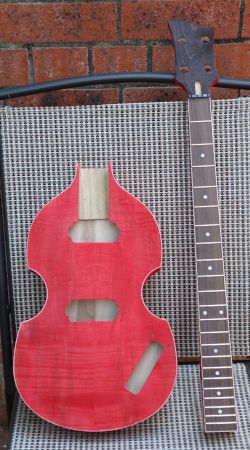
 . 4. is the screws ext for the tuning pegs. 5. is the screws for the controls and pick guard, and finally 6. appears to be the screws for the tail piece and the adjustment screw/nut for the bridge.

    Now on to dry fit:

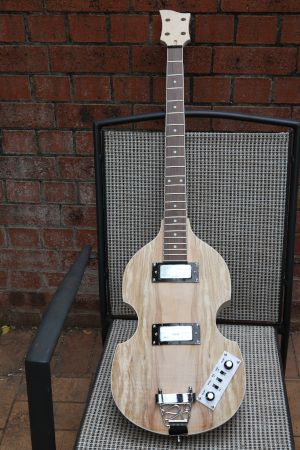
    I made an assumption (dangerous at any time) that the body was symmetrical and used the points of the C cutaways on the sides in the middle as reference points. Measured from point to point across and used this to determine the centre line of the body, and marked that with a charcoal pencil (charcoal is realy easy to remove). From there I measured out half the width of the pickup plate either side of the centre and marked that. Then marked the centre of the other axis for each pickup and marked from the centre out. I then marked my holes for the pickups, drilled them, and mounted my pickups.


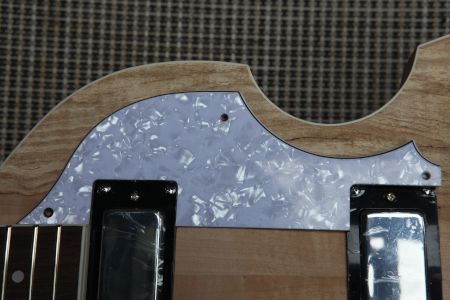
    Now, I can hear some of you groaning , shaking your heads sadly and saying nooooooo!. Aaand, here's why:


    Yeh, should have used the pick guard to determine the mounting of the pickups .

    For the control plate, I put the plate with controls in their hole, moved it to one side and up as far as it would go, marked dots at all the corners, moved it down as far as it would go and did the same thing, then repeated for the other side. This left me with a cluster of four dots at each corner. ( I do have a pic, but I need the 5th for something else). I placed the plate with the corners somewhere in the middle of the four dots and marked my holes.

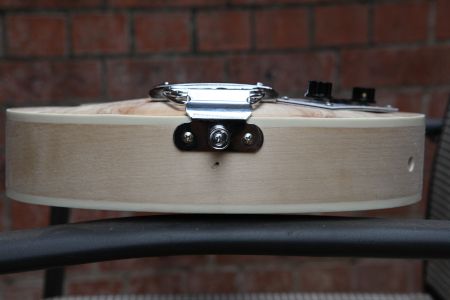
    Now I couldn't see a photo of the tail piece that had the right angle to show that the middle screw was the strap button:


    You will notice the small hole in the middle. That was for the strap button before I found out it was meant to be in the tail .
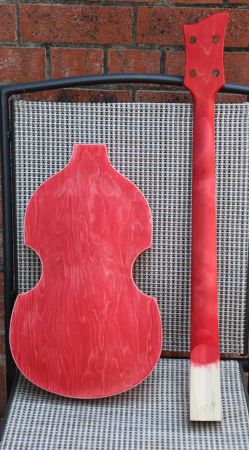
    Next is staining .

  2. #2

  3. #3

  4. #4
    Member Cliff Rogers's Avatar
    Join Date
    Aug 2019
    Location
    Minbun, FNQ
    Posts
    234
    Cliff

  5. #5
    Member Bugeye29's Avatar
    Join Date
    Apr 2020
    Location
    Melbourne Australia
    Posts
    29
    Hi Rabbit,

    Thanks for the informative post, i am in the process of building the same kit i have a build log here. Your welcome to ask me any questions if i can help i will although this is my first build also.
    There is a wealth of information on this forum and helpful builders.

  6. #6
    Overlord of Music fender3x's Avatar
    Join Date
    Jan 2016
    Location
    Miami, FL, USA
    Posts
    2,199
    Starting with the plastic box...

    1. The nut and washer, if you are correct, will fit the jack. The nut for the jack will ONLY fit the jack so it should be easy to figure out. The plastic cover is exactly what you thought.

    2. Screws are probably for the pickup rings. They look too short to be for the pickups. The other thing is a pickguard bracket, mounted like in the pic. It's common if you add the pickguard on an archtop.

    Click image for larger version. 

Name:	bracket.jpg 
Views:	157 
Size:	4.4 KB 
ID:	37516 Click image for larger version. 

Name:	hof.jpg 
Views:	179 
Size:	23.8 KB 
ID:	37518

    3. Strap buttons, yes. The front one goes roughly where this fellow has his. Usually on or just behind the heel.

    Click image for larger version. 

Name:	paul-mccartney-ringo.jpg 
Views:	169 
Size:	198.0 KB 
ID:	37517

    4. Hard to see, but sounds right.

    5 & 6 seem right.

    Your dry fit looks reasonably good, so this many not be an issue, but really the most important thing before drilling holes is to make sure that the strings align well with the bridge--or in this case the tailpiece. Since this has a floating tailpiece, a mm one way or the other should not make too much difference.

    With regard to the extra hole under where the tailpiece mounts, what I might be inclined to do is get a third screw that looks like the others for the tailpiece, and put the strap button in the hole drilled in the wood. The strap button often goes at the end of the tailpiece, but I don't think there is any law that says it must ;-)

  7. #7
    Yes, I did look at them *before* my first post . Helpful yes, but not all was explained because the focus tended to be one one model. Not all instruments are the same, or we'd all be playing either a Gibson Les Paul or a Fender P bass . A re-read of some of those did make a bit more sense.

    Quote Originally Posted by fender3x View Post
    Starting with the plastic box...

    The other thing is a pickguard bracket, mounted like in the pic. It's common if you add the pickguard on an archtop.

    Click image for larger version. 

Name:	bracket.jpg 
Views:	157 
Size:	4.4 KB 
ID:	37516 Click image for larger version. 

Name:	hof.jpg 
Views:	179 
Size:	23.8 KB 
ID:	37518

    3. Strap buttons, yes. The front one goes roughly where this fellow has his. Usually on or just behind the heel.

    Click image for larger version. 

Name:	paul-mccartney-ringo.jpg 
Views:	169 
Size:	198.0 KB 
ID:	37517

    Your dry fit looks reasonably good, so this many not be an issue, but really the most important thing before drilling holes is to make sure that the strings align well with the bridge--or in this case the tailpiece. Since this has a floating tailpiece, a mm one way or the other should not make too much difference.
    Yeh, while exploring strings I came across a video titled "Hofner Ignition violin bass upgrade". It gave me a good look at the Hof, both Chinese made and German. The strap button was indeed on the body, just below the heel. I have also seen a pic of a non-Hof with it on an angle on the side of the neck in the heel aria. The vid also gave me a good look at the pick guard. The German made Hof had it floating more than 5mm off the deck! The Chinese one had spacers under the guard where it screws to the body in addition to that bracket.

    My screw up with the pickup alignment is no biggie fortunately. I was never intending on using the pick guard that came with the kit. Whilst I don't use a pick, one day I might. I have some black pearl material coming. It's actually a guard for a strat, so I'm hoping there is enough material for both the guard and the control plate.

    During dry fit, the end of the neck was square with the pickups. I'll do another dry fit before gluing the neck, with the outer strings to see if it naturally sits where it should. I can tweak it if needs be and give the end a quick touch up on the disk sander to fit flush with the pickup.

    So... progress. I gave the body and neck a sanding and stained them with Color Tone Cherry Red stain. This was purchased pre-mixed. I put on two coats with 24 hours between coats (probably unnessisary), The second coat realy didn't look any different to the first upon drying .


    I'll give it a week before the next stage .
    Last edited by Rabbit; 02-10-2020 at 08:50 AM.

  8. #8
    Overlord of Music fender3x's Avatar
    Join Date
    Jan 2016
    Location
    Miami, FL, USA
    Posts
    2,199
    I have built a couple of semi-hollows and never even considered putting a pickguard on, although you do see a lot more violin basses with than without.

  9. #9
    Member Cliff Rogers's Avatar
    Join Date
    Aug 2019
    Location
    Minbun, FNQ
    Posts
    234
    Quote Originally Posted by Rabbit View Post
    ..... Not all instruments are the same, or we'd all be playing either a Gibson Les Paul or a Fender P bass . ....
    Maybe you can volunteer to write the HB-4S violin bass kit build manual.
    Cliff

  10. #10
    Quote Originally Posted by Cliff Rogers View Post
    Maybe you can volunteer to write the HB-4S violin bass kit build manual.
    Does the phrase "blind leading the blind" hold any meaning for you?

Page 1 of 5 1 2 3 ... LastLast

Posting Permissions

  • You may not post new threads
  • You may not post replies
  • You may not post attachments
  • You may not edit your posts
  •