Looks good.


Looks good.
PitBull Builds: FVB-4, LP-1SS, FBM-1, AG-2, TB-4, SSCM-1, TLA-1, TL-1TB, STA-1HT, DSCM-1 Truckster, ST-1, STA-1, MBM-1.
Scratch Builds: Pine Explorer, Axe Bass, Mr Scary, Scratchy Tele's.
The little voices in my head keep telling me "build more guitars"

Looks good, i better get my act together and finish mine your putting me to shame.

I think your's involved more work. I just slapped the stain on because I had always planned on painting the binding. How did you go with your staining problem on the binding? Did you find a solution to the dye that had creeped into the cracks? And your wiring I think is more complex, you mentioned 3 wires with the Hoff pups. I had another play tonight, and it's growing on me.. still feels kinda cramped.... I didn't expect 4 inches would make much differenceOriginally Posted by Bugeye29

.
Hi Rabbit,
Well i could not remedy the stain issue so have to live with it, a lesson learnt for the next build.
Regarding the wiring Simon was a great help in sorting that, all is done except i forgot to run an earth wire to the bridge / tail piece which is tomorrows job along with fitting the strings. All being well it should be finished tomortow night ( dont hold me to it ).
I am looking forward to trying it i currently have a standard size bass as my main instrument, i am looking forward to the lighter weight of the HB-4
That's a shame. Maybe next time if you have a kit with pale binding, you could carefully paint on liquid latex as a mask. That would fill any cracks in the binding to prevent ingress of dye into those cracks.
I get the impression he's good for that.
It's certainly light! My other instrument, a Gibson/Epiphone/Tobias (anything swallowed up by Gibson seems to have an identity crisis) Toby IV and it's considered light, but compared to the violin bass it's heavy. The short scale of the violin bass does feel a bit weird at first, but the sound is something else. The tape wound strings that I put on it realy accentuates the mellow tone, and coupled with an effect built in to my amp called "Fat Bottom" is really something else. Yeh, I couldn't imagine it in the hands of Cliff Burton or Steve Harris <chuckle> . Enjoy playing your new instrument when it's done! Now I just have to wait for a reply from Pit Bull about my next project........
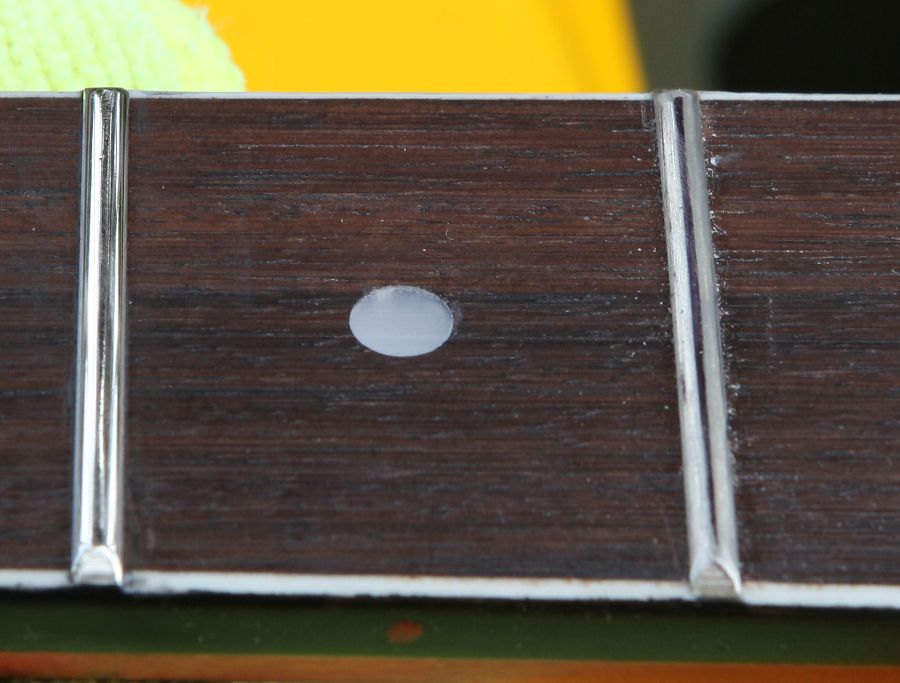
OK so a final update. When I finished putting "The Hoff" together it was fairly quick and I just wanted a working instrament. After completing Dora and doing the fretwork, I figured I should probably do something about The Hoff. I levelled the frets, but kinda procrastinated with the re-crowning. With the re-crowning of Dora I had to do it twice, because the first time I used s crowning file, and ended up making some frets lower . It was also too easy to cut into the fretboard with the edges of the file. For The Hoff I used the Guns 'n' Guitars method using a piece of timber with 45 degree angles, small fats on the ends and 400 grit paper on the angle. It's more or less a shorter version of when people use a triangular file to re-crown. after that I used the dremmel and some Autosol metal polish to polish the frets with the fretboard protected with some masking tape. I also dressed the fret ends. Before and after:
I gotta say, even using a dremmel... fretwork is *very*tedious!
The final step was intonation. I never got the intonation right in the first place. When I put the bridge on and re-strung, I intonated the E string. The other 3 were sharp. I intonated the G string and the two middle strings were pretty much right, but the E string was flat. I managed to pry off the piece of fret wire that passes for a saddle and moved it to the same slot as the A string and it was almost right. In this configuration by angling the whole bridge slightly I was able to get all 4 strings in the green for both open and 12th fret. Win!

Looking at the photo, Id say you still need to work on your fret polishing technique. It sounds like youve gone straight from the profiling process to the Dremel stage. For a bass, you may not notice the scratches in the frets due to the relative large string to scratch ratio, but on a guitar, the top strings would feel very scratchy indeed.
I always rub the frets with P240 to start with, to get rid of all the cross-scratches and deep lengthwise scratches, before going to P320, then up through the grades to P800 and then the micromesh. Only then do I polish with the Dremel.
Ill tape the fretboard up before using the crowning file (getting a good one is the secret here, and it took me a while to get one that just worked fast and easily), which generally is enough to protect the board from the file edges. Replace the masking tape if the file is cutting through.
I will rub each fret with each grade of sandpaper the same number of times to try and keep the height level. Typically 50 with P240 (more if I cant run an offcut of .010 string along each fret without feeling it catch). Then 20 with P320 and 10 after that. Ill rotate the guitar each time I change grits, mainly so that the fret ends are done fairly evenly, as the end nearest you can end up with kess sanding if you dont rotate.
Others will do it differently but that works for me. But you must get rid of any large and medium scratches in the frets before final metal polishing. Otherwise its like trying to remove tooling scratches on body wood with P2000 sandpaper. You can get the top of the wood feeling nice and smooth and looking shiny, but the deep tooling marks are still there.

It's important to have an appropriately sized crowning file for the given fret size, or this can happen. There is another member that posted about this very issue just the other day.With the re-crowning of Dora I had to do it twice, because the first time I used s crowning file, and ended up making some frets lower.
Also worth noting that achieving a proper crown on a fret is not always done so by only running the file directly over the centre line of the fret. Sometimes the file needs to be run off centre. It's all about how the groove of the crowning file mates with the size and shape of the fret wire.
There are that many different fret wire sizes and specs that it would be near impossible to make a crowning file that fit every one exactly. So compensations have to be made.
Like most things, it becomes less tedious the more you do it. You find easier and quicker ways of doing things as you go along.I gotta say, even using a dremmel... fretwork is *very*tedious!
My first level, crown and dress took me about 4-1/2 hours. Now I do it in about 1-1/2 (depending on coffee breaks!). I can pretty much do a full refret, level, crown and dress in the original 4-1/2 hours.
I have taken to just using two strips of painters tape on either side of the fret I'm crowning, and just moving them as I work up the fretboard. I'll replace the tape if it starts to get worn out or lose its stick.Ill tape the fretboard up before using the crowning file (getting a good one is the secret here, and it took me a while to get one that just worked fast and easily), which generally is enough to protect the board from the file edges. Replace the masking tape if the file is cutting through.
I also agree with Simon that finding the tool that works for you is a huge part of getting your best result. Unfortunately it requires buying & trying to find it, but this has the side benefit of adding more "weapons" to your arsenal. I have files that aren't necessarily my favourite, but still come in handy for certain jobs.
Making the world a better place; one guitar at a time...
 Posting Permissions

 Reply With Quote