Results 1 to 9 of 9

Thread: First build Es 1s

  1. #1

    First build Es 1s

    Hey Everyone, I’m Ollie, starting my first build and I couldn’t be more excited to get stuck into it in iso! Got a little bit of background knowledge being an apprentice chippy, but definitely thrown myself into the deep end by doing my own guitar. Read and watched a few things around the web to understand the basics but got a few queries a bit more specific to my build. Anyway, I’m in set up and sanding processes.

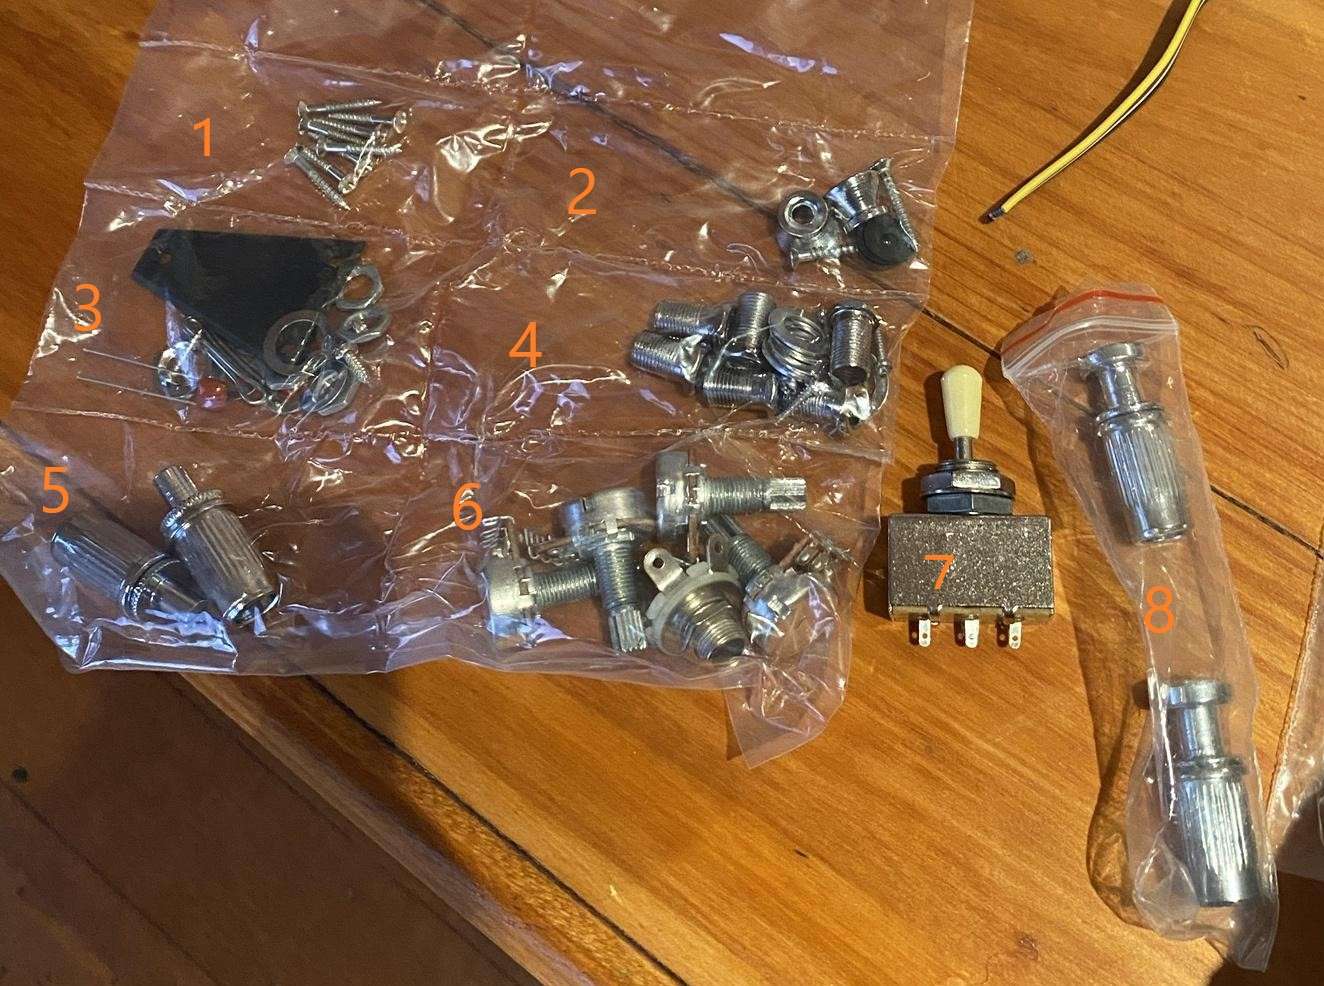
    Roughly lined everything up on the body in the dry fit. Would love a bit of input on where things go and which way, seems like there’s a spare hole after lining up the knobs and having a spot for the switch. Not sure what it’s for and also would like it if someone could give me a hand just identifying some of the bits and bobs. Got an idea what most the parts are but if someone could just label the bag that would be heaps easier for me

    Testing the neck out and having a closer look at it, looks like there has been some timber flake off in the routing process. Upon fitting, my rough sight notices that the angle isn’t affected but there is a small gap on the left side more so under the last fret so I’m not sure if it’s something to worry about now or just keep in mind later on for something. I understand that the pocket also needs a little tidy up too.

    On the back of the neck at the join, I’m not sure what’s going on here but I can see that there’s a layer between back of neck and the light outside edge of body(term for that?). It looks like it’s sort of just flaked a bit. Will many coats of oil fill in that or is there like a type of bog to go in there that can be oiled or something?

    Signs of glue around the openings in the body but it’s a spalted maple top so I’ve read that sanding the veneer is a big no no. I thought maybe a high grit like 1500- 2000 could get it but would like to check on with other people. There’s also some sort of machining line from the opening to the edge that I feel like might show up more after an oil so I’m not sure whether or not it’s worth trying to get out.

    Read and watched a lot on oiling the body but haven’t heard much about the neck in regards to the fretboard. It’s already smooth and what I think is finished. The back obviously needs a touch up but not sure if the actually fret board is something that gets a coat or not. Was planning on just matching the amount of coatings I put on with the neck so down the sides of the neck there’s no difference in tone

    With the gluing and joining, is it easier to oil the neck seperate to the body and then glue it in? Not sure how the glue fares on oiled timber. Also got a bone but to put in. if I put that in before I oil, Is that going to absorb oil?

    https://imgur.com/gallery/s7fcXwL

    https://imgur.com/gallery/tzOcm5L

    Cheers to anyone that can chime in with any info and thanks for having me!

  2. #2
    GAStronomist Simon Barden's Avatar
    Join Date
    Oct 2016
    Location
    Reading, UK
    Posts
    10,547
    Hi and welcome.

    Your spare hole? I presume you want to plug it in to an amp? The rear one is where the jack socket goes.

    I wouldn't worry about any minor gaps like the one in your picture below. It's very likely the gap will disappear when you clamp and glue it. If not, it's small enough for finish to cover and fill the gap:

    Click image for larger version. 

Name:	GXD5Von.jpg 
Views:	206 
Size:	664.5 KB 
ID:	37303


    1= pickup ring mounting screws
    2 = strap buttons
    3 = truss rod cover, solder and various screws and washers for the pots, jack and switch.
    4 = mounting screws and washers for the tuners
    5 = Bridge posts and bushings
    6 = volume pots (a500) tone pots (B500) and output jack
    7 = pickup selector switch
    8 = stop tailpiece posts and bushings

  3. #3
    GAStronomist Simon Barden's Avatar
    Join Date
    Oct 2016
    Location
    Reading, UK
    Posts
    10,547
    You need to mask off the neck pocket and the end part of the neck that sits in the pocket, as you don't want any finish on those at all. Wood glue (like Titepond or PVA) adheres to the cellulose in the wood which is what give a strong join. Put it on over a finish and you only get the strength of the hardened glue gripping on to the finish irregularities, which is a far weaker bond.

    That neck heel area will need a bit of work. It's not great if you want to do an all-natural finish. I'd normally use a standard fine wood filler to plug any gaps like that after gluing the neck on. It's not in the most visible position, but you'll know it's there. I generally try and tint the filler with mixed-up artists acrylic paint to get close to the wood colour if I'm not doing a solid colour over the top. But it looks like you may have to do a small bit of sanding or chisel work to get the neck seated in the pocket properly, it seems to be sticking out by 1mm or so at the bottom.

    Glue - test with turps or metho and any light areas probably have glue on them that stop the liquid being absorbed. Sanding isn't that good at removing it unless you can really dig in, and here you can't. SO you need to use a glue remover like Goof Off (90% acetone), or even just pure acetone. Just be careful as acetone will soften and eventually melt the binding material, so mask that off and don't use too much.

    You've definitely got a score mark which will show up under a clear finish. I'd try and see what steaming will do to it. Damp piece of cotton cloth over the area, hot iron or soldering iron over it for a few seconds, making sure steam is coming off. You may need a few applications to get the best you can from it. Damp, not soaking cloth, and you may need to re-wet it after a couple of steams. It may cure it completely, or it may reduce it's depth significantly. You can lightly sand the top to remove it, but I'd use P800 and keep checking after a few strokes to see how its going as you don't want to over-sand. The veneer thickness is likely to be 0.5mm, so you probably have enough depth to sand that area flat as the score won't be very deep, especially after some steaming.

  4. #4
    Member ThatCluelessGerman's Avatar
    Join Date
    May 2020
    Location
    Hamburg, Germany
    Posts
    333
    Quote Originally Posted by Simon Barden View Post

    Your spare hole? I presume you want to plug it in to an amp?
    Haha, I can totally relate! When I unpacked my ES-1, for a brief moment I also thought "damn, it's one hole too many" until I realized the jack socket is on the top
    I don't know what I'm doing but I hope I will end up with a guitar

  5. #5
    Member
    Join Date
    Apr 2020
    Location
    Northumberland UK
    Posts
    124
    Hi Ollie and welcome to the forum.

    The light edge to the body you refer to is the binding.
    I think that once you have cleaned the neck pocket and pushed the neck home and clamped it then the bottom joint of the neck will also look fine. The binding needs a bit of a clean-up in that area as well.

    I have just finished my ES-1GT build and had much the same as you.
    Spend a good amount of time ensuring the neck sits at the right angle to the bridge. Time spent here will pay off later when you come to fit the strings and adjust the action.
    Ask questions Before you remove and wood though.

    Will the lines on your maple top show?
    Best bet is to wipe some metho on it and see what it looks like. If it does show then some VERY gentle sanding may get it off.
    Personally I would not use less than 600 grit (but knock the edge off the paper first) and do not use any pressure (1500 may polish the wood a bit too much and make the stain take-up different in that area.

    Good luck and ask lots of questions.

    Cheers
    Ricky

  6. #6
    Hey guys, thanks for helping out!

    Up to fiddling with the neck and eyeing it off, seems to be straight ie. no twists. Checked with a 600mm level and appears to be very slightly convex. The manual says that’s pretty standard and won’t need anything done to it now. I had a look with the level to see if the frets needed a touch here and there. obviously being convex, it’s rocking around and there are the odd fret that needs a shave. Wondering if I need to properly flatten the fretboard with the rod before going ahead and get them all at once or, if I were to just put the high grit on the level and go from there getting them pretty similar in bunches of 3-4 frets. Something that’s a little harder to find an answer for through google, I also sort of think that something like that doesn’t matter as much because once tension is on the neck everything moves around.

    Also with the placement of the strings, I threw the e’s on, they run down the board very straight and consistent which is nice. Low e is just a fraction closer to the edge in comparison but I’m assuming that’s because the string is thicker so the middle of it probably runs relevantly the same distance from side.
    High e string starts touching the frets roughly on the 17th fret where as the low e runs the same height, cleared from the frets, the whole way.But as I said before, the neck didn’t appear to be twisted so I think that’s just a matter of raising one side of the bridge later on

    https://imgur.com/gallery/YwFR1As

    As again, thanks for all the advice and let me know what I can and can’t do!

  7. #7
    Member ThatCluelessGerman's Avatar
    Join Date
    May 2020
    Location
    Hamburg, Germany
    Posts
    333
    Do you have a notched straight edge to check if the fretboard is straight? If you put on a ruler on the frets, you can't really check if the fretwire is uneven or if it is the neck/fretboard.
    I usually first check if the neck is straight with a notched straight edge before glueing and stringing it up. If it isn't (they usually are), I adjust them slightly on the truss rod. Then, I use a credit card (or a fret rocker) to check for uneven frets. I mark them and then do filing/sanding/polishing.
    Then, AFTER it's strung up and finished, the neck will slightly bend under the tension (VERY slightly, it's not like it's gonna look like a bow) and sometimes the frets need a slight touch up then, if a correction on the truss rod won't do.
    I don't know what I'm doing but I hope I will end up with a guitar

  8. #8
    Nah I had read in the instructions that it wasn’t an essential tool and that you could get by without, is there an alternative way to do it or even make one out of something?

  9. #9
    Member jonwhitear's Avatar
    Join Date
    May 2020
    Location
    Sydney, Australia
    Posts
    260
    Quote Originally Posted by Olliebanko View Post
    Nah I had read in the instructions that it wasn’t an essential tool and that you could get by without, is there an alternative way to do it or even make one out of something?
    You can make one. Get a steel ruler form bunnings for a few $, line it up with your frets and mark positions, then file out notches.

Tags for this Thread

Posting Permissions

  • You may not post new threads
  • You may not post replies
  • You may not post attachments
  • You may not edit your posts
  •