Results 1 to 4 of 4

Thread: First Build DGM-3F

  1. #1

    First Build DGM-3F

    Hi Everyone,

    This is my first ever guitar build. The kit is DGM-3F. I sadly am not able to work on it much due to other responsibilities. I have done a dry build and everything seems to be fine. I haven't noticed any deficiencies. My goal is to at least get it painted or stained before August 14th so I get it done before it starts to get cooler outside because I do not have the resources/room to paint inside. I also leave on the 14th to go on a trip, so it would be great if I get some of the bigger stuff done before then. This leads me to my concerns/questions.
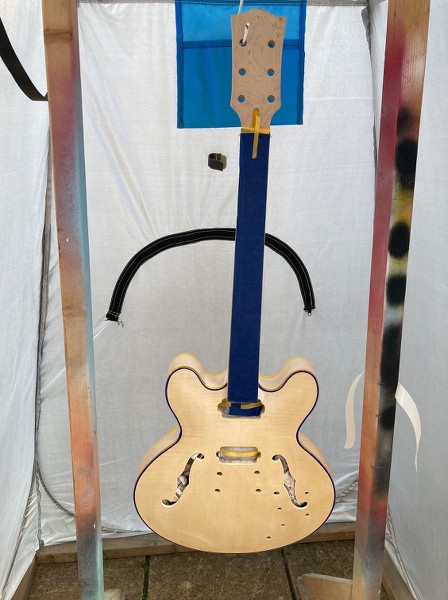
    My guitar kit has a flame maple veneer and I am not sure what that means other than the guide says I can not sand over it because it is very thin.
    So, how should I prepare the guitar for painting or staining?
    Can you even paint over a flame maple veneer? Would the paint soak into the veneer or just cover it up and it would not be seen?
    Also when painting the body I have seen people screw in a mock neck so they can spray paint the body without getting too much paint on themselves and they can hang it by that mock neck. My guitar is a glue-in neck so not sure what I would do for that other than just painting the whole thing after gluing the neck in. Or am I able to screw in a mock neck and then after painting or staining glue in the neck?

    I'm sure I will have a lot more questions in the future, but I hope this will be a great experience.

    -Nathan

  2. #2
    Mentor Trevor Davies's Avatar
    Join Date
    May 2020
    Location
    Perth
    Posts
    1,377
    Hi and welcome CryoNova12.

    The prep for the flame maple will depend on whether you are painting or staining. If staining you will need to check for glue marks (using a damp (water or metholated spirits) rag. Very light sanding of the veneer is possible but they do not normally need it!.

    I'm not a guitar painter, but I'm sure you can paint over flame maple - but it would cover it up and the flame would not be seen.

    As for the mock neck (or lollypop stick!) you can screw it into the top shoulder of the body - I did that with my set neck SSCM-1 build which was a set neck. Others put some dowel into the jack plug hole!.
    Attached Thumbnails Attached Thumbnails Click image for larger version. 

Name:	IMG_1178.jpg 
Views:	57 
Size:	109.4 KB 
ID:	43315  
    PitBull Builds: FVB-4, LP-1SS, FBM-1, AG-2, TB-4, SSCM-1, TLA-1, TL-1TB, STA-1HT, DSCM-1 Truckster, ST-1, STA-1, MBM-1.

    Scratch Builds: Pine Explorer, Axe Bass, Mr Scary, Scratchy Tele's.

    The little voices in my head keep telling me "build more guitars"

  3. #3
    GAStronomist Simon Barden's Avatar
    Join Date
    Oct 2016
    Location
    Reading, UK
    Posts
    10,547
    Hi and welcome.

    Finishes

    Just a few basics first. 'Lacquer' is really any finish that's either transparent (clear) or semi-transparent (tinted) when applied. The term is often used to describe a traditional nitrocellulose lacquer, which is always a sprayed finish, but it does encompass any translucent (and usually sprayed-on) finish. Apply enough coats of a tinted lacquer and it can become opaque, but it's rarely used like that, and reserved for when you want to see what's underneath.

    'Paint' is used to describe a solid colour finish, where even a single coat will hide what's underneath.

    'Clear coat' is any transparent or very slightly tinted transparent finish that is applied over the top of bare wood, stain, tinted lacquer or paint to add a protective layer to the surface underneath.

    The term 'stain' is fairly generic term that covers both 'stain' and 'dyes' (there are technical differences but basically they both contain a pigment in a solvent). The solvent is normally either water or spirit/alcohol.

    The most common finish used on here is to stain the body and neck and then apply a protective clear coat over the top. You get to see the wood grain very clearly.

    There are numerous clear coats types (and which are applicable to all finishes). The easiest to apply (and can be done indoors) are the wipe-on types, which generally break down into three classes:

    i) 'Polymerising' oils include TruOil, Tung oil and boiled linseed oil. These products harden as they dry, but have a slight yellow/amber tint to them, which can deepen over time. So great for some colours, but you can find that a blue stain is turned green.

    ii) Wipe-on clear polyurethane, which is basically a thinned version of normal oil-based polyurethane varnish. You can buy it or make your own at about half the price of the bought product (50:50 varnish and turpentine). This is clear and stays clear, so good if you want to keep the exact stained colour you've applied.

    iii) Shellac. Another product with between a slight and pronounced yellow tint depending on what version you buy. You can buy it pre-mixed, but it doesn't last long, so best to make it up yourself from flakes and methylated spirit (or just ethanol if you can get it). Shellac is compatible with every other finish you are likely to apply, so makes a good base coat.

    All the above work well, but you do need to apply many coats, so it's not a quick process. But you can generally apply these inside a house, so it does extend the build season.

    Then there are various aerosol sprays available. Polyurethane and acrylic are the standard ones you'll get online or in automotive stores. Nitrocellulose is a lot more environmentally damaging, so you'll generally only get these from specialist retailers, often luthier suppliers. Whilst clear and paint versions are available for all of the above types, tinted lacquers tend to be the domain of nitrocellulose (AKA 'nitro'), and if you want to achieve a true replica classic guitar finish, then you'll need to use nitrocellulose. Note that nitro sprays are at least double the price of other spray finish cans, so it's not a cheap finish. You can easily use 5 or 6 cans for a black headstock and a tinted finish with clearcoat over the top.

    Any spraying should really be done outside or a very well ventilated area, and a suitable mask must be worn. Certainly for nitro work you'll need a vapour mask, and you should really be using goggles and nitrile gloves., but I'd use my vapour mask for any spray work.

    For spraying, you can get an air compressor and spray gun, but to start with you are better of with aerosols unless you play to build a lot of guitars.

    For spraying, it is best to do it in a sheltered area that's safe from wind and minimises blown dust. I use a pop-up tent and have a frame inside to hang guitars from.


    Others have used IKEA clothes tents for a similar purpose. Get a light-coloured fabric as dark ones can become very hot inside very quickly when sunny, and too much heat causes no end of problems when applying finishes.

    Any finish will need to be flattened off by sanding and then polished, if you want a factory-style gloss finish.

    Finish the neck and body separately or glue them first then apply the finish (set neck guitars)

    Partly personal preference and partly down to how much space you have. An assembled guitar is quite unwieldy when it comes to moving it around for applying finish, so if you are short on space, then definitely do as much as you can whilst the neck and body are separate.

    I prefer to glue the neck on first, as it allows me to fill any cracks around the neck join and then apply finish over that from the start. I also spray all my guitars, so it's easy to spray the whole guitar when it's hanging up.

    But you can do them separately, (not forgetting to mask off the neck join areas otherwise the glue join will be very weak) and deal with the join area at the end.

    Hanging to spray

    Hanging a complete guitar from a tuner hole is easy if the guitar is assembled. Hanging a body on its own is generally far more of a problem. You could do as Trevor has done, and screw a 'stick' into the side of the neck pocket, but this is easier on some guitars than others. The small neck pocket size on an SG-style guitar would make this difficult to do safely IMO, so I wouldn't attempt that on your guitar.

    Other people have used a small clamp used between the neck pocket and the neck pickup cavity, and attached a suspension cord/wire from that.

    And if you do have a side-mount jack socket hole, then a broom handle in the hole can make a good handle.

    But you don't need to hang the body up. You can do it more slowly and do one side at a time. I often spray my bolt-on neck bodies lying flat. and apply three coats to one side one day, and three to the other side the next (repeat as necessary). You are far less likely to get runs on a flat surface than one hanging vertically. I also do the sides each time. I suggest putting the body or neck on small blocks to hold it off the spray table surface, as otherwise the overspray can stick the body to the surface at its edges and cause ridges in the finish on the underside, which you don't see until you turn it over.

    If you do get a run, don't try to sand it back immediately. You need to wait a couple of days for the run to dry thoroughly. It's much thicker than the layer of finish around it, and the surface dries quite quickly, trapping soft finish underneath. If you don't allow this to harden, you'll pull off the soft finish centre with your sandpaper; the solvent in which has often softened the finish layers beneath, and you end up with a pit in the finish that takes even longer to re-finish than waiting a couple of days.

    And there is often no need to sand a run back until you've finished applying the finish, or the last stage of one finish type before starting the next.

  4. #4
    GAStronomist Simon Barden's Avatar
    Join Date
    Oct 2016
    Location
    Reading, UK
    Posts
    10,547
    I forgot to say that another method of hanging up a body is to fit a small screw eye in the position the end strap button will go. Use a screw eye with a thread that’s smaller than the strap button screw, do you don’t loose any grip on the wood when you finally fit the strap button. I’ve done it on a couple of bolt-on neck bodies.

    See Jmax’s picture in his latest build diary post here.

    https://www.buildyourownguitar.com.a...l=1#post222373

Posting Permissions

  • You may not post new threads
  • You may not post replies
  • You may not post attachments
  • You may not edit your posts
  •