Page 3 of 11 FirstFirst 1 2 3 4 5 ... LastLast
Results 21 to 30 of 105

Thread: Harley Benton Jazz Bass kit build

  1. #21
    Overlord of Music fender3x's Avatar
    Join Date
    Jan 2016
    Location
    Miami, FL, USA
    Posts
    2,201
    Quote Originally Posted by Simon Barden View Post
    No. 
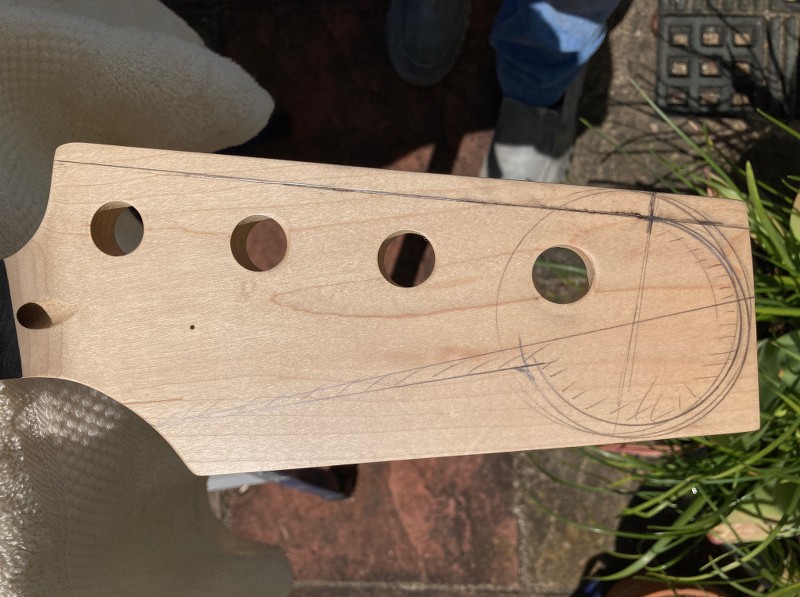
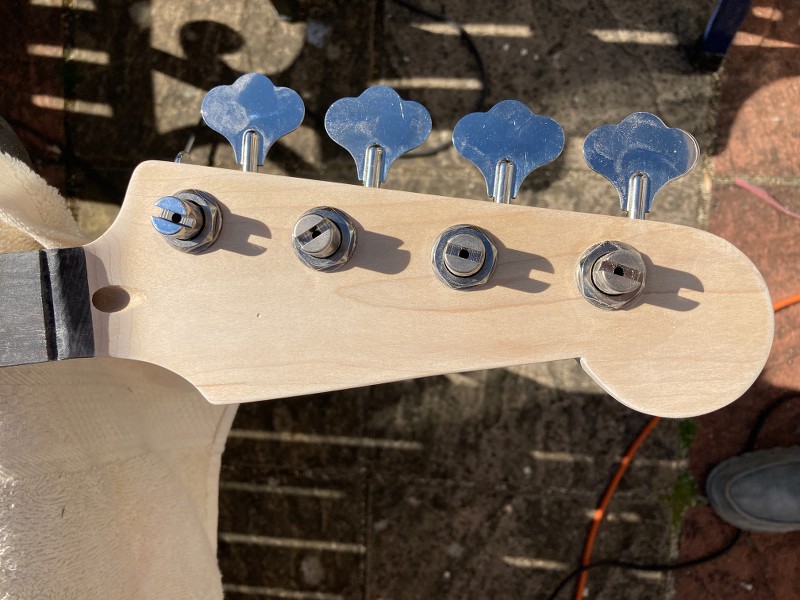
I'll check the holes against the large Hipshots just to make sure they get covered up (they probably won't align perfectly) ...
    I thought about this when I saw this jig.

    https://www.youtube.com/watch?time_c...ature=emb_logo

    Overkill for sure, but a simplified version might still be a way of getting really small dowels that fit the pilot screw holds for the tuners.

  2. #22
    GAStronomist Simon Barden's Avatar
    Join Date
    Oct 2016
    Location
    Reading, UK
    Posts
    10,547
    Not quite sure it would work well for 1mm dia holes. Sanding cocktail sticks is probably the easiest way.

  3. #23
    GAStronomist Simon Barden's Avatar
    Join Date
    Oct 2016
    Location
    Reading, UK
    Posts
    10,547
    The sun is out so the jazz bass kit has come out of hibernation. Actually I'm still waiting for the resin to arrive for the Hexacaster, and I can't progress on that until it does.

    So it was shape the JB headstock day.

    I didn't want it as large an a standard JB headstock, Always seemed too big, so I've gone for a slimmed down version, which is in keeping with the Hipshot Lites that I decided to use.

    I didn't use a template, just a compass to draw the scroll and a ruler for the straight lines.


    I had to take 5mm off the top edge of the paddle as the base of the cloverleaf part of the tuners were rather hidden behind it, so there's now a few mm of the shafts showing.

    My first scroll outline was too big, so I drew it a bit smaller and cut out to the shaded line. I also decided on a more gentle angle for the lower edge of the headstock, so the scroll didn't look too much like a circle stuck on the end.

    Jigsaw, files and sandpaper got me to this. I loosely fitted the tuners to get a better idea of how it worked with them fitted.


    I was half-tempted to make the scroll end slightly smaller as sometimes it looked fine to me and sometimes too large. Which probably means it's fine and I was just over-thinking it. The JB body is quite large, so I don't want to end up with too small a headstock and it all looking unbalanced.

    What I did do after the photos were taken was decrease the radius of the lower edge curve where it branches from the nut. Not a lot, just a couple of mm in the middle. But it now better complements the sharp upward sweep of the upper curve in my opinion. I would have taken another picture, but I put more filler in the old tuner pilot screw holes so it's on its back, drying at the moment.

  4. #24
    Overlord of Music fender3x's Avatar
    Join Date
    Jan 2016
    Location
    Miami, FL, USA
    Posts
    2,201
    Quote Originally Posted by Simon Barden View Post
    Body is boring basswood, but I've got tons of Daphne Blue...

    ...PBG JBs don't have is a proper JB-style narrow width nut.
    That's one of my all-time favorite Fender colors. Much nicer on guitars than any car I have seen it on ;-) The SD's will sound great on it, I am guessing.

    Not much help for impulse purchases, but you actually can get Jazz Bass nut spacing from Pit Bull. There is no extra cost, but you have to special order it. In my case that meant several months waiting. But when it got here it was 38mm at the nut, on the money.

  5. #25
    GAStronomist Simon Barden's Avatar
    Join Date
    Oct 2016
    Location
    Reading, UK
    Posts
    10,547
    The HB is generally a much better crafted kit than a Pit Bull one. Only real complaint is the tuner hole diameters being slightly oversize compared to normal. The body wood isn’t anything you’d want to stain, but for a solid colour bass it’s pretty much ideal as a kit. This is what a low-cost Chinese kit can be like with proper quality control in place. As a kit to easily upgrade, the tuner hole size lets it down. The pre-sealered body and neck preclude reliable staining if the body wood was more suitable, as you’d have to sand back quite a way to guarantee reaching bare wood. But there are no machining marks on the body to remove, unlike on the Pit Bull kits.

    If they offered their bolt-on kits with an ash or alder body with no sealer on the body or neck, and standard diameter tuner holes, then they’d probably dominate that area of the kit guitar market.

  6. #26
    GAStronomist Simon Barden's Avatar
    Join Date
    Oct 2016
    Location
    Reading, UK
    Posts
    10,547
    Well, I finished routing out for the SD NY4 pickups, which required widening the routs then filling in the ends on the bridge position pickup rout with some basswood, and then routing it out again so the pickup just fits in. The neck one just needs the right-sized hole in the pickguard.

    My first go at routing a new pickguard (the NY4 pickups are shorter than standard JB ones, so I couldn't rout a normal pickguard) ended up with a piece breaking off both the pickguard blank and the pickguard I was using as a template. so I have yet to re-do that.

    But I did apply a light mist coat of sealer/filler, which I'll sand down to see how flat I've got it. There are a couple of small areas that have shown up that need a touch of filler, but otherwise it's looking good.


    I did it without the spray tent as I'm sanding it all back, so wasn't worried about dust, but the new spray tent arrived just after I'd done this.

    I changed my mind and it will be sprayed Sonic Blue, rather than Daphne Blue, as I think Sonic is the colour I actually wanted my refinished Strat to be.

  7. #27
    Overlord of Music fender3x's Avatar
    Join Date
    Jan 2016
    Location
    Miami, FL, USA
    Posts
    2,201
    Ahh the old sonic vs daphne blue conundrum...

    https://www.youtube.com/watch?v=_MdB_oD-AoQ

    I couldn't decide which I liked better on my hybrid, so my son decided ;-)

    I am sure that a solid color is right choice, given the grain...or lack thereof showing in the pic.

  8. #28
    GAStronomist Simon Barden's Avatar
    Join Date
    Oct 2016
    Location
    Reading, UK
    Posts
    10,547
    It has to be a solid colour because of the exposed bridge pickup rout, which has been filled in at the ends and the rout widened.

    I sanded down the sealer/filler and the first coat of sonic blue has been applied.


    My second go at routing a scratchplate also ended in a small chunk tearing out in the neck cavity area where it couldn't be fixed by modifying the shape, so a lot of swearing and some more blanks ordered. I will revert to rough jigsawing and then sanding to shape, and will then fix the scratchplate on the body and rout out the neck surround area on the guitar to get an exact match (I did this on the Hexacaster scratchplate and that worked well). I can also mark out the control plate join and get that a slightly better fit than the stock scratchplate does.

    Oh, and of course this meant I had to order an oscillating bobbin sander so I could do it properly.

  9. #29
    Nice excuse for a new toy Mr Barden

  10. #30
    Member
    Join Date
    Mar 2020
    Location
    Surrey, UK
    Posts
    95
    Quote Originally Posted by Simon Barden View Post

    Oh, and of course this meant I had to order an oscillating bobbin sander so I could do it properly.
    Aha, which one did you go for? I'm thinking of the Triton belt and spindle sander which would pretty much cover all my needs.

Page 3 of 11 FirstFirst 1 2 3 4 5 ... LastLast

Posting Permissions

  • You may not post new threads
  • You may not post replies
  • You may not post attachments
  • You may not edit your posts
  •