


It took a year to do, but I finally managed to finish the respray of a friend's Gordon-Smith Strat-style guitar. It's a hardtail, with just 1x volume and 1 x tone control.
Gordon-Smith (now 'Gordon Smith' without the hyphen since being acquired in 2015 by Auden) have been the UKs largest maker of guitars for a long time, and are still mainly hand made, though there is a fair bit of automation these days. They've always has a slightly quirky, semi-industrial feel to them. with a real touch of the cottage industry to the operation (and a fair amount of bodging as well).
Dave, despite being a keyboard player and knowing about 3 guitar chords, had a collection of 12 Gordon-Smiths, some very rare indeed (now almost all gone after having a huge declutter of synths and guitars).
I was originally just going to polish the body, as it was all lumpy with mega orange peel and dust lumps in it. Well below par for a commercially made guitar. I was also going to overhaul the electrics as the tone pot had a broken track and there was a push/pull switch that brought in some capacitors that didn't really do anything useful to the sound.
I'm sure Dave would have bought the guitar used and the original owner will have fitted the Kinman pickups and the GraphTech saddles.
The original body look wasn't good. The brown-burst was rather lacklustre, and the body edges were very patchy with a mixture of solid and translucent finish. I tried simply surface sanding and polishing it, but the lumps were under, not on, the surface. In addition, the poly finish had come away from the wood in a couple of places around screw holes, one of them not hidden by the scratchplate. The wood hadn't been grain filled, so the surface had all the grain holes in it as well. So it was time to strip and refinish.
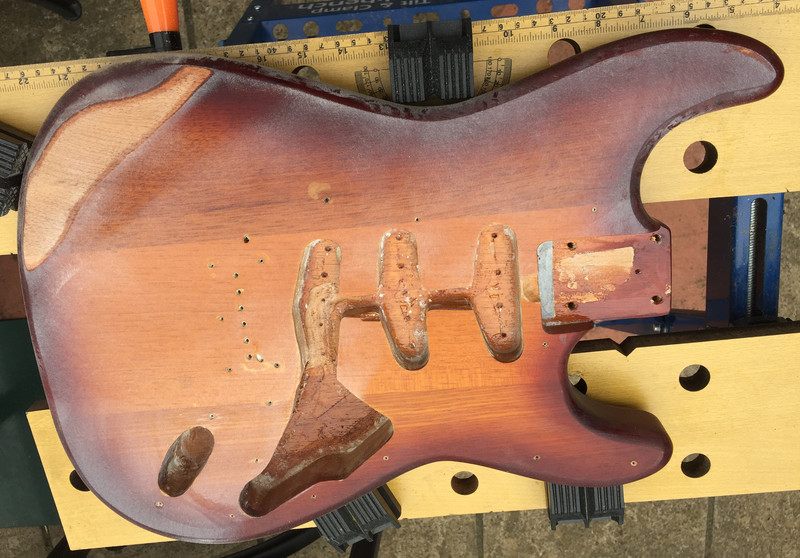
I forgot to take a full 'before' pic, but here's one taken just after I started stripping the original finish off:
As you can see, it wasn't a very inspiring look at all, and the three-piece body was made from very different bits of wood.
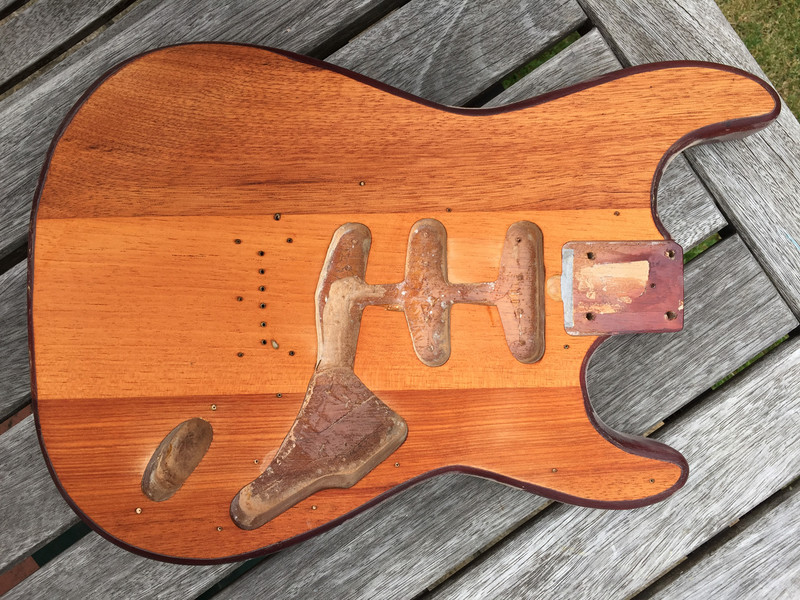
Here's the top fully stripped:
It's probably somebody's national flag, but that wood really is mismatched. It should have been a solid colour job, not a sunburst.
So it got respray number one.
And despite the finish being fully stripped back to wood, the nitro reacted and bubbled up. So that was all stripped back, the body re-stained, and a red/black burst sprayed. And then autumn/winter happened, so no chance to clear coat and that was it for last year.
Come (UK) spring this year and the clear coat went on. And up came the bubbles again. I was not impressed.
So it was strip down time again (I was getting quite good at this by now).
I decided not just to stain the body with a yellow stain, but to also spray it with clear yellow lacquer to try and get a more even look to the base body colour. I 'd also used Aqua Coat clear grain filler on the body first so it was properly flat. And that worked a lot better than staining alone had done. Then the red/black sunburst was applied, and then the clear coats.
All looked perfect and it hung in the garage for a month hardening off. But when I took it down, two huge bubbles had appeared in the paint (both about 1cm across), one on an edge and one around a pickguard hole where I'd left a nail in from spraying it (Fender style). Aaaaggggghhhh!!!!
At it was all in the solid black section of the burst and at least i could do a local fix, so some time was spent painting on coats (not spraying) to filling the holed (the bubbles had gone all the way down to the wood) and then spraying on a few more clear coats.
Time to sand down - and I sanded through the burst. Then came a process of respraying bits of the burst, more clear coats and then sanding and sanding through again. And repeating. And repeating.
Finally got to a stage where it was all hanging together, and after an initial few days in the garage, brought it inside to cure to make sure it didn't get too hot.
I was able to give it a sand flat and a basic polish before I went away down to Falmouth sailing, and when I came back I then gave it another sand and polish, and then another until I was happy it was flat as I could get it. There were a couple of very small holes in the finish on the back where some bubbling had occurred in the clear coat when I sprayed when it was really too hot. They had been sprayed over so the finish was flat, but further sanding had exposed them again. But they were really small and better to get the thing built rather than strive for perfection that I was unlikely to ever achieve (and probably sand through again in the process).
Frets were fine, so I just polished those (it's a really flat board, maybe 18" radius though I didn't check, but certainly flatter than a Gibson's 12"). New pots fitted (stuck with mini-ones as the control rout would have needed widening to fit full-sized ones in), new 5-way switch (control cavity too shallow for a CRL or Oak Grigsby so fitted what seems to be a very nice 'import' switch). Control and output jack cavity copper foil shielded. It's got quiet Kinmans already, but it never harms having some further noise reduction.
0.033uF orange drop tone cap fitted, which makes the tone control far more useable IMO with less mud option on offer but still a very decent amount of treble roll-off.
New push/pull switch was used to add in the neck pickup to the pickup selection (like the switch on my Dave Gilmour Strat does).
'Kinman' style treble bleed fitted (well it has Kinman pups, so what else could I do?).
Pure Tone jack socket fitted.
The original black Schaller strap locks were replaced with chrome to match the rest of the hardware.
The body screw holes for the neck were drilled out so the screws didn't bind
A lot of the screw heads were pretty tarnished so I used new scratchplate and neck screws, whilst the others were placed on my electric drill chuck to rotate them whilst I used metal polish on a rag to clean the heads up (I've never done this before, but it worked fine and got good results, so will do it again in future).
After a test assembly, I removed the original cardboard neck shim that was making things worse, not better.
I replaced the original string trees as they had no posts whatsoever and were sitting right on the headstock, causing, not curing, tuning problems.
And so it all went back together and ended up looking like this:
I was very pleased with it and Dave was over the moon. The darker, more Fendery finish just pulls those three different bits of wood together in a exactly the way that the original finish didn't. It has also acquired sustain and resonance in the process that it didn't have before. When Dave first bought it, our common friend Max, ex-Fender demonstrator and ex-music shop owner, described its sound thus: "Some guitar bodies really ring and resonate with the strings and make the guitar a delight to play. But what you have bought is a coffee table". However it was decided by all that it was a coffee table no longer.
I have a feeling that it will probably disappear up to Scotland with Dave's brother, Dan (who's a great guitar player). the next time he visits, as he doesn't get on with trem-fitted Strats in general, as he can't do his Telecaster-playing tricks on them. And Dave has been really thinning down his guitar collection to basics.


 Reply With Quote


