Page 8 of 19 FirstFirst ... 6 7 8 9 10 18 ... LastLast
Results 71 to 80 of 183

Thread: Dual Build: GSJ-1 and GSM-1

  1. #71
    Member
    Join Date
    May 2020
    Location
    Gold Coast, Qld
    Posts
    213
    Quote Originally Posted by Simon Barden View Post
    A bit better weather today; no rain, warmer and far less wind. But I'm feeling under it a bit, so am not planning on doing much today, apart from adding some more black paint to the headstock faces to build up the thickness.

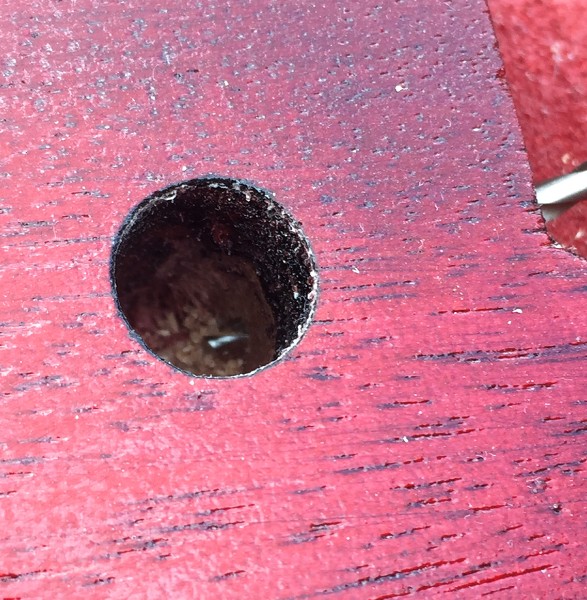
    But I did drill the bridge post ground wire holes. I didn't use a long drill bit as originally planned, as the longest bits I had were all to big for the job (fine for making larger control wire passages in bodies but not for a single thin wire), so I'd ordered a small pin vice drill that came with a whole assortment of very small drill bits (always very useful) that arrived today.

    GSJ-1. You can just see the drill bit poking through at the bottom of the post hole:


    GSM-1, showing the pin drill. Masking tape on the edge of the rout to prevent any damage from using the drill.


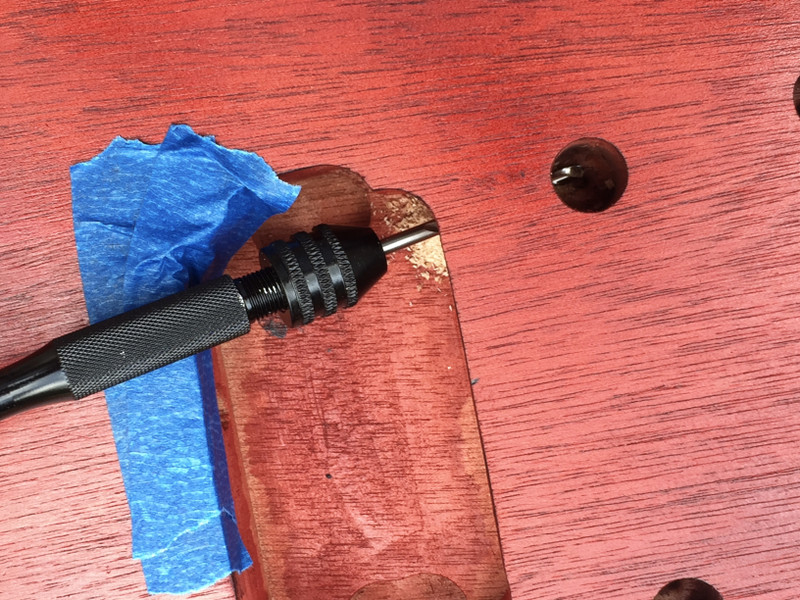
    The GSJ-1 has had a coat of Heritage Cherry lacquer applied, whilst the GSM-1 is yet to have it, hence the difference in colours between the two bodies.
    Good thinking Simon! I never even thought of that. I went from the electronics well to the tail piece post. Wasn't pretty, 3rd time lucky!
    The tail piece and the bridge holes were out about 3mm on mine. Had to do some filing of the bridge and tail piece to get them both to fit.

  2. #72
    Wayyy to much time on your hands obviously (spray tent)!! Such a great idea - nicely done!
    ~~ love through art ~~
    Build 1: DHB-5 Semi-Hollow Electric Bass https://www.buildyourownguitar.com.a...ad.php?t=10621
    Build 2: GSM-1 Electric Guitar https://www.buildyourownguitar.com.a...ad.php?t=10714

  3. #73
    GAStronomist Simon Barden's Avatar
    Join Date
    Oct 2016
    Location
    Reading, UK
    Posts
    10,547
    Things are moving forwards slowly with these. Just adding final clear coats when the weather permits and sorting out the headstock logos. Finally found a method that works for me without too much hassle.

    The GSJ-1 came with a single-ply pickguard that wasn't really the right shape and had too few screw holes, so it was time to make a more authenticity shaped 3-ply replacement. The GSM-1 came with a 3-ply guard, so that one's fine.

    The current Gibson SG Jr reissue [ickguards have fewer screw holes than the originals, but still more than the kit has. The old plastic material was more prone to warping, which is why I assume more screws were used back then; the same reason that Fender switched from 5-screw to 8-screw Tele pickguards.

    Here's the original GSJ-1 guard:

    Click image for larger version. 

Name:	PG Original.jpg 
Views:	124 
Size:	850.3 KB 
ID:	36906

    It's a bit thin (width-wise) in places and whilst the outline along the bottom edge may have followed the contours of an original 60s SG Jr with very bevelled edges, it certainly doesn't follow the kit edge outlines, even though I have enlarged the bevels a bit from the original kit ones.

    So time to draw a new outline on paper, using pics of originals for inspiration.

    This shape was cut out with a thin bladed jigsaw, and smoothed down to the correct size using a Dremel sanding drum. The bevels on the edge were were filed by hand and then sanded.

    However I chose to do this on a really hot day and I was sweating a lot and not thinking clearly. I took a break to go and visit a friend, leaving everything out in the garden.

    One thing I learnt. Don't leave your big black sheet of pickguard material out in the sun on a 35°C day when going to see a friend unless you are making a pickguard for one of Salvador Dali's guitars.

    I didn't photograph the sheet, but later found that this old Tele guard was also outside in an oddments box and has suffered a similar if lesser fate, as unlike the pickguard blank, one side hadn't been left hanging off the side of a Workmate. But still, all rippled and certainly rather bent.:

    Click image for larger version. 

Name:	tele warped.jpg 
Views:	132 
Size:	537.0 KB 
ID:	36907

    Also, double check that the material has protective film on both sides instead of assuming that and take the film off what you think will be the rear of the plate and find that it should have been the front of the new design scratchplate plate and you've scratched the top side as it didn't have film on.

    And don't try polishing out scratches with a foam pad on a mains drill that runs far too fast and makes enough heat to soften and deform the scratchplate. Stick to the battery drill.

    Also, don't spend ages then copying and cutting out a replacement for the new guard pickguard from the new but damaged one, only to find that you've just copied the kit pickguard instead.

    So the first pickguard was useless, the second was the wrong shape and I had just enough non-warped material left to cut out another one. Luckily I'd learnt lessons, and this one is pretty good, if not quite perfect. But it is good enough.

    So we have

    1. Original
    2. 1st warped and scratched pickguard
    3. 2nd pickguard, a copy of the original shape.
    4. 3rd and final pickguard

    Click image for larger version. 

Name:	PG all.jpg 
Views:	141 
Size:	726.2 KB 
ID:	36908

    And here's the final pickguard laying on the guitar:

    Click image for larger version. 

Name:	PG final.jpg 
Views:	138 
Size:	589.8 KB 
ID:	36909

  4. #74
    Could you please send me a template?

    Sent from my G8441 using Tapatalk

  5. #75
    Member ThatCluelessGerman's Avatar
    Join Date
    May 2020
    Location
    Hamburg, Germany
    Posts
    333
    Oh damn, LOL, I wish I had your patience. Pickguard looks great, perfect spacing!
    I don't know what I'm doing but I hope I will end up with a guitar

  6. #76

  7. #77
    GAStronomist Simon Barden's Avatar
    Join Date
    Oct 2016
    Location
    Reading, UK
    Posts
    10,547
    It's based on my edge bevelling, which won't be the same as yours. I just first drew the existing outline onto some paper, then placed that on the body so the straight line end-of-neck joint was correct. I then just folded the paper over the bevel edges and marked that with a pencil. I then drew a curve that generally followed the bevel edge a few mm in for the bottom edge and the lower cutaway, modifying it slightly in the same way the vintage pickguards start to deviate from the edge as well. I gave the body of the pickguard a bit more fullness as well, again using a pic of a vintage guard to guide me.

    Then stuck that onto the plastic (with some Pritt Stick as it holds well but comes off easily in water) and cut it out.

    So I don't have a template I can pass on, and it really is best if yours follows your own bevel line, which I'm sure will differ from mine since I modified it. If you do what I did, then

    I just placed the screw holes by eye from pics of vintage Jrs.

  8. #78
    Your persistence paid off there Simon. Looks great after all that hard work.

  9. #79
    GAStronomist Simon Barden's Avatar
    Join Date
    Oct 2016
    Location
    Reading, UK
    Posts
    10,547
    I know it could be slightly better, but I'm not doing another one, and if I try to mod that one any more, I know I'll just mess it up. 99% OK is a lot better than a probable future 10% OK.

    Now need to order some more pickguard material for the other guards I need to make.

  10. #80
    Quote Originally Posted by Simon Barden View Post
    I know it could be slightly better, but I'm not doing another one, and if I try to mod that one any more, I know I'll just mess it up. 99% OK is a lot better than a probable future 10% OK.

    Now need to order some more pickguard material for the other guards I need to make.
    Yes and don't leave that one lying in the sun mate.

Page 8 of 19 FirstFirst ... 6 7 8 9 10 18 ... LastLast

Posting Permissions

  • You may not post new threads
  • You may not post replies
  • You may not post attachments
  • You may not edit your posts
  •