Page 1 of 3 1 2 3 LastLast
Results 1 to 10 of 22

Thread: My first Pit Bull build: IB-1F

  1. #1
    Member Adamc's Avatar
    Join Date
    Feb 2018
    Location
    melbourne
    Posts
    61

    My first Pit Bull build: IB-1F

    Hi folks, I'm back. Well, after an injury to my arm stopped me in my tracks, Ive been waiting patiently, (that's a lie) on the sidelines hoping to be able to kick off a kit build. So now I'm finally at a point where i can hold tools and do much sanding, its time to kick things off.

    The kit I've chosen is the IB-1F, with the flamed top and the floyd. I envisage a steep learning curve ahead. I did however spec it with the neck from the AIB-1F kit, as I wasn't a fan of the busy inlay on the original neck.

    And here is where I need to tap in to the wealth of knowledge at my fingertips.
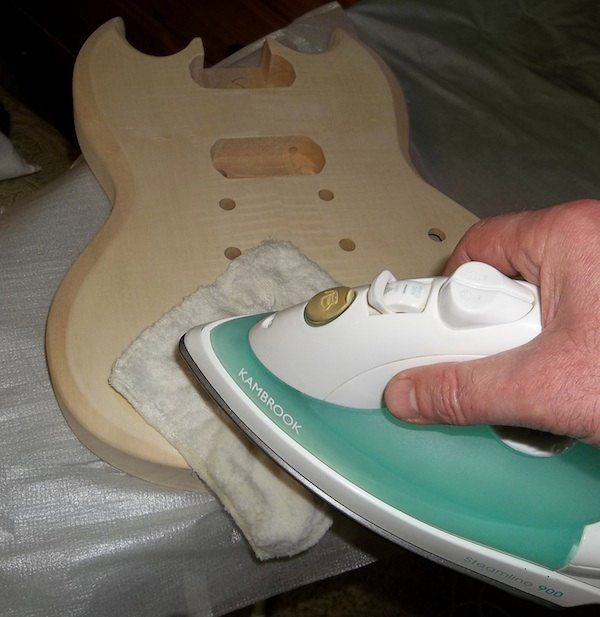
    The top had a few marks in it, and Adam guided me to a very helpful you tube clip on how to steam small dings back to shape. I think it was pretty successful so far. Ill try to put a before and after pic in. There's also a bit of a 'crease' for want of a better term that i'm a little concerned about

    So the original plan was to do the sides and back in an automotive candy style red, with a translucent red over the maple top, though some doubts are creeping in about the marks in the top. Can i fill them with timber mate and super carefully sand them smooth, then carry on? I know the veneer is incredibly thin, so any thoughts on how to make the grain pop? is it so thin that the traditional dark stain then sand back is no longer an option? ive heard of ebony timber mate being used, though im unfamiliar with the technique required. Ok thats probably way too many questions to start with. Over to the more knowledgable ones.....

  2. #2
    Member Adamc's Avatar
    Join Date
    Feb 2018
    Location
    melbourne
    Posts
    61
    the dent before steaming
    https://i.imgur.com/h4J4Dls.jpg
    and after
    https://i.imgur.com/i0UubYo.jpg
    and the crease i was talking about
    https://i.imgur.com/hVAvfpS.jpg

    AM i wasting my time trying to preserve the maple top. Am i better off just filling and sanding and going full opaque on the whole body?
    Last edited by Adamc; 05-02-2020 at 08:46 AM.

  3. #3
    Mentor JimC's Avatar
    Join Date
    Sep 2019
    Location
    SE England
    Posts
    517
    The way I'd look at it is that there's no actual downside to giving it a go with the maple top. Isn't the worst that can happen that you decide it looks like hell and sand it back and give it a solid colour paint job? I wouldn't put filler in the dent though, dont think there's too much chance of that looking good.
    Build #1, failed solid body 6 string using neck from a scrapped acoustic (45+ odd years ago as a teenager!)
    Build #2, ugly parlour semi with scratch built body and ex Peavey neck
    Build #3, Appalachian Dulcimer from EMS kit
    Build #4, pre-owned PB ESB-4
    Build #5, Lockdown Mandolin
    Build #6, Sixty six body for Squier
    Build #7, Mini Midi Bass

  4. #4
    Member Adamc's Avatar
    Join Date
    Feb 2018
    Location
    melbourne
    Posts
    61
    Good point Jim. Can only try. Solid colour will hide it if it’s awful


    Sent from my iPhone using Tapatalk

  5. #5
    Member
    Join Date
    Jan 2020
    Location
    London, UK
    Posts
    116
    +1 to that. Those are nasty dents, but it would be a shame to waste the flame in the maple if there's still a chance of getting it.

  6. #6
    Overlord of Music Sonic Mountain's Avatar
    Join Date
    Jul 2017
    Location
    Toowoomba, Qld.
    Posts
    3,261
    It's also worth having a couple of goes at the steaming process, it might get better with another go.

    You will want to build up a decent amount of clear coat over it anyway, so a lot of minor imperfections will disappear in that process.

    I have also recently been getting into using CA (CyanoAcrylate - AKA Super glue) glue as a wood sealer. There is quite a bit of information online on how to do it. You could definitely use that to fill the depressions and then use the clear of your choice over it.
    Build 1 - Shoegazer MK1 JMA-1
    Build 2 - The Relliecaster TL-1
    Build 3 - The Black Cherry SG AG-1
    Build 4 - The Sonicaster TL-1ish
    Build 5 - The Steampunker Bass YB-4
    Build 6 - The Howling Gowing ST-1

    "What I lack in talent I make up for with enthusiasm"

  7. #7
    Member Adamc's Avatar
    Join Date
    Feb 2018
    Location
    melbourne
    Posts
    61
    Thanks for the suggestion Sonic. I’ll look into the CA. Always good to hear of a new technique to explore. I’ll give the steam another go this weekend with my larger soldering iron. I don’t think the small one really did the technique justice


    Sent from my iPhone using Tapatalk

  8. #8

  9. #9
    Member Adamc's Avatar
    Join Date
    Feb 2018
    Location
    melbourne
    Posts
    61
    Seriously! Why didn't I think of that? I can spread the heat wider with the iron and hopefully even it out. See, that's why I was hoping to tap into your knowledge banks


    Sent from my iPad using Tapatalk

  10. #10
    Overlord of Music WeirdBits's Avatar
    Join Date
    Jan 2013
    Posts
    2,731
    Yep, always keep an old clothes iron in the workshop. Repeated short steamings - dampen, apply iron, allow to dry, repeat - can bring out some major dings and is less likely to go horribly wrong.
    Scott.

  11. Liked by: Adamc, JimC, Tony M

Page 1 of 3 1 2 3 LastLast

Posting Permissions

  • You may not post new threads
  • You may not post replies
  • You may not post attachments
  • You may not edit your posts
  •