
On the edge? I *am* the edge!Originally Posted by Simon Barden

<giggles maniacally>
(yeh ok, maybe one too many episodes of Aeon Flux in my youth) Working on templates for the back of the axe and scraping drips from the black primer on the neck...


On the edge? I *am* the edge!
(yeh ok, maybe one too many episodes of Aeon Flux in my youth) Working on templates for the back of the axe and scraping drips from the black primer on the neck...

Great work Rabbit. The body and blade are looking good.
PitBull Builds: FVB-4, LP-1SS, FBM-1, AG-2, TB-4, SSCM-1, TLA-1, TL-1TB, STA-1HT, DSCM-1 Truckster, ST-1, STA-1, MBM-1.
Scratch Builds: Pine Explorer, Axe Bass, Mr Scary, Scratchy Tele's.
The little voices in my head keep telling me "build more guitars"
A bit of a setback. Now that "The Shed" is open again I used one of the small bandsaws to remove the excess from the back of the blade. I was figuring on creating the final shape with a single pass with the pattern bit on the router. Disaster. Something didn't feel right , the chattery feeling you get when you are going against the grain. Had I stick to what I had been doing and making passes only a few mm deep at a time all would have been fine, but sadly no:
I could have retrieved the main missing chunk and glued it back , finished the shaping and bogged up the rest, but I thought the project was better served by cutting off the back and gluing on a new piece. At least so far I haven't had to re-do the slot for the blade on the other side, but they are fragile, so I can't relax till the blade is done and glued in. .

Yikes! I sometime think the router is part skill and part luck. Sorry yours didn't hold this time.

Yeah, of all the hand power tools, there's just something about routers. When things go wrong... they go wrong fast!
At least you can still count to ten, yes?
Making the world a better place; one guitar at a time...
Yeh. I should have stopped when I felt the chattering and realised I was going against the grain . On the plus side it's an opportunity to re-do a piece with less filling so less work prepping for finishing.Today I'll cut the new piece and do the glueup.
The neck has been painted and some water based poly put on (with a cross linker). Still working out what i'm going to do about the head stock. Black isn't a great back ground for home printer created decals. I have to mess around a bit but I'll trial an inlay of epoxy with graphite pearl mixed into it.
I cut a new piece and glued it on. The glue up wasn't as level as I wanted, so there was a bit sticking up on one side and a gap on the other. I used the planeing jig to level off the bit sticking up and added a piece one the gap side and then planned it flush with the body leaving me with a body with the new bit of timber ready for me to try routing again. This time I changed my order of operation and put the templates for the back of the blade in place with the original body template. I started with a shallow pattern bit, then a slightly longer bit, and a slightly longer bit and a fourth slightly longer bit. This was as far as I got on one side... things were looking encouraging:
Before flipping it over I took the back of the blade templates off and did the step down:
Yeh, As you can see, routing is a messy affair! I flipped the body over and repeated. Because the second pattern bit had a bearing that was slightly smaller than the diameter of the bit, and I bypassed that bit, the two halves didn't quite meet. I knew the second side would be a hair bigger so I used a bottom bearing trim bit to match it up. and here's how it ended up:
Still experimenting with an inlay for the headstock....and that's where I'm at.
Looking good. Yes routing is a very messy affair. Lots of man glitter. Glad it worked out this time.
What have you tried for the headstock inlay?
PitBull Builds: FVB-4, LP-1SS, FBM-1, AG-2, TB-4, SSCM-1, TLA-1, TL-1TB, STA-1HT, DSCM-1 Truckster, ST-1, STA-1, MBM-1.
Scratch Builds: Pine Explorer, Axe Bass, Mr Scary, Scratchy Tele's.
The little voices in my head keep telling me "build more guitars"
I sprayed a piece of scrap maple with the normal initial finish ie, primer, base coat, clear. Then i printed a red version of my avatar and started tracing it with a scalpel, then trying to carve out the outline with the blade. It's not the right tool. I only did a little bit so I will try some different burrs on the dremel. Once I find something that works I'll mix up some epoxy and pearl powder (probaby graphite, maybe some rainbow flake) syringe that in and sand back to see if it sands smooth withoout going through the clear.
Why not do the inlay, then clear over it?
Making the world a better place; one guitar at a time...
 Posting Permissions

 Reply With Quote
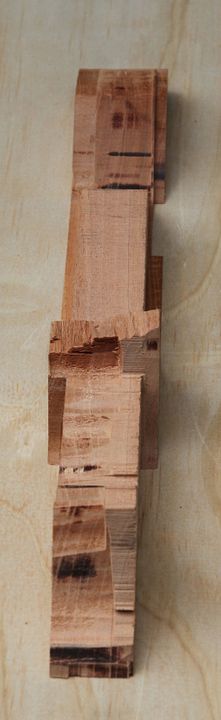
_IMG_1974.jpg?width=960&height=720&fit=bounds)
_IMG_1976.jpg?width=960&height=720&fit=bounds)
_IMG_1978.jpg?width=960&height=720&fit=bounds)