Page 2 of 3 FirstFirst 1 2 3 LastLast
Results 11 to 20 of 28

Thread: GPB-4R my first build

  1. #11
    Member
    Join Date
    Jul 2021
    Location
    Sydney NSW Australia
    Posts
    21
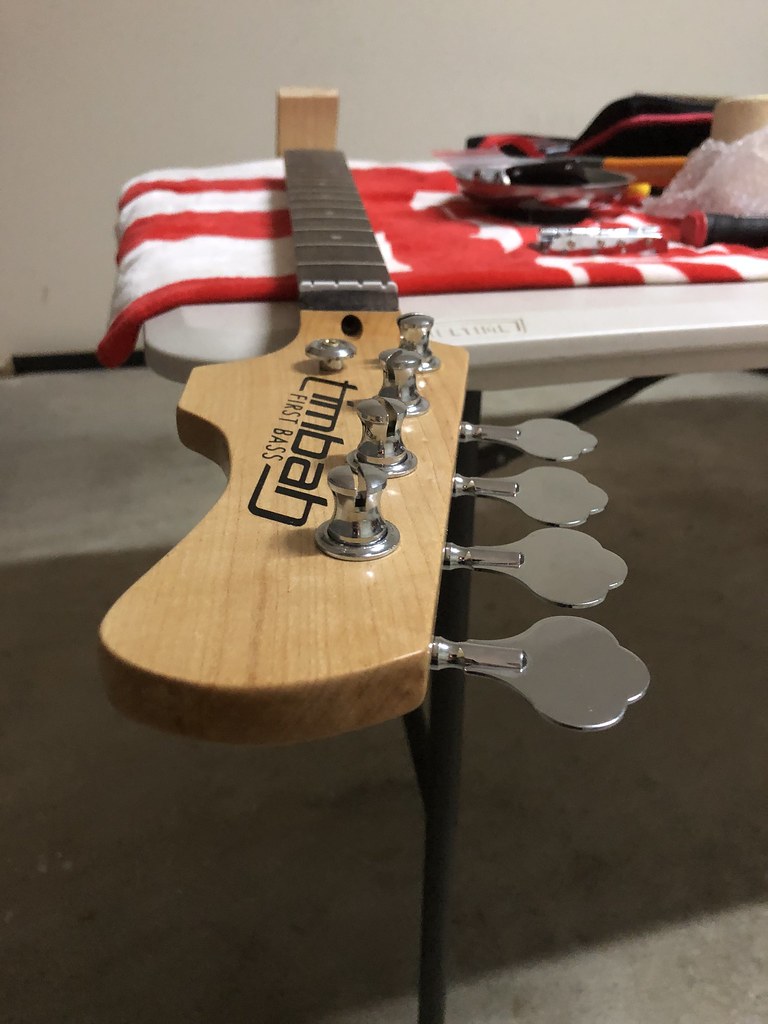
    My wife bought one of those Cricut Maker 3 machines, so I put together a headstock decal. She stuck that on to the headstock for me. I used the same font as Triumph had used on the Street Triple. That was my old motorbike that I absolutely loved. I named it First Bass because it was the first bass I’d built. Gives some room for expansion, too! Second Bass, Third Bass, Home Run!


    Timbah First Bass by Tim Gill, on Flickr

  2. #12
    Member
    Join Date
    Jul 2021
    Location
    Sydney NSW Australia
    Posts
    21
    While I was waiting for the lacquer to dry, I mounted the neck hardware. I used a round file at the front of each of the tuner holes so I could get the front mounts for the machine heads in. I used a rubber mallet and a hammer on a flat piece of timber to tap them in. Gently. Ish.

    Timbah First Bass by Tim Gill, on Flickr
    Timbah First Bass by Tim Gill, on Flickr

  3. #13
    Member
    Join Date
    Jul 2021
    Location
    Sydney NSW Australia
    Posts
    21
    Once the lacquer was dry and no longer giving off a smell, I started sanding the rough spots back. Given that the grain was showing anyway, there was only so much I could sand. I was also being careful not to go through to the paint.
    Then I moved on to polishing. I used Meguiar’s polishing compound. Once I’d done a few passes of that, I used two coats of Mothers carnauba wax and then two coats of Meguiars Tech Wax 2.0. Lots of polishing.
    Timbah First Bass by Tim Gill, on Flickr
    Timbah First Bass by Tim Gill, on Flickr

  4. #14
    Member
    Join Date
    Jul 2021
    Location
    Sydney NSW Australia
    Posts
    21
    I then put it all back together using plenty of soap on all the screws and the replacement neck screws. I also added in the copper shielding in the pickup cavity. I put that on in small strips, trying to keep it on the backing paper as long as possible.

    Finally, a painted assembled bass.
    Timbah First Bass by Tim Gill, on Flickr
    Timbah First Bass by Tim Gill, on Flickr

  5. #15
    Member
    Join Date
    Jul 2021
    Location
    Sydney NSW Australia
    Posts
    21
    The only thing to do now is add the strap buttons and set the bridge height. It’s already playing pretty nicely though. It sounds great. Once I get it setup properly it should be sweet. It’s a bit of a Monet: pretty from afar but far from pretty. I think it’ll do nicely for my 80’s band duties.


    Timbah First Bass by Tim Gill, on Flickr

  6. #16
    GAStronomist Simon Barden's Avatar
    Join Date
    Oct 2016
    Location
    Reading, UK
    Posts
    10,547
    Congratulations on finishing your first bass, and also for going for an individual look. Not bad at all.

    With an ash body, it's definitely going to need grain filling (as it makes getting a flat surface a lot easier) or else many coats of a primer/filler (if going for a solid colour as you did). Some woods have closed pores and don't need grain filling. The rest have open pores, (like ash) and really do need pore filling. As you have found, paint doesn't fill in any dips, but just follows the contours (it would need to be very thinned down to do so and by the time the thinning agent had evaporated you'd still have dips, albeit smaller ones).

    Grain fillers are rarely perfect, and you do need to sand them back to a level surface, but they will still shrink over time. However the surface is definitely flatter as a result.

    So then you put the primer on. And you sand back flat as this is also filling the remaining dips. You may need several coats of primer before you cans sand flat and not reach the wood again. Number of primer coats depends on the surface you are priming. Flat metal maybe two coats, but uneven wood needs more. You can skimp at this stage and leave it uneven, but its a lot easier to use a thick primer that builds up quickly, than do the same with much thinner paint or lacquer.

    If you want a flat glossy finish, then once the body is flat, then it makes the painting and lacquering a lot easier, with less sanding as you only need to sand off the paint imperfections, not try and get the finish flat as well.

    Cavity shielding only really works if the shielding is grounded and you form a complete enclosure with the shielding. You'd normally put tape all over the underside of the pickguard. This is grounded by contact with the grounded potentiometers. You'd also run the cavity tape up onto the top of the body, so that it contacts the tape on the pickguard, and so grounds the cavity tape. You can of course run a ground wire down from the rear of a pot to the cavity tape, and either solder it to it, or use an eye on the end of the wire and a screw to hold it in contact with the tape.

    The P-bass pickup design is hum-cancelling (one of the two coils is reverse wound/reverse polarity with respect to the other), so you are unlikely to pick up much hum (unlike on a Jazz bass where the standard pickups are not hum-cancelling unless one i.e. RW/RP to the other and you have a 50/50 mix), but in electrically noisy environments, shielding can still have an effect, so you might as well get the benefit from full coverage.

  7. Liked by: topstimbo

  8. #17
    Member
    Join Date
    Jul 2021
    Location
    Sydney NSW Australia
    Posts
    21
    Thanks Simon. I really appreciate it.
    This is all great advice. If I make another one, I’ll definitely spend more time on that priming/grain filling stage. Doing this project has shown me how much that step affects things down the line.

    I’ll see if I have enough copper tape left to cover the back of the pickguard too. I was actually quite surprised how little hum it has at the moment. I’ll follow your advice and make sure it’s all covered.

    Thanks again


    Sent from my iPhone using Tapatalk

  9. #18
    Mentor Trevor Davies's Avatar
    Join Date
    May 2020
    Location
    Perth
    Posts
    1,377
    Looks great Tim. I love the way the logo has worked out.
    PitBull Builds: FVB-4, LP-1SS, FBM-1, AG-2, TB-4, SSCM-1, TLA-1, TL-1TB, STA-1HT, DSCM-1 Truckster, ST-1, STA-1, MBM-1.

    Scratch Builds: Pine Explorer, Axe Bass, Mr Scary, Scratchy Tele's.

    The little voices in my head keep telling me "build more guitars"

  10. Liked by: topstimbo

  11. #19
    GAStronomist Simon Barden's Avatar
    Join Date
    Oct 2016
    Location
    Reading, UK
    Posts
    10,547
    Starting a build diary and detailing the steps really helps, especially if new to kit building and finishing, as people can comment and ask questions and propose solutions as you go along.

    You've ended up with a nice looking-bass, just with a different surface finish to that you intended. Some people want that look and there is absolutely nothing wrong with it at all. But if you did want a nice flat shiny finish on the next build, you should now hopefully be able to get one (never any guarantees as we all end up with guitars that are what they are!).

    The hum-cancelling split coil P-bass pickup was a great invention by Fender. It first saw light in 1957, the same year that Gretsch and Gibson introduced their dual-coil humbuckers. It may well have borrowed the hum-cancelling idea from them (I'm sure Leo kept his eye on guitar patents that were being filed), but it did it whilst retaining a single-coil sound and in a non-patent infringing way.

    So under normal circumstances, you are unlikely to get much hum at all from a P-bass (the coils aren't as close together as on a guitar humbucker, so noise pickup from each coil will be slightly different and so the hum-cancelling isn't perfect). But in an more electrically noisy environment, the shielding can come in useful. You don't have any control of the electrics where you play gigs, so you may pickup more noise in some venues than others.

  12. Liked by: topstimbo

  13. #20
    Member
    Join Date
    Jul 2021
    Location
    Sydney NSW Australia
    Posts
    21
    Quote Originally Posted by Trevor Davies View Post
    Looks great Tim. I love the way the logo has worked out.
    Thanks for that, Trevor. I’m pretty happy with the logo.


    Sent from my iPhone using Tapatalk

Page 2 of 3 FirstFirst 1 2 3 LastLast

Tags for this Thread

Posting Permissions

  • You may not post new threads
  • You may not post replies
  • You may not post attachments
  • You may not edit your posts
  •