
Great professional finish. So when are you going into business?


Great professional finish. So when are you going into business?
I don't think I will be going business anytime soon. I will post at some stage all the little flaws in my build at some stage.Originally Posted by ILRGuitars

But when I do go into business I will need a logo
See below my playing around with sizing and wording.
I am wondering if I can make it out of sheet aluminium and polish it up to go with the chrome hardware. Then I just need to work out how to apply some lettering.

That's exactly what I did on the cherry with the aluminium TRC. I just cleared it and did a water slide decal and cleared again over the top of that.
Build 1 - Shoegazer MK1 JMA-1
Build 2 - The Relliecaster TL-1
Build 3 - The Black Cherry SG AG-1
Build 4 - The Sonicaster TL-1ish
Build 5 - The Steampunker Bass YB-4
Build 6 - The Howling Gowing ST-1
"What I lack in talent I make up for with enthusiasm"
Yep...good idea and a water decal will work fine.

Yeah, that's a great idea
#001 (LP-1S) [finished - co-runner up Nov 2018 GOTM]
#002 (WL-1)
#003 (MPL Megacaster - semi scratch build) [finished]
#004 (ST-1 JR - Arachnoid Superhero build) [finished]
#005 (LP jr)
#006 (TL-1A)
Junk shop acoustic refurbs (various)
'The TGS Special'
Sonic
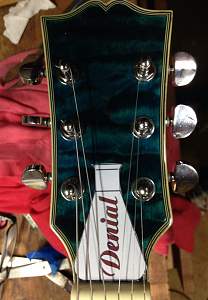
I have made a aliminium blank I am happy with. See pictures
How shiny can I make it an it will still take a top coat of lacquer finish?
Where did you get the decals from?
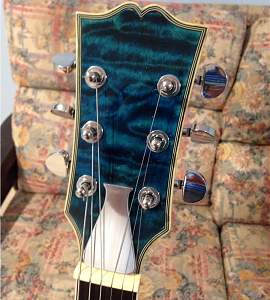
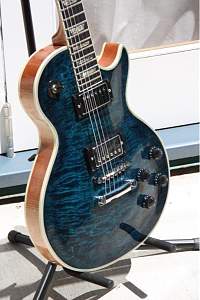
See some picture from the weekend taken out in the sun to show the colours better

Very nice buddy
I tired a few things and ended up using a Rustoleum clear as the clear acrylic didn't want to stick to the polished aluminium very well. I started out with it highly polished, but, I ended up with something similar to the level of buff you have there. I think I could have made it shinier and the Rustoleum still would have stuck to it. You just have to really clean any polishing compounds off it before painting.
I drew my decal up in illustrator and the printed it on waterside paper that I got from these guys:
https://drdecalmrhyde.com.au
It's pretty easy, just make sure you get the right paper for your printer. I used a laser jet. It's not very dear and it arrived very quickly. Use the same clear to seal the decal after printing as you are going o use on the TRC and it will blend in nicely.
Build 1 - Shoegazer MK1 JMA-1
Build 2 - The Relliecaster TL-1
Build 3 - The Black Cherry SG AG-1
Build 4 - The Sonicaster TL-1ish
Build 5 - The Steampunker Bass YB-4
Build 6 - The Howling Gowing ST-1
"What I lack in talent I make up for with enthusiasm"

I'd print/cut the decal so that the decal backing covered the whole of the truss rod cover. Then you won't have any visible edges and you won't need to put a thick coating of clear over the top so that you can then cut it back to flat surface without damaging the decal.
I'd suggest drilling the fixing holes before putting the decal on.
 Posting Permissions

 Reply With Quote