Page 8 of 9 FirstFirst ... 6 7 8 9 LastLast
Results 71 to 80 of 86

Thread: Hoopers TL-1TH

  1. #71
    Moderator Gavin1393's Avatar
    Join Date
    Sep 2012
    Location
    Mindarie, Western Australia
    Posts
    3,152
    Quote from sfkhooper on April 19, 2013, 21:29

    Kind of amazed that each model doesn't have it's own separate clear wiring diagram. :?
    Pitbull do not want to be prescriptive in terms of telling you how you should wire your guitar. I mean, YOU are building this guitar and may just want to coil split, or perhaps put in a push pull pot or perhaps concentric pots to handle the volume and tone settings for each pickup.

    There are links to these diagrams on the forum that Adam encourages you to use. The Dimarzio site is great for basically selecting on the site what you want to use and it will offer suggested wiring options. Just remember that there are some very basic rules when it comes to wiring and the site kinda expects you to know these.
    The pickups have a HOT wire and a GROUND wire. The ground wire is always soldered to the back of the pot.
    The bridge must always have a ground wire, this is also soldered to the back of the pot.
    All the ground wires must be linked up and exit the guitar through the output jack.
    All long wires should be insulated to reduce hum.

    Then there are some tricks that many of us use to give a smooth tone transition through out the volumes which involve an extra step never shown on these diagrams. Hint! It involves a 150k resistor and a .001 mf capacitor.

    Hope this clears up some of the issues you were having.
    http://www.buildyourownguitar.com.au/forum/image.php?type=sigpic&userid=1258&dateline=1443806  448Gavmeister

  2. #72
    Overlord of Music keloooe's Avatar
    Join Date
    Jan 2013
    Location
    Melbourne
    Posts
    3,162
    Yes, that little trick that nobody ever tells you is awesome, especially for my Epi, cause at 10, there's instant feedback, so I have to dial it back to 5, so with one of 'these', I can get my sound back!

  3. #73
    Quote from Gavin1393 on April 20, 2013, 08:19
    Pitbull do not want to be prescriptive in terms of telling you how you should wire your guitar.
    That's fine, but I'm willing to bet that most customers wouldn't be experienced with even basic electronics. In my opinion there should at least be a wiring diagram for the kit as delivered.

  4. #74
    Moderator dingobass's Avatar
    Join Date
    Sep 2012
    Location
    Perth
    Posts
    4,491
    There are video guides to help you on your way, as well as links.

    There are so many differing methods of Guitar wiring for every model we sell, and if we were to provide these as printed options, it would cost us a small fortune in printing and we would have to pass that quite considerable cost onto the customer.

    This is why we recommend that folk do some research of the links provided to find a diagram that suits their needs.

    Another really helpful site is www.guitarelectronics.com
    These guys have more wiring schematics than you can poke a stick at 8O

    There is always a workaround for glitches, mistakes and other Guitar building gremlins.....

  5. #75
    Overlord of Music keloooe's Avatar
    Join Date
    Jan 2013
    Location
    Melbourne
    Posts
    3,162
    Wow DB, you weren't joking then, just checked them out!!!
    My eyes 3 mins ago: 8O

  6. #76
    Moderator dingobass's Avatar
    Join Date
    Sep 2012
    Location
    Perth
    Posts
    4,491
    Quote from keloooe on April 20, 2013, 18:43
    Wow DB, you weren't joking then, just checked them out!!!
    My eyes 3 mins ago: 8O
    Yep, that was my reaction when I first found them as well.. And lets not mention that they also do custom wiring schematics also!

    There is always a workaround for glitches, mistakes and other Guitar building gremlins.....

  7. #77
    Overlord of Music keloooe's Avatar
    Join Date
    Jan 2013
    Location
    Melbourne
    Posts
    3,162
    Yeah, that is even better!!!
    And DB, check your email

  8. #78
    I've Been going over options to fix my bridge placement problem. Can't see many ways around it. Either the scratch plate was improperly cut or the body wasn't routed correctly for the pickups. Either way, the two simply don't go together. Two choices, move the pickups up so that the scratch plate moves up to the correct location, or get a differently shaped scratch plate. As I've already screwed the scratch plate down, the choices are further limited.

    Looking back, what I should have done is measure everything up first, before I screwed the scratch plate down. The only practical choice would have been to route or file out the pickup recesses to correctly relocate them. A problematic job.

    There's an easier solution. In it's current situation, the scratchplate needs about 5mm added to where it interfaces with the guitar neck, and about 5mm shaved off the bottom to correctly accommodate the bridge. A custom scratch plate is in order. We've dealt with a local company called Resiplex who cut custom shapes out of any type of plastic. So I'll remove the scratchplate, trace it onto paper with pencil and make the appropriate mods. Resiplex can cut sandwiched perspex on an angle, so I might even be able to achieve exactly the same look that I have now with the black and white margin around the edge. I doubt it'll be more than about $30 and the custom shape should be barely noticeable.

    I'm not sure how the kits get out of the factory like this. Whichever way I tackle this problem, it was going to involve some major mod, either to the body or the scratchplate. They simply don't go together. But, thinking outside the box, I should have a solution soon.

  9. #79
    Cant you just push the neck in further? and screw it in?

  10. #80
    Moderator Gavin1393's Avatar
    Join Date
    Sep 2012
    Location
    Mindarie, Western Australia
    Posts
    3,152
    Hi SFK,

    Before you start making modifications to what might not actually need modifications can you please take some measurements and post the results of those measurements on this thread? I need these measurements in order to help you.

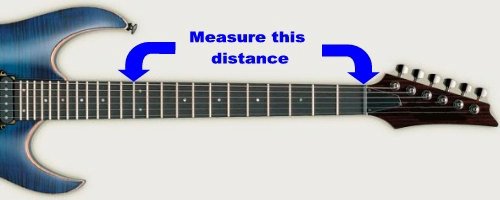
    The first measurement I need is for you to measure from the FRET-WIRE of the 12th FRET,to the point where, if you ran your finger along the strings, you would touch the nut. Hence you are measuring the nut from the 'bridge side of the nut rather than from the 'Headstock' side of the nut.

    The second measurement I need is from the same point on the 12th FRET,that is, measure from the FRET-WIRE of the 12th FRET. I first want you to use a screw drive and wind the saddles on the bridge as far forward (towards the pickups) as they will go. When you have done this please measure the distance from the saddles to the 12th Fret.

    Secondly, I would like you to wind the saddles away from the pickups as far back as they will go. Please re-measure the distance from the saddles to the 12th Fret.

    Please provide me with those measurements exactly as they are and I will then try and assist you.
    http://www.buildyourownguitar.com.au/forum/image.php?type=sigpic&userid=1258&dateline=1443806  448Gavmeister

Page 8 of 9 FirstFirst ... 6 7 8 9 LastLast

Posting Permissions

  • You may not post new threads
  • You may not post replies
  • You may not post attachments
  • You may not edit your posts
  •