Yes, you should be able to cut it down, but then you'll need 3 matching small screws. Fine if you've got some, but if you haven't then it may be better value to look for a 3-screw bell truss-rod cover on eBay or Amazon that come with the screws.


Yes, you should be able to cut it down, but then you'll need 3 matching small screws. Fine if you've got some, but if you haven't then it may be better value to look for a 3-screw bell truss-rod cover on eBay or Amazon that come with the screws.
Frustrating day yesterday. Sprayed the two kits with vintage cherry lacquer just fine.
And it did help to mask some of the small imperfections as I'd hoped, but I couldn't get the clear lacquer to spray properly, it just came out too dry with with solid white flecks. First time I'd used this particular mini-gun, which I bought to keep exclusively for clear use, even though it is exactly the same as my other mini-gun, apart from the external colour, and it was set up exactly the same.
Tried loads of different combinations of air pressure and paint levels with no joy. So I can only assume it was too hot to spray (28°C +) with what I had as I didn't have any retardant thinners to use.
So have no got some of those on order which, will arrive tomorrow. Today will be a rest day to let things dry, especially as it is supposed to be on and off showers today, although a lot cooler.
Ah, just seen this.Originally Posted by Simon Barden

How do I ground to the bridge post then as it looks a difficult one to drill?
Easiest to use a long drill bit (so you can get the flattest angle without the drill getting in the way, and drill a hole from the pickup cavity to a bridge post hole. You could do it from the control cavity, but there's a lot of guesswork as you can't see the post hole from the rear. It would involve making a template of the front on paper and card, so you could then transfer the post hole position to the rear and also measuring hole depth and working out the drill angle and then trying to keep it there. So KISS principle makes drilling from the pickup cavity the best option. I need to dig out my thinnest long drill, which will undoubtedly have disappeared, and I'll take some photos to show what I did.
A bit better weather today; no rain, warmer and far less wind. But I'm feeling under it a bit, so am not planning on doing much today, apart from adding some more black paint to the headstock faces to build up the thickness.
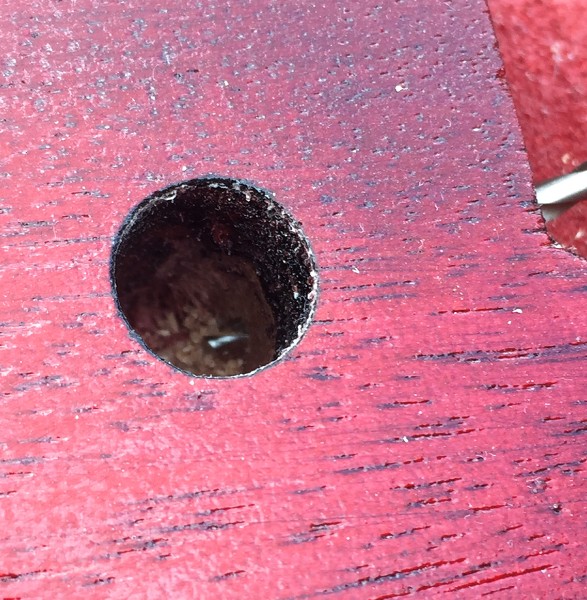
But I did drill the bridge post ground wire holes. I didn't use a long drill bit as originally planned, as the longest bits I had were all to big for the job (fine for making larger control wire passages in bodies but not for a single thin wire), so I'd ordered a small pin vice drill that came with a whole assortment of very small drill bits (always very useful) that arrived today.
GSJ-1. You can just see the drill bit poking through at the bottom of the post hole:
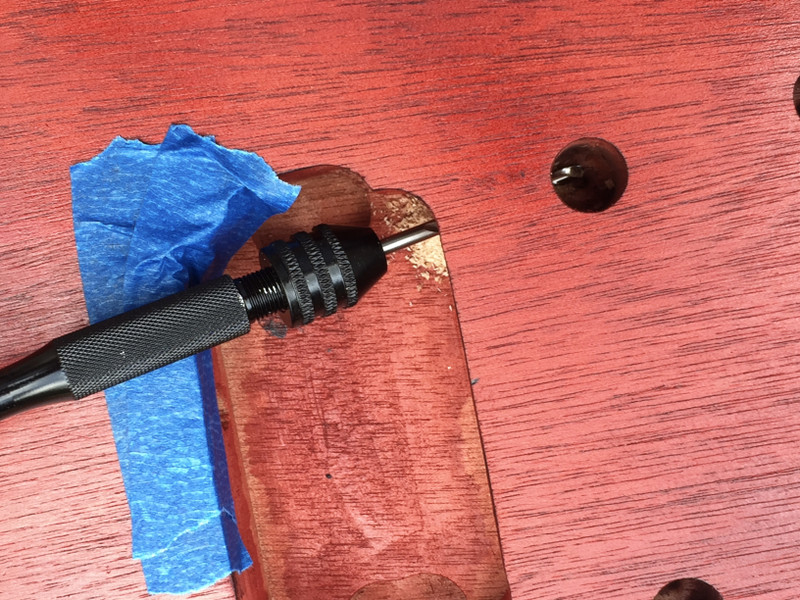
GSM-1, showing the pin drill. Masking tape on the edge of the rout to prevent any damage from using the drill.
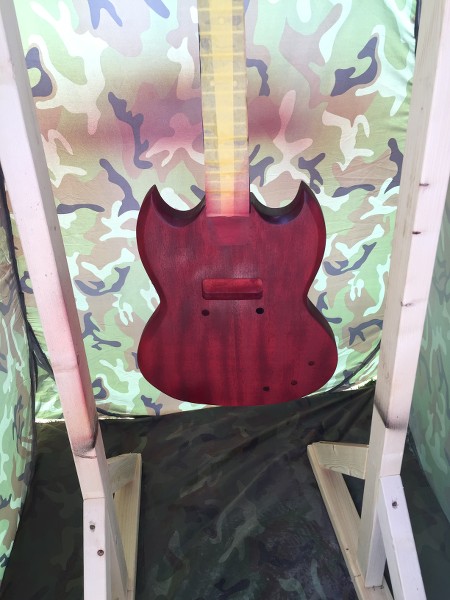
The GSJ-1 has had a coat of Heritage Cherry lacquer applied, whilst the GSM-1 is yet to have it, hence the difference in colours between the two bodies.

Nice tidy work as always Mr. Barden, nicely done😉
FrankenLab:
Turning tone wood into expensive sawdust since 2016!
Thanks Simon, I'll have to order a long drill bit or my workmate might have one.
I managed to get a 3 hole 3 ply black and white truss rod cover with SG in white on it, so that will match the scratch plate.
Work and weekends keep getting in the way but I'm still keen!

@ $55 AUS that is a steep price. Best price here (US) was directly from the mfg. It's $23.30 from them and $2 more on Amazon. The only thing comparable seems to be Crystalac, which was $20 for a half pint, and there are a lot less reviews of it. It pays to be unique! That may be cheap compared to the rest of the English speaking world, but is still about 2/3 what I paid for the body it will go on ;-)
I just ordered some General Finishes Dye Stain. It's water based, but has a binding agent in it so that it can be used with other water based products, and is also supposed to help control blotching. The mfg recommends putting it on bare wood, and not filling first. It looks to me like you may have done it the opposite way?
Last edited by fender3x; 13-06-2020 at 05:51 AM.
I did. But I needed to in order to stain it and darken the pores first. But I did test it out first on scrap wood, and my main stain was spirit-based, not water based. If you aren't highlighting, then it comes down to how transparent the grain filler is.
Crystalac looks to be a very good product. I've seen the Highline Guitars chap use it with excellent results.
I saw that as well...actually the only use of Crystalac that I have seen. It's not cheap either, and I ultimately went with the one that seems to be used most often. Both the stain and the Aqua Coat should be here by Tuesday. Will test it both ways. Thanks!
 Posting Permissions

 Reply With Quote