Page 4 of 18 FirstFirst ... 2 3 4 5 6 14 ... LastLast
Results 31 to 40 of 175

Thread: Lyn #14 - Solid-body Acoustic

  1. #31
    Mentor robin's Avatar
    Join Date
    Feb 2013
    Location
    Brisbane
    Posts
    1,513
    Thanks Frank, Stan, Kim and Andrew


    I thought it was about time to try my hand at binding, so as this guitar is very much a test bed, I thought why not?

    First hurdle? How am I going to cut a channel for the binding without a router? Answer, same as with everything else, with a chisel.

    I needed to cut a guiding gouge so as to reduce tear out. I would dearly love to be able to afford to buy a descent gramil but even with one of those, with its flat surface, I was going to have a problem with the horn and the waist-line of a guitar. I found the answer on Google and made myself a “poor man’s” beading tool. I had to modify it by rounding of the surface to fit the contours of a guitar but it worked pretty well.

    The screw that does the gouging is sharpened by simply lightly filing the top surface flat until there is a slight cutting edge around the circumference of the screw. Apart from its simplicity the beauty is it is quite accurate and by turning the screw 1/2 turn I could go from 5mm to 4mm in seconds.

    Click image for larger version. 

Name:	001 (5).JPG 
Views:	174 
Size:	169.6 KB 
ID:	11686


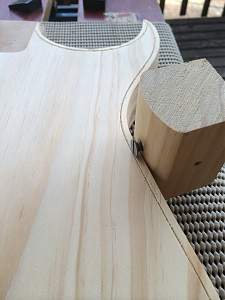
    And here it is from a different angle showing how I had to round off the edges for the horn and waist.
    Click image for larger version. 

Name:	002 (3).JPG 
Views:	159 
Size:	175.1 KB 
ID:	11687

    Here it is in action.
    Click image for larger version. 

Name:	005 (5).JPG 
Views:	162 
Size:	139.9 KB 
ID:	11688

    The bevel was actually to match the rather extreme horn curve but it worked fine for the waist-line as well.
    Click image for larger version. 

Name:	006 (4).JPG 
Views:	163 
Size:	131.7 KB 
ID:	11689

  2. #32
    Mentor robin's Avatar
    Join Date
    Feb 2013
    Location
    Brisbane
    Posts
    1,513
    Once the beading/gouging was done it was out with the chisel.
    Click image for larger version. 

Name:	007 (4).JPG 
Views:	158 
Size:	159.0 KB 
ID:	11690


    Here is the end result. It is still pretty rough, and I made a few noob mistakes with the chisel, but after I file and sand it back I am hoping that it will be OK. I’m not after perfection here. It took a bit longer than using a router (well actually, a lot, LOT longer) but it sat nicely with my ethos of hand tools only, and it was a great way to learn how to use a chisel.
    Click image for larger version. 

Name:	002 (4).JPG 
Views:	163 
Size:	169.6 KB 
ID:	11691


    My next job will to be to actually glue the binding. That job, I am told, is not as easy as it sounds.

    Stay tuned.

  3. Liked by: Zandit75

  4. #33
    Moderator dingobass's Avatar
    Join Date
    Sep 2012
    Location
    Perth
    Posts
    4,491
    Hot Dayum!

    There is always a workaround for glitches, mistakes and other Guitar building gremlins.....

  5. #34
    Overlord of Music
    Join Date
    Aug 2012
    Location
    Brisvegas
    Posts
    3,356
    That binding marking jig is brilliant.
    'As long as there's, you know, sex and drugs, I can do without the rock and roll.'

  6. #35
    GAStronomist wokkaboy's Avatar
    Join Date
    Dec 2012
    Location
    Perth WA
    Posts
    13,555
    awesome work as always Westie07, binding channel by hand you have done a great job. So if the channel is about 4mm wide, will you have 2 layers of binding, maybe different colours ? that's a wide channel.
    I think cutting the channel is much harder than gluing the binding. Helps to have a heat gun (you may need a power tool finally !) to pre-bend the binding, especially on the lower horn is the tightest contour of the tele body
    Current Builds and status
    scratch end grain pine tele - first clear coat on !
    JBA-4 - assembled - final tweaks
    Telemonster double scale tele - finish tobacco burst on body and sand neck

    Completed builds
    scratch oak.rose gum Jazzmaster - assembled needs setup
    MK-2 Mosrite - assembled - play in
    Ash tele with Baritone neck - neck pup wiring tweaks and play in

  7. #36
    GAStronomist FrankenWashie's Avatar
    Join Date
    Jan 2016
    Location
    Glebe, NSW
    Posts
    5,666
    Now that is some quality MacGyvering. Great job!
    FrankenLab
    Hand crafting guitars, because Death Rays are expensive.


  8. #37
    One day I too shall have the guts to try something insanely awesome like this with wood!
    Looking mighty fine dude! Awesome work!

  9. #38
    GAStronomist wokkaboy's Avatar
    Join Date
    Dec 2012
    Location
    Perth WA
    Posts
    13,555
    hey Redneck, doesn't take guts to build a scratchy. Just get some cheap timber (here a pine body blank costs about $25), get some plans or design your own shape and start cutting. Can get a PBG neck for it.
    If you muck up the first attempt at least you can replace the body blank pretty cheaply.
    Once you have built a couple of these you will have the experience and confidence to move onto some nicer timbers
    Current Builds and status
    scratch end grain pine tele - first clear coat on !
    JBA-4 - assembled - final tweaks
    Telemonster double scale tele - finish tobacco burst on body and sand neck

    Completed builds
    scratch oak.rose gum Jazzmaster - assembled needs setup
    MK-2 Mosrite - assembled - play in
    Ash tele with Baritone neck - neck pup wiring tweaks and play in

  10. #39
    Mentor robin's Avatar
    Join Date
    Feb 2013
    Location
    Brisbane
    Posts
    1,513
    @DB
    Thanks Phil, I think…. Although it could be a “Hot Dayum” what does this idiot think he’s doing? Lol.

    @Pabs
    Thanks Craig, but I can’t take any credit for the beading jig. I just adapted someone else’s idea to work with a guitar.

    @Woks
    Thanks Warren, it’s not so pretty IRL, but I am hoping that the binding will hide all my mistakes. It will actually be 3 layers of binding, cream/black/cream. I probably should have used some purfling but I didn’t fancy doing a second channel for that.

    @Frankie
    Thanks mate, I wish I could take some credit, but I stole it from the interwebs.

    @Redneck
    Thanks mate. Woks is right, as usual.

    I am using a Pitbull neck, an assortment of hardware and some cheap-as bits of pine. If it all goes belly up, and I have every expectation that it will, I will just bin the body and reuse the neck and hardware on some other wacky experiment.

    Until I started making these Pitbull guitars I had zero experience in working with wood. But building the kits I picked up a few skills and now I think, what the heck, that sounds like a good idea, I might give it a go.

    The hand tools bit is just me having too much spare time on my hands.

    Cheers guys,
    Rob

  11. #40
    GAStronomist wokkaboy's Avatar
    Join Date
    Dec 2012
    Location
    Perth WA
    Posts
    13,555
    good stuff Westie, triple binding C/B/C will look the goods mate.
    you are too negative about your abilities buddy, no way this project will go belly up

    keep up the good work mate !
    Current Builds and status
    scratch end grain pine tele - first clear coat on !
    JBA-4 - assembled - final tweaks
    Telemonster double scale tele - finish tobacco burst on body and sand neck

    Completed builds
    scratch oak.rose gum Jazzmaster - assembled needs setup
    MK-2 Mosrite - assembled - play in
    Ash tele with Baritone neck - neck pup wiring tweaks and play in

Page 4 of 18 FirstFirst ... 2 3 4 5 6 14 ... LastLast

Posting Permissions

  • You may not post new threads
  • You may not post replies
  • You may not post attachments
  • You may not edit your posts
  •