Page 4 of 5 FirstFirst ... 2 3 4 5 LastLast
Results 31 to 40 of 49

Thread: Build #14 - Frankenstrat v2

  1. #31
    Ignoring the neck for now, I decided to move on to some painting. Will have plenty of time for neck work while I'm waiting for curing.

    First up, some grain filling and sanding, followed by primer/sealer, followed by more sanding before a few coats of black

    Click image for larger version. 

Name:	PXL_20230516_012600874.jpg 
Views:	778 
Size:	271.0 KB 
ID:	44297Click image for larger version. 

Name:	PXL_20230517_005051168.jpg 
Views:	783 
Size:	275.1 KB 
ID:	44298

  2. #32
    Next, the taping. As I probably already mentioned I'm not attempting a replica, this is more of a tribute. So, I didn't pay too much attention to getting it exactly right, just went with something kinda close.
    Click image for larger version. 

Name:	PXL_20230519_002642355.jpg 
Views:	658 
Size:	296.2 KB 
ID:	44299Click image for larger version. 

Name:	PXL_20230519_002650208.jpg 
Views:	659 
Size:	264.5 KB 
ID:	44300

  3. #33
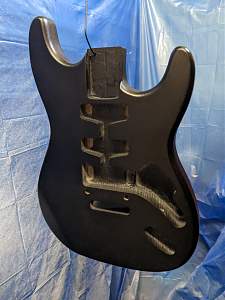
    And then, the white coats. Let it dry and remove the tape. It's starting to take shape. Going to let that sit over the weekend and dry properly before I gently knock down the few furry white edges where the tape was. Now I'm just waiting for some thinner masking tape to come in before I move on to the red.
    Click image for larger version. 

Name:	PXL_20230519_052933036.jpg 
Views:	658 
Size:	313.7 KB 
ID:	44301Click image for larger version. 

Name:	PXL_20230519_053000031.jpg 
Views:	652 
Size:	268.8 KB 
ID:	44302

  4. #34
    Happy days! This showed up today.
    Click image for larger version. 

Name:	PXL_20230525_224736421.jpg 
Views:	639 
Size:	201.3 KB 
ID:	44322

  5. #35
    Slowly filling in the routes for the pickup mount screws so I can surface mount my pickups.
    Click image for larger version. 

Name:	PXL_20230526_001124126.jpg 
Views:	666 
Size:	252.7 KB 
ID:	44323

  6. #36
    Taped up and ready for the red coat. Many differences from the original, but was never going for a replica, just a tribute.

    Click image for larger version. 

Name:	PXL_20230526_045049982.jpg 
Views:	663 
Size:	359.5 KB 
ID:	44324
    Click image for larger version. 

Name:	PXL_20230526_045104456.jpg 
Views:	664 
Size:	359.4 KB 
ID:	44325

  7. #37
    And now it's red. Let that sit for a bit.

    Click image for larger version. 

Name:	PXL_20230526_061922862.jpg 
Views:	655 
Size:	233.0 KB 
ID:	44326

  8. #38
    Tape removed. Some of the cheaper stuff has left a sticky residue. I've got some "De-Solv-it" which is used to remove that sort of stickiness but I'm hesitant to try it. It says it's safe to use on painted surface but I'm not confident and I don't really have a discreet spot to test it on. Might just be safe and go grab some isopropyl alcohol and try that first.

    *Edit: That was a bad idea. Isopropyl alcohol ate through some of my whitepaint and exposed the black underneath. Fortunately, it looks like I did it on purpose as it's on an edge. Back to the drawing board...

    Anyway, progress pics...
    Click image for larger version. 

Name:	PXL_20230527_002344842.jpg 
Views:	658 
Size:	339.9 KB 
ID:	44327Click image for larger version. 

Name:	PXL_20230527_002412584.jpg 
Views:	661 
Size:	299.5 KB 
ID:	44328
    Last edited by m0j0; 27-05-2023 at 09:22 AM.

  9. #39
    Turns out that I do have a discrete area to test - behind the neck mount plate (I'm an idiot). Also turns out the "De-Solv-It" product is much safer (just don't rub too hard). Managed to remove all the sticky residue and wiped it over with a damp cloth.

    Click image for larger version. 

Name:	PXL_20230527_015145689.jpg 
Views:	662 
Size:	377.5 KB 
ID:	44329Click image for larger version. 

Name:	PXL_20230527_015201109.jpg 
Views:	660 
Size:	401.6 KB 
ID:	44330

  10. #40
    Now to decide what to do about the damaged paintwork. It would be fairly easy to mask around the section and give it a couple of light sprays with the white to patch it. Or, I could just keep it and pretend it's intentional. The beauty of one of these builds is the more mistakes you make, the more authentic it looks. Will sit on that decision over the next few days since I can't move on to the clear coats yet anyway.

    Click image for larger version. 

Name:	PXL_20230527_015211310.jpg 
Views:	664 
Size:	220.5 KB 
ID:	44331

Page 4 of 5 FirstFirst ... 2 3 4 5 LastLast

Posting Permissions

  • You may not post new threads
  • You may not post replies
  • You may not post attachments
  • You may not edit your posts
  •