Page 4 of 16 FirstFirst ... 2 3 4 5 6 14 ... LastLast
Results 31 to 40 of 155

Thread: I bought the cheapest kit I could find on eBay - let's see if this was a good idea

  1. #31
    Member ThatCluelessGerman's Avatar
    Join Date
    May 2020
    Location
    Hamburg, Germany
    Posts
    333
    Today, I didn't do much with the guitar pieces as I had some urgent client work. I mean, in this current crazy times, you don't hesitate when a client calls, even if it means to ditch lunch ;-)

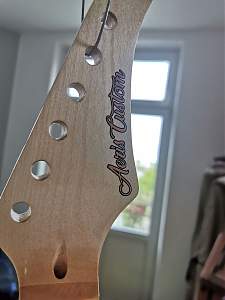
    However, I had some spare time in the morning which I used to design and print a decal for the headstock. As I wanted to have a copper decal, it was a lot of trial and error. I even experimented with copper plating the text but this was not a good option. Then, I tried toner activated foil, but this didn't work either. So I mixed some metallic acrylic ink and filled in the decals by hand. First I tried it with a tiny brush, but this actually was very hard and not precise. After that, I tried some fountain pen nibs but these were too sharp and scratched away some of the prints. Luckily, I had an idea that worked out in the end. I used a dried marker as a pen, dipping it into the ink. Finally. It took me around 2 hours to finally get a decent decal. I made a few because I figured I'd f*ck up a bunch of them when applying, but I didn't. Now I have a looot of decals ;-)

    Click image for larger version. 

Name:	IMG_20200515_190253.jpg 
Views:	278 
Size:	166.3 KB 
ID:	35123

    A freaking lot of decals:

    Click image for larger version. 

Name:	IMG_20200515_150747.jpg 
Views:	256 
Size:	251.1 KB 
ID:	35125

    Click image for larger version. 

Name:	IMG_20200515_164314.jpg 
Views:	254 
Size:	170.6 KB 
ID:	35124

    After applying the decal:

    Click image for larger version. 

Name:	IMG_20200515_164123.jpg 
Views:	239 
Size:	138.1 KB 
ID:	35126

    And after a coat of tru oil:

    Click image for larger version. 

Name:	IMG_20200515_190117.jpg 
Views:	247 
Size:	154.8 KB 
ID:	35127
    I don't know what I'm doing but I hope I will end up with a guitar

  2. Liked by: Joe Garfield

  3. #32
    Member ThatCluelessGerman's Avatar
    Join Date
    May 2020
    Location
    Hamburg, Germany
    Posts
    333
    I also got a set of new knobs with abalone top. I still hope to get some green and blue colors on my pickguard to match them a bit.

    Click image for larger version. 

Name:	IMG_20200515_164213.jpg 
Views:	211 
Size:	151.8 KB 
ID:	35129

    They look nice :-)

    I also ordered a replacement for the super ugly black switch know. But it's gonna take a while, coming all the way from China...

    Click image for larger version. 

Name:	IMG_20200515_191724.jpg 
Views:	225 
Size:	161.7 KB 
ID:	35128

    On the 4th or 5th coat of tru oil, the back developed a really nice shine. I really love it. But as I heard that some people put 30 coats of tru oil on, I think there is still a loooong way ahead of me...

    Click image for larger version. 

Name:	IMG_20200515_190158.jpg 
Views:	214 
Size:	373.7 KB 
ID:	35130

    That's it for today. I think I'll spend the next days with nothing more than putting on coats of oil, so I'm not sure if I have any interesting updates on the way...
    Last edited by ThatCluelessGerman; 16-05-2020 at 01:57 AM.
    I don't know what I'm doing but I hope I will end up with a guitar

  4. #33
    GAStronomist Simon Barden's Avatar
    Join Date
    Oct 2016
    Location
    Reading, UK
    Posts
    10,547
    Nice work. I tried that once but it didn't work that well so I gave up.

    If you want a less shiny, more satin, finish, then you could leave it at 5 or 6 coats of TruOil, but if you want a flat really shiny finish, then you need enough depth of finish to sand it flat and polish it up again, whilst still leaving enough thickness to provide protection for the wood.

  5. #34
    Mentor blinddrew's Avatar
    Join Date
    Apr 2018
    Location
    York, Uk
    Posts
    1,122
    Sanding and oiling becomes a bit of a way of life for a while.

  6. #35
    Love those new knobs, and the oiled finish is looking good too
    #001 (LP-1S) [finished - co-runner up Nov 2018 GOTM]
    #002 (WL-1)
    #003 (MPL Megacaster - semi scratch build) [finished]
    #004 (ST-1 JR - Arachnoid Superhero build) [finished]
    #005 (LP jr)
    #006 (TL-1A)

    Junk shop acoustic refurbs (various)
    'The TGS Special'

  7. #36
    Member
    Join Date
    Apr 2017
    Location
    Sydney
    Posts
    232
    Knobs look great.
    Just keep going with the oil until you are happy with the gloss level. Looking good so far.

  8. #37
    Member ThatCluelessGerman's Avatar
    Join Date
    May 2020
    Location
    Hamburg, Germany
    Posts
    333
    So far, I am adding coat after coat of tru oil. I'm rubbing it with 0000 steel wool every 2-3 coats because I keep finding dog hairs sticking in the coating all the time

    After the steel wool:

    Click image for larger version. 

Name:	IMG_20200517_101132.jpg 
Views:	220 
Size:	279.7 KB 
ID:	35152

    It looks very shiny:

    Click image for larger version. 

Name:	IMG_20200517_101117.jpg 
Views:	232 
Size:	237.9 KB 
ID:	35154

    Click image for larger version. 

Name:	IMG_20200517_102033.jpg 
Views:	239 
Size:	378.6 KB 
ID:	35151

    Click image for larger version. 

Name:	IMG_20200517_101105.jpg 
Views:	242 
Size:	169.6 KB 
ID:	35150

    However, it's starting to look really nice, although I'm a bit worried the tru oil won't be very tough / resistant later? Is there anything I can do to make it a bit harder? I'm just scared the knobs and seams of my jeans could eventually scratch it or even rub through it, even after it is cured? What do you guys think?
    I don't know what I'm doing but I hope I will end up with a guitar

  9. #38
    Member ThatCluelessGerman's Avatar
    Join Date
    May 2020
    Location
    Hamburg, Germany
    Posts
    333
    Oh, and... I redid the pick guard. I wasn't happy with the first try and when I added some more ammonium (hoped for more colour), it just ATE right through the copper leaf. Bummer.
    So re-plated it and added 5 layers of leaf this time.

    Also, I had the genius idea (hahaha lol!) to do a test piece first. (Lightbulb goes on)

    So here is some plastic covered with just one layer of copper.
    Salt and ammonia on the left, salt and vinegar on the right.

    Click image for larger version. 

Name:	IMG_20200516_150055.jpg 
Views:	239 
Size:	292.8 KB 
ID:	35160

    After an hour, it looked amazing (even though it ate through the one layer of copper easily).

    Click image for larger version. 

Name:	IMG_20200516_171852.jpg 
Views:	228 
Size:	302.7 KB 
ID:	35161

    So now trying the pickguard:

    Click image for larger version. 

Name:	IMG_20200516_172635.jpg 
Views:	214 
Size:	334.7 KB 
ID:	35159

    After 2 hours, still no luck.

    Click image for larger version. 

Name:	IMG_20200516_185404.jpg 
Views:	236 
Size:	321.6 KB 
ID:	35162


    So I actually gave up on my hope of getting some blue or green colors. I left it like this over night, hoping it would dry out and I could maybe brush on a little ink (it's cheating, I know! ).

    After I woke up in the morning, NOTHING had happened to it! It still wasn't dry! So I took it out, threw it on the coffee table, forgetting about it until 2 hours later.
    Went into the living room, and found this!

    Click image for larger version. 

Name:	IMG_20200517_102038.jpg 
Views:	216 
Size:	339.1 KB 
ID:	35158

    Fiiiiinally! I really love how it turned out! This evening, I'll be sealing it with spray lacquer. I hope it will keep its amazing look!
    I don't know what I'm doing but I hope I will end up with a guitar

  10. #39
    GAStronomist Simon Barden's Avatar
    Join Date
    Oct 2016
    Location
    Reading, UK
    Posts
    10,547
    The Tru Oil dries pretty hard if you leave it for about a month. I had to sand it off a guitar as I'd sanded through the TO and messed up the finish, and a lot of it was very hard work indeed.

    Nice work on the pickguard. If you haven't done so yet, I'd wash it thoroughly a few times before putting any finish on.

  11. #40
    Member
    Join Date
    Apr 2017
    Location
    Sydney
    Posts
    232
    Tru-oil was originally designed for coating the handle of guns/rifles.
    It does dry very hard, you just need to give it time to cure.
    Simon is right on the money with it - give it a month at least to cure and harden off.
    In Sydney in summer (think daytime temperatures in 30s up to low 40s and low humidity) and I gave about my last one at least a month to harden right out.
    You are fortunate to be coming into summer in Hamburg but I don't know that it really get warm in comparison. Patience is important, but you look like you are getting a good finish.

Page 4 of 16 FirstFirst ... 2 3 4 5 6 14 ... LastLast

Posting Permissions

  • You may not post new threads
  • You may not post replies
  • You may not post attachments
  • You may not edit your posts
  •