ok perfect, just needed to check that wire wasnt meant to overlap both points on the pot, can finish this up now and get it tested! cheers


ok perfect, just needed to check that wire wasnt meant to overlap both points on the pot, can finish this up now and get it tested! cheers

Hi Ben,
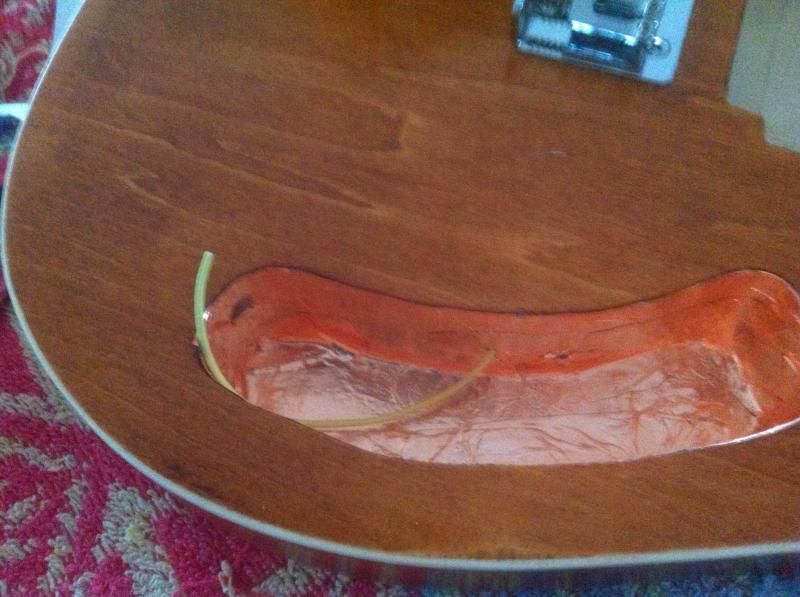
Robin's diagram shows it correctly, the PBG diagram is just a little awkward with the way the wires overlap. The brown 'hot' wire in the PBG diagram connects from the 'tip' lug of the jack to the middle lug (only) of the volume pot, and the green wire connects from the right lug (only) of the volume pot to the left lug on the tone pot. Also, the left lug on the volume pot is connected/soldered to the pot casing as it needs to connect to ground. The right lug of the tone pot should not have a connection. The capacitor is connected from the middle lug of the tone pot to the pot casing. Make sure the legs of the cap don't short against anything else once it is in place (you can slide some plastic sleeving from a stripped wire onto the legs before you solder it if you're worried).
Note: the left/right lugs I'm referring to is based on how they are drawn in the PBG diagram I posted.
Scott.

glad you got the wiring sorted Ben, its not that hard once you built a few axes it gets easier
Current Builds and status
scratch end grain pine tele - first clear coat on !
JBA-4 - assembled - final tweaks
Telemonster double scale tele - finish tobacco burst on body and sand neck
Completed builds
scratch oak.rose gum Jazzmaster - assembled needs setup
MK-2 Mosrite - assembled - play in
Ash tele with Baritone neck - neck pup wiring tweaks and play in
cheers for the clarification, yeah i just couldnt quite tell on the diagram, wanted to check. I had already put shielding on the cap leg as well because i too was worried about it shorting!/<\\/p>[]<\\/p>/Quote from WeirdBits on May 20, 2014, 12:50
Hi Ben,
Robin's diagram shows it correctly, the PBG diagram is just a little awkward with the way the wires overlap. The brown 'hot' wire in the PBG diagram connects from the 'tip' lug of the jack to the middle lug (only) of the volume pot, and the green wire connects from the right lug (only) of the volume pot to the left lug on the tone pot. Also, the left lug on the volume pot is connected/soldered to the pot casing as it needs to connect to ground. The right lug of the tone pot should not have a connection. The capacitor is connected from the middle lug of the tone pot to the pot casing. Make sure the legs of the cap don't short against anything else once it is in place (you can slide some plastic sleeving from a stripped wire onto the legs before you solder it if you're worried).
Note: the left/right lugs I'm referring to is based on how they are drawn in the PBG diagram I posted.
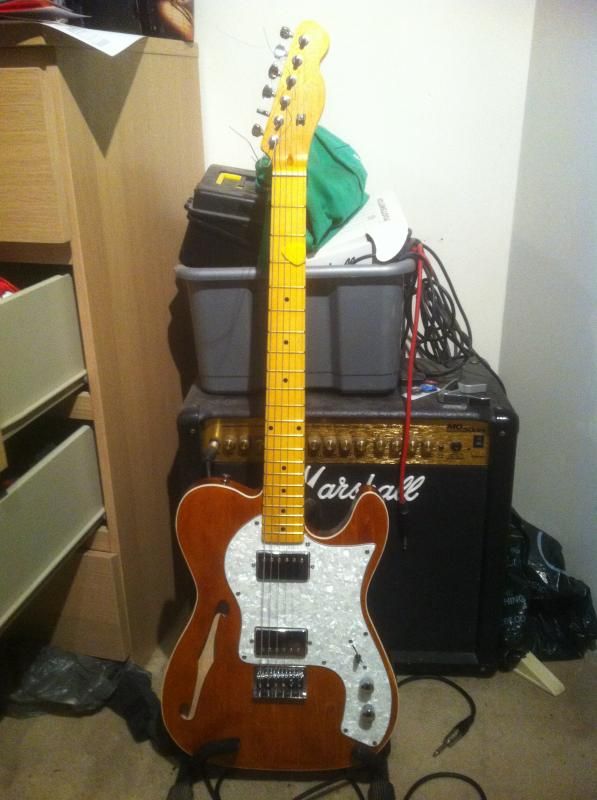
i didnt really take many pics as i was doing the soldering, though it took me a few hours to get it sorted and the scratchplate drilled. i lined the cavity with some copper slug tape (good tip that, i read it somewhere on this forum ages ago-dunno if its made a difference because i didnt test the electronics beforehand).
then theres a pic of it plugged in for testing next to my crappy (but awesome) squier tele (these pics are off my phone hence why theyre kind of shit)
and a final pic with the control knob covers on, and also drilled for the strap buttons.
it sounds kind of shitty at the moment because ive not set it up properly but its all working and im super happy how it came out. not got time to dial it in today as ive got to head out and run some errands, but will get it sorted tomorrow hopefully. im also waiting on a fret file so i can dress the frets, its kind of buzzy right now.
been great fun building this, i want to make another already, gonna have to have a think though. im tempted by a tele deluxe even though its real similar to this, hmm cant decide
wow the neck looks insanely yellow, its not that severe to the eye, that must be because of the lighting in my room!
looks great Ben. Yer the neck is very yellow, may need sunglasses to look at it, as you say its not as yellow in the flesh
Current Builds and status
scratch end grain pine tele - first clear coat on !
JBA-4 - assembled - final tweaks
Telemonster double scale tele - finish tobacco burst on body and sand neck
Completed builds
scratch oak.rose gum Jazzmaster - assembled needs setup
MK-2 Mosrite - assembled - play in
Ash tele with Baritone neck - neck pup wiring tweaks and play in

That looks unreal mate, wicked job. You need to get some pics together and enter it into gotm.

Looks amazing Ben! I really love the thinline. Have never seen one that didn't look amazing and yours is no exception! Awesome job. Any chance of a sound demo??
cheers,
Gav.
--
Build #01: BC-1
Build #02: ST-1
Build #03: JR-1DC
Build #04: ES-2V
Build #05: ESB-4 (GOTM July 2014)
Build #06: RC-1
Build #07: MK-2
Build #08: TLA-1
Build #09: JR-1DC
Build #0A: LPA-1
Build #0B: STA-1 (GOTM April 2015)
Build #0C: MKA-2
Build #0D: LP-1M
Build #0E: JB-1
Build #0F: FS-1
Find me:
https://www.facebook.com/firescreek.guitars/
http://www.guitarkitbuilder.blogspot.com.au/

Looking good mate!
There is always a workaround for glitches, mistakes and other Guitar building gremlins.....

great result mate.
And don't knock Squiers, my Strat's build quality is as good as any name Fender - an electronics upgrade is all you need and then they are as good
Stan's LP Build for my Sister: http://www.buildyourownguitar.com.au...ead.php?t=3146
Benson Pickup Strat mod: http://www.buildyourownguitar.com.au...ead.php?t=5229
Epiphone LP headstock fix: http://www.buildyourownguitar.com.au...ead.php?t=3410
Martin Backpacker Repair: http://www.buildyourownguitar.com.au...?t=5038&page=3
'57 Harmony Jazz guitar project: http://www.buildyourownguitar.com.au...ead.php?t=2972
 Posting Permissions

 Reply With Quote