


Such a shame. The finish is looking great. I hope I can get something half as good (minus the cracks).


Such a shame. The finish is looking great. I hope I can get something half as good (minus the cracks).
Mantra: No more pedals, must finish BlueyCaster...
Disclaimer: I haven't done woodwork since high school, and wasn't really paying attention at the time ...
Thanks jugglindan. I like your disclaimer - reminds me of a school report I once had. My woodwork teacher said "He tries hard, with little success". Sometimes I wonder if he got it right after all.....
Completed Builds
#7 FS-1
#6 FV-1G
#5 ATL 1SB Thinline
#4 ST1-Jnr
# 3 JBA-4
# 2 LP-1S
# 1 TLA-1R
Hi Simon.
Clamping crossed my mind last evening as I was able to push the cracks closed. Playing around last night I was able to use a very fine black permanent marker with a fine pen along the edge of the cracks, wiping it off quickly so it was not on the top finish. That certainly helped hide the "white" of the crack that could be seen. So thinking along these lines, I'm considering masking off the crack really carefully, taking a really fine brush (just a few hairs !) with a little black enamel to do a proper job of getting the colour back into the crack, and then simply blowing some acrylic over the crack - or simply a drop of super glue. I reckon a small patch might not be too hard to fix and re-polish up (and it would not be quite so soul destroying as waiting for a crack to emerge from under the neck plate). I should be able to work on a small area if I wrap sand paper around a small eraser to sand flat prior to a re-polish of the area.
PS - I got a firebird studio - I had back problems at the time and realised that it was very much lighter than the regular firebird (plus I really had a screamer of a deal as the store was in liquidation). Its a fun guitar - really great value. However, since the band I was in split up I mainly play sitting down nowadays, so I'm often thinking .... what if I'd got the heavy firebird ? (and could I hide one from the wife ?)
Completed Builds
#7 FS-1
#6 FV-1G
#5 ATL 1SB Thinline
#4 ST1-Jnr
# 3 JBA-4
# 2 LP-1S
# 1 TLA-1R

The new Epi Firebird is almost identical to my 2019 Firebird. And a lot cheaper. Just change the truss rod cover and no-one would know the difference. I prefer the standard tuners over the banjos, though they could have restyled the headstock slightly to keep the straight string pull. I tried a Firebird with banjo tuners a while back, and just couldn't get it in tune at all, let alone keep it in tune.
Fortunately most of us are no longer the same person we were in high school.
Mantra: No more pedals, must finish BlueyCaster...
Disclaimer: I haven't done woodwork since high school, and wasn't really paying attention at the time ...
Especially if you live with an Igor.
Ok - so following Simons comment about CA - and it being best to stop cracks I
(1) Looked up CA - its locktite. OK had some.
(2) Watched a U tube video.
(3) Got clamping and gave it a go.
I figured that if the crack extended - the guitar is ruined.
So here is my progress.
Starting point .... note crack in finish now has raised edges. BUT I can push them into place.
All clamped and ready to go.....
The sharpie and cocktail stick helped - would do slightly differently if I did again. I basically used the sharpie to try to cover the white area evident in the crack. I had thought the cocktail stick might help with the glue - I wasn't sure whether I would need it, but noticed that if I painted the end with the sharpie - it bled into the locktite ... darkening it. However, I didn't really manage to get this consistent - and in the end, the filled cracks were partly black with some glue remaining clear/white. But it improved things.
Last edited by DJP; 17-06-2020 at 04:40 PM.
Completed Builds
#7 FS-1
#6 FV-1G
#5 ATL 1SB Thinline
#4 ST1-Jnr
# 3 JBA-4
# 2 LP-1S
# 1 TLA-1R
OK. Glue added.
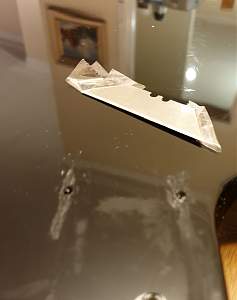
And scraped back to finish using a blade with some really thin sticky tape wrapped around the end.
Completed Builds
#7 FS-1
#6 FV-1G
#5 ATL 1SB Thinline
#4 ST1-Jnr
# 3 JBA-4
# 2 LP-1S
# 1 TLA-1R
And onto strip sanding ....
Oh dear ... at this point its looking worrying.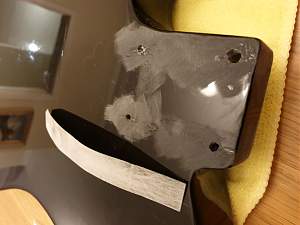
Completed Builds
#7 FS-1
#6 FV-1G
#5 ATL 1SB Thinline
#4 ST1-Jnr
# 3 JBA-4
# 2 LP-1S
# 1 TLA-1R
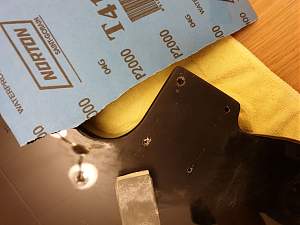
2000 grit ... looking better. The crack fill is actually pretty level, there is minor pitting along it. BUT, at this point I was not sure I want to add more glue and start again, re-sanding etc, as even though I put loads and loads (and loads) of acrylic coats on, I did spray them quite thin and I have already sanded and polished the heck out of them. .... so I do not want to risk going through the acrylic and having to do a re-spray risking a bigger mess.
Last edited by DJP; 17-06-2020 at 04:52 PM.
Completed Builds
#7 FS-1
#6 FV-1G
#5 ATL 1SB Thinline
#4 ST1-Jnr
# 3 JBA-4
# 2 LP-1S
# 1 TLA-1R
 Posting Permissions

 Reply With Quote