
Looking good so far Wazkelly. I can imagine it's nigh on impossible, not to have some material break away from fret edges when pulling the frets out. Look forward to seeng it completed. And cheers for info DB.


Looking good so far Wazkelly. I can imagine it's nigh on impossible, not to have some material break away from fret edges when pulling the frets out. Look forward to seeng it completed. And cheers for info DB.

Rosewood is a cantankerous bugger when removing speed humps...
It helps to tighten the truss rod to get as much back bow as possible without blowing the truss rod nut
Then heating the fret with your trusty soldering iron and using a fingerboard guard helps to reduce chip out.
http://www.stewmac.com/Luthier_Tools..._Set_of_2.html
There is always a workaround for glitches, mistakes and other Guitar building gremlins.....

Thanks for the good advice DB. May have to consider those tips for another fret less project as all the humps were removed before I realised the edges were not as smooth and clean as they could have been.
Just wondering how things would go if I applied ebony timber mate over the whole fret board and whether it would darken the light coloured fret lines. Would I have to tape over the white lines or should I cover them with something that would sand off easy and not lift it out of the fret cuts? Would clear nail Polish be ok or would your suggest something else?
Cheers, Waz
Sanded off the timber mate this morning......
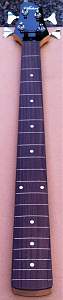
Then applied 1st coat of CA glue a couple of hours ago......wondering how long to leave it before light sanding as it is starting to rain outside at the moment and temperature is about 19 degrees C ???


hey Waz the neck is coming along nicely. I guess to be on the safe side 4-5 hours should be heaps for the CA glue to dry.
If you caked it on thick then maybe 6 hours should be heaps
Current Builds and status
scratch end grain pine tele - first clear coat on !
JBA-4 - assembled - final tweaks
Telemonster double scale tele - finish tobacco burst on body and sand neck
Completed builds
scratch oak.rose gum Jazzmaster - assembled needs setup
MK-2 Mosrite - assembled - play in
Ash tele with Baritone neck - neck pup wiring tweaks and play in
Thanks Woks, will leave it until later on tonight before having another look at things to see if ready for a light sand. If not there is always another chance tomorrow night after work.
Cannot believe it has taken 8 weeks since the first coat of CA glue was applied to finish this project. Extremely fiddly stuff and each time you do a touch up you risk creating more minor stuff ups to fix, hence why it has taken so long to get it done.
99.5% happy as there were still a couple of minor imperfections here and there but figured this is about as good as it might get. First shot shows the gear used, and for those wondering what the coloured small squares are, those are micro mesh pads. Originally had 4 but the 4000 grit one ran out of puff when buffing up the J bass & Tele a few months ago. The tube of metal polish was an experiment that proved a winner as it acted a bit like a polishing compound and then brought it home with the car polish. Did the same on the guitar body, neck, headstock and now so shiny it proved hard to photograph without showing up unwanted reflections.
Did a quick sound check and it was fine however action is still a bit high and will give it a bit of time to settle before tweaking things a bit. Haven't played flat wounds for ages and had forgotten how smooth and mellow they are. Just need to make more time for playing to get better at pitching the notes without looking all the time.
More shots.....


Hey Wazza, it was worth the wait, it looks great.
 Posting Permissions

 Reply With Quote

