Page 2 of 5 FirstFirst 1 2 3 4 ... LastLast
Results 11 to 20 of 45

Thread: Gavin & Ebens BC-1

  1. #11
    Overlord of Music gavinturner's Avatar
    Join Date
    May 2013
    Location
    HOLGATE NSW
    Posts
    3,057
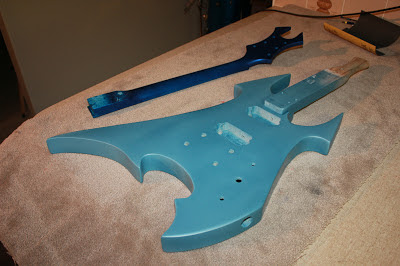
    Today we got the base colour coats on both the neck and the body. Both colours look great - very well chosen by my young assistant. We had a couple of lumps to contend with between coats (a result of uneven pressure on the nozzle from small fingers) but these were easily sanded off with 800 grit. Final coats look great.


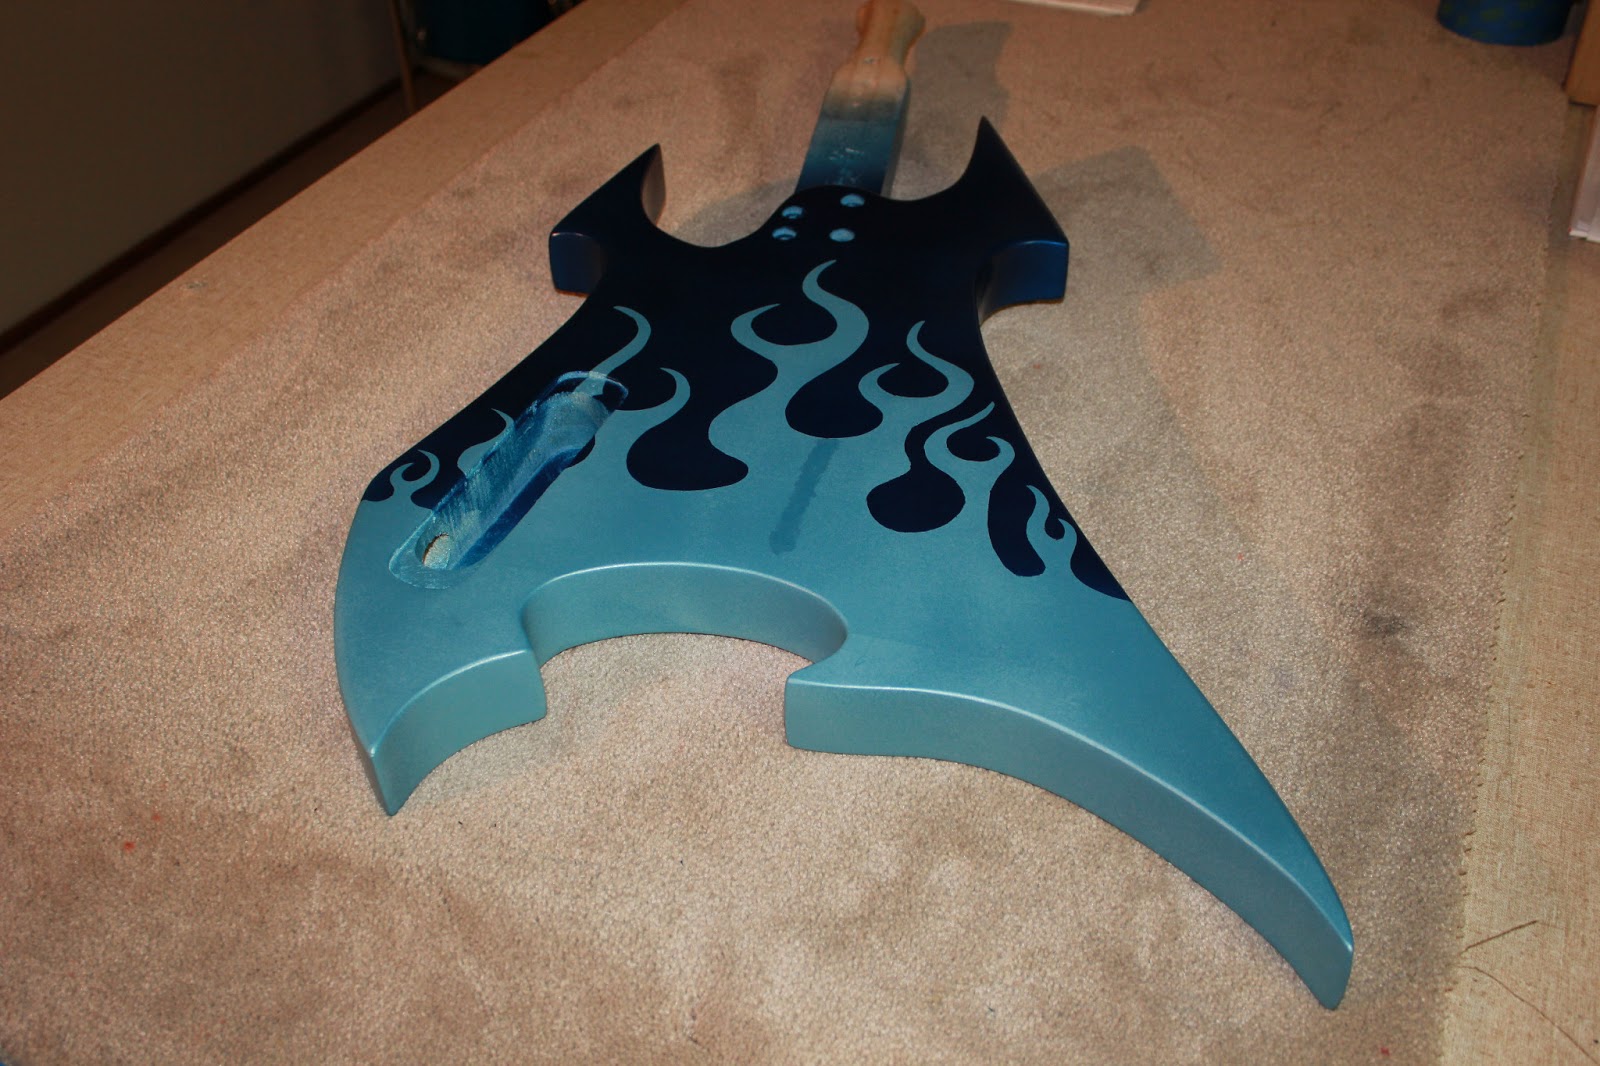
    After the first colour was dry on the body (this light colour will become the colour of the hot rod flames) it was time to cut out our frisket sheet and mask off our flame pattern.


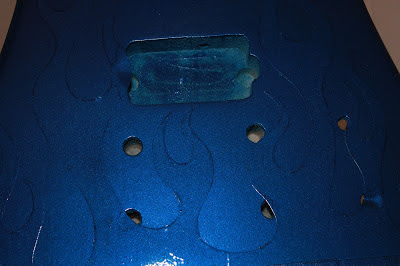
    The mask went on easily (not sure how easily it's going to come off however) and we re-sprayed over the top with our dark blue base colour. Remarkably, this coat went on without incident and looks like we'll have a nice single coat of paint from which to extract the frisket. I've used frisket before to mask off inlay, and let me tell you, after 4 layers of paint, the frisket becomes all but irretrievable!


    I have very high hopes for how this bad boy is going to turn out. My son can't wait to start wiping on the Minwax poly!
    --
    Build #01: BC-1
    Build #02: ST-1
    Build #03: JR-1DC
    Build #04: ES-2V
    Build #05: ESB-4 (GOTM July 2014)
    Build #06: RC-1
    Build #07: MK-2
    Build #08: TLA-1
    Build #09: JR-1DC
    Build #0A: LPA-1
    Build #0B: STA-1 (GOTM April 2015)
    Build #0C: MKA-2
    Build #0D: LP-1M
    Build #0E: JB-1
    Build #0F: FS-1

    Find me:
    https://www.facebook.com/firescreek.guitars/
    http://www.guitarkitbuilder.blogspot.com.au/

  2. #12
    Moderator Brendan's Avatar
    Join Date
    Apr 2013
    Location
    Perth, WA
    Posts
    3,444
    Sounds great! Good luck extracting the frisket...

  3. #13
    Moderator Gavin1393's Avatar
    Join Date
    Sep 2012
    Location
    Mindarie, Western Australia
    Posts
    3,152
    Watching with interest at how this project is developing.
    http://www.buildyourownguitar.com.au/forum/image.php?type=sigpic&userid=1258&dateline=1443806  448Gavmeister

  4. #14
    Overlord of Music gavinturner's Avatar
    Join Date
    May 2013
    Location
    HOLGATE NSW
    Posts
    3,057
    /<\\/p>[]<\\/p>/Quote from Brendan on July 11, 2013, 17:27
    Sounds great! Good luck extracting the frisket...
    Thanks Brendan. Fingers crossed! Tomorrow will reveal all.
    --
    Build #01: BC-1
    Build #02: ST-1
    Build #03: JR-1DC
    Build #04: ES-2V
    Build #05: ESB-4 (GOTM July 2014)
    Build #06: RC-1
    Build #07: MK-2
    Build #08: TLA-1
    Build #09: JR-1DC
    Build #0A: LPA-1
    Build #0B: STA-1 (GOTM April 2015)
    Build #0C: MKA-2
    Build #0D: LP-1M
    Build #0E: JB-1
    Build #0F: FS-1

    Find me:
    https://www.facebook.com/firescreek.guitars/
    http://www.guitarkitbuilder.blogspot.com.au/

  5. #15
    Overlord of Music gavinturner's Avatar
    Join Date
    May 2013
    Location
    HOLGATE NSW
    Posts
    3,057
    The frisket came off today to reveal the flames underneath. The front came away without incident and the little fella was punching the air and doing a victory dance in celebration. Unfortunately, when we pulled frisket off the back we found a small sliver of dark blue paint where the frisket sheets didnt quite meet. 8O :x

    Totally my fault - on the front I taped up the join between frisket sheets to make sure there was no problem. On the back I forgot. Gaaaaah! I tried to fix the mistake with a little light blue paint but the fix looks awful. I explained to Eben that we would have an issue at some stage, but unfortunately it was at the very last stage! Anyway, I gotta bite the bullet and repair the problem correctly with more spray cans. Might mean a total re-spray, but if that's what it takes..

    It would be nice, just once, to have a project with no do-overs!

    You can see the offending issue on the back of the guitar below. Will now take a couple of days to get the paint back to this stage (and looking good).


    --
    Build #01: BC-1
    Build #02: ST-1
    Build #03: JR-1DC
    Build #04: ES-2V
    Build #05: ESB-4 (GOTM July 2014)
    Build #06: RC-1
    Build #07: MK-2
    Build #08: TLA-1
    Build #09: JR-1DC
    Build #0A: LPA-1
    Build #0B: STA-1 (GOTM April 2015)
    Build #0C: MKA-2
    Build #0D: LP-1M
    Build #0E: JB-1
    Build #0F: FS-1

    Find me:
    https://www.facebook.com/firescreek.guitars/
    http://www.guitarkitbuilder.blogspot.com.au/

  6. #16
    Moderator Brendan's Avatar
    Join Date
    Apr 2013
    Location
    Perth, WA
    Posts
    3,444
    Can see why the young'n was punching the air - you've done a great job on it and it looks great. Sorry to hear about where the sheets join. Good news is nothing's broke - guitar just needs some more 'loving'!

  7. #17
    Overlord of Music Fretworn's Avatar
    Join Date
    May 2013
    Location
    Hornsby Area, Sydney, NSW
    Posts
    3,951
    Awesome job!
    Current:
    GTH-1

    Completed:
    AST-1FB
    First Act ME276 (resurrected curb-side find)
    ES-5V
    Scratchie lapsteel
    Custom ST-1 12 String
    JBA-4
    TL-1TB
    Scratch Lapsteel
    Meinl DIY Cajon
    Cigar Box lap steel

    Wishing:
    Baritone
    Open D/Standard Double 6 twin neck

  8. #18
    Overlord of Music gavinturner's Avatar
    Join Date
    May 2013
    Location
    HOLGATE NSW
    Posts
    3,057
    Thanks guys. The respray is in progress!
    Hopefully will be even better the second time around .

    cheers,
    Gavin.
    --
    Build #01: BC-1
    Build #02: ST-1
    Build #03: JR-1DC
    Build #04: ES-2V
    Build #05: ESB-4 (GOTM July 2014)
    Build #06: RC-1
    Build #07: MK-2
    Build #08: TLA-1
    Build #09: JR-1DC
    Build #0A: LPA-1
    Build #0B: STA-1 (GOTM April 2015)
    Build #0C: MKA-2
    Build #0D: LP-1M
    Build #0E: JB-1
    Build #0F: FS-1

    Find me:
    https://www.facebook.com/firescreek.guitars/
    http://www.guitarkitbuilder.blogspot.com.au/

  9. #19
    Overlord of Music gavinturner's Avatar
    Join Date
    May 2013
    Location
    HOLGATE NSW
    Posts
    3,057
    OK. 2 weeks and a complete respray later (from primer up) we are now in a better position. Everything is back to how it was, without the evil little line between frisket sheets on the guitar back. Alot of time and hassle (not to mention money) for such a little touch up! Not to worry.

    This time around I even overcame my fear of the airbrush to create black drop shadows behind the light blue flames. Both Eben and I are very happy with the result!

    Now it's time to start with the wipe-on poly. I know that poly is the death if tone, but I wanted a finish that Eben could apply himself. I don't think subtle tone is Eben's goal anyway with this metal shredding rockabilly beast.

    --
    Build #01: BC-1
    Build #02: ST-1
    Build #03: JR-1DC
    Build #04: ES-2V
    Build #05: ESB-4 (GOTM July 2014)
    Build #06: RC-1
    Build #07: MK-2
    Build #08: TLA-1
    Build #09: JR-1DC
    Build #0A: LPA-1
    Build #0B: STA-1 (GOTM April 2015)
    Build #0C: MKA-2
    Build #0D: LP-1M
    Build #0E: JB-1
    Build #0F: FS-1

    Find me:
    https://www.facebook.com/firescreek.guitars/
    http://www.guitarkitbuilder.blogspot.com.au/

  10. #20
    That's an extraordinarily tasteful pointer shredder. I like it!

Page 2 of 5 FirstFirst 1 2 3 4 ... LastLast

Posting Permissions

  • You may not post new threads
  • You may not post replies
  • You may not post attachments
  • You may not edit your posts
  •