
It was suggested that I would get a better sound out of my Maton by going to 13's, but it made everything sound dull. I'll stick to my 12-53 D'Addario's.
My friend has 53's on his Fender Tele. Feels like playing an acoustic.


It was suggested that I would get a better sound out of my Maton by going to 13's, but it made everything sound dull. I'll stick to my 12-53 D'Addario's.
My friend has 53's on his Fender Tele. Feels like playing an acoustic.
Acoustics:
1995 Maton EM725C - Solid 'A' Spruce Top, QLD Walnut B&S, AP5 Pickup
2015 Ibanez AEL108MD-NT - Laminated Spruce top, Laminated Mahogany B&S, Fishman Sonicore Pickup
Electrics:
Pitbull LP-1S - http://www.buildyourownguitar.com.au...ead.php?t=5745
Carsen Superstrat Rebuild - http://www.buildyourownguitar.com.au...ead.php?t=6284
Builds in Progress:
Silent Guitar Semi-Scratch Build - http://www.buildyourownguitar.com.au...ead.php?t=6809
Hi there,
Sorry about this off subject message. I'm new to this and would like to post some questions about my Les Paul build - but I can't work out how to post a question. Any help greatly appreciated. Cheers Liam

No problems Liam, ordinarily you can ask for advice in the Builiding your Pitbull guitars sectoin, chances are you might already find the answer there. Otherwsie if you start a build diary, as issues arise you can ask for advice as you go. Or you can do as you've done and see what folks can do to assist.Originally Posted by Liam Jeffery

So what questions do you have? Can you illustrate them with photos for clarity?
FrankenLab:
Turning tone wood into expensive sawdust since 2016!
The madness continues:
So we had some fun in the FrankenLab with the palm router, a couple of little whoopsies, mainly due to the flexible nature of the router's edge guide. Due to the protruding "ears" we had to finish the wider section of the top of the channel with some avant grade use of a brad point drill and some careful work with a miniature Japanese back saw.
Tips for young players:
1. MAKE SURE YOUR NECK BLANK STARTS SQUARE AND STAYS SQUARE!
2. If you have to attach 'ears" to widen the headstock, do it AFTER you rout the TR Channel.
3. 6 1.5mm cuts are better than 3 x 3mm cuts.
Hopefully this is of use to someone or at the very least amusing to those more experienced builders.
FrankenLab:
Turning tone wood into expensive sawdust since 2016!
Nice work Franken!!
I love the proposed headstock design!
Acoustics:
1995 Maton EM725C - Solid 'A' Spruce Top, QLD Walnut B&S, AP5 Pickup
2015 Ibanez AEL108MD-NT - Laminated Spruce top, Laminated Mahogany B&S, Fishman Sonicore Pickup
Electrics:
Pitbull LP-1S - http://www.buildyourownguitar.com.au...ead.php?t=5745
Carsen Superstrat Rebuild - http://www.buildyourownguitar.com.au...ead.php?t=6284
Builds in Progress:
Silent Guitar Semi-Scratch Build - http://www.buildyourownguitar.com.au...ead.php?t=6809

I bet Paul Reed Smith didn't get it !00% right first time either. Never give up. never surrender.
I'm really interested in how these truss rod thingies are fitted. Please, please take sufficient photos to show all the steps.
No problems Simon, can do. We've had a wee fail on this neck with the thinning of the headstock, but I will document that also as it is probably a good learning tool for others. While the neck is now probably not usable I'm going to complete it any way for the shaping exercise.
FrankenLab:
Turning tone wood into expensive sawdust since 2016!
How and where is the headstock thinned? Is there any way you could strengthen it by gluing on some more wood - or even a layer of something light but strong, say carbon fibre?
It was an overly ambitious manual rip cut with a Ryoba saw that went pear shaped. The scarf joint and such are all fine, it's just that the cut wandered out leaving a severe dishing in he back of the head and a drastic thinning at the start of the head stock transition. Photos to follow.
FrankenLab:
Turning tone wood into expensive sawdust since 2016!
So, on the left, FrankenLab's scarf jointed neck building effort, the right is the factory neck, less FB from my SV-1 kit.
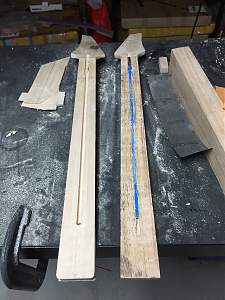
Rear view of the necks
Highlighting the lamination of the three neck slices
The scarf joint, thankfully still solid as a rock
Unfortunately, here's where it all went a little pear shaped. Many bad words were spoken.
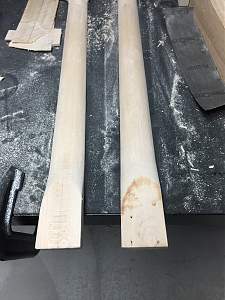
The upshot is, I was a little too impatient in thinning the headstock. Rather than considering what need to happen and the likely pitfalls and issues, I charged off and tried to take a lengthwise cut down the rear of the head to thin it out from 3/4" to the standard 1/2".
The Ryoba saw I was using deflected because I was effectively cutting through three divergent grain patterns at once. I tried to correct for this, instead of stopping and rethinking and this is what I have ended up with. All my efforts did was cause more of a bow in the cut and digging it in harder to the meat of the head stock. I probably would have been better off trying to rout that extra 1/4" off and shaping from there.
This was always an exercise in the exercise of building a neck. Given that the fundamentals of the thing are still sound, i am going to push ahead and install a truss rod and a fingerboard purely to gain the additional experience of mounting a TR, cambering a FB, fretting and possibly inlay. It is entirely possible that this will end up looking schmick, bar the obvious cock up, but i can't see machine heads mounting to it properly, and i'd imagine that if I did manage to get them on there, the head section would part company from the rest of it pretty damn quick under tension.
It goes back to what DB always says, don't rush.
I rushed. Oops and other associated bad words.
FrankenLab:
Turning tone wood into expensive sawdust since 2016!
 Posting Permissions

 Reply With Quote