Page 15 of 26 FirstFirst ... 5 13 14 15 16 17 25 ... LastLast
Results 141 to 150 of 258

Thread: NON-PBG - LP Build Diary for DIY Guitars GLP-40BBK

Hybrid View

Previous Post Previous Post   Next Post Next Post
  1. #1
    Quote Originally Posted by gavinturner View Post
    If you are applying the conductive shielding paint wth a brush you could get away with not masking at all. Personally if you want to mask I would get some low tack painters tape. It will be very gentle on the TO. I use the light green stuff from BEAR. What were you thinking of finishing with the CA glue? It is used here on various builds all the time.

    cheers,
    Gav.
    Thanks for tip Gav but I think I will mask just to be safe.

    With the glue I just remember reading somewhere on the net it wasn't a good idea.

  2. #2
    Overlord of Music gavinturner's Avatar
    Join Date
    May 2013
    Location
    HOLGATE NSW
    Posts
    3,057
    The fretboard on lots of fretless necks are finished here with CA glue to give them strength and shine.

    cheers,
    Gav.
    --
    Build #01: BC-1
    Build #02: ST-1
    Build #03: JR-1DC
    Build #04: ES-2V
    Build #05: ESB-4 (GOTM July 2014)
    Build #06: RC-1
    Build #07: MK-2
    Build #08: TLA-1
    Build #09: JR-1DC
    Build #0A: LPA-1
    Build #0B: STA-1 (GOTM April 2015)
    Build #0C: MKA-2
    Build #0D: LP-1M
    Build #0E: JB-1
    Build #0F: FS-1

    Find me:
    https://www.facebook.com/firescreek.guitars/
    http://www.guitarkitbuilder.blogspot.com.au/

  3. #3
    Quote Originally Posted by gavinturner View Post
    The fretboard on lots of fretless necks are finished here with CA glue to give them strength and shine.

    cheers,
    Gav.
    Oh ok cool, I'll have a look into them. Something I might consider after a few more practice builds first haha.

  4. #4
    Just thought I would give an update and show some of the headstock designs I have come up with.

    Click image for larger version. 

Name:	headstock1.png 
Views:	617 
Size:	22.4 KB 
ID:	12426

    Click image for larger version. 

Name:	headstock2.png 
Views:	624 
Size:	58.0 KB 
ID:	12427

    Click image for larger version. 

Name:	headstock3.png 
Views:	619 
Size:	59.8 KB 
ID:	12428

  5. #5
    ....and a few more.

    Click image for larger version. 

Name:	headstock4.png 
Views:	628 
Size:	59.2 KB 
ID:	12429

  6. #6
    GAStronomist wazkelly's Avatar
    Join Date
    Aug 2015
    Location
    Caloundra West, Sunshine Coast Qld
    Posts
    6,631
    Headstock shapes look interesting and like one on the left immediately above or very top right in panel showing 8 images.

    With CA glue I am using it to finish off a fretless neck and very fiddly indeed plus highly toxic fumes that makes your eyes water, well at least that is how it affected me. Have run out of TO and need to do a touch up spot on one of my axes where top was accidently scorched with a soldering iron. The CA comes up clear and in a small area might be OK but would never recommend over a large area such as a guitar body as it does not dry completely flat and smooth and requires extremely delicate wet sanding to start the polishing process.

    Had left things for over a week and last night thought I had it done but on the final 12,000 micro mesh sandings I noticed it was starting to go through around 2nd fret....ARRRGGGHHHH. Another touch up, then another light sand tonight plus apply a bit more to just the whole area of that 2nd fret block hoping it will dry pretty smooth and flat overnight. Looks great all polished up but damn hard to get it all looking perfect and not slightly sand through. Unfortunately those areas will not take the final car polish as too close to the bare wood.

  7. #7
    Quote Originally Posted by wazkelly View Post
    Headstock shapes look interesting and like one on the left immediately above or very top right in panel showing 8 images.

    With CA glue I am using it to finish off a fretless neck and very fiddly indeed plus highly toxic fumes that makes your eyes water, well at least that is how it affected me. Have run out of TO and need to do a touch up spot on one of my axes where top was accidently scorched with a soldering iron. The CA comes up clear and in a small area might be OK but would never recommend over a large area such as a guitar body as it does not dry completely flat and smooth and requires extremely delicate wet sanding to start the polishing process.

    Had left things for over a week and last night thought I had it done but on the final 12,000 micro mesh sandings I noticed it was starting to go through around 2nd fret....ARRRGGGHHHH. Another touch up, then another light sand tonight plus apply a bit more to just the whole area of that 2nd fret block hoping it will dry pretty smooth and flat overnight. Looks great all polished up but damn hard to get it all looking perfect and not slightly sand through. Unfortunately those areas will not take the final car polish as too close to the bare wood.
    Ok thanks for your input wazkelly,

    Ouch. That sounds like you have a bit of work to do. I'm sure you will get it sorted. I think I'll wait before I'm going to do the CA and do a few builds first.

    12000 micro mesh says allot to me with this build. I'm taking your advice and putting about 10 coats of TO on, 1500 wet and dry sand back and repeat. She's already starting to look very shiny.

    The soldering iron, well I won't ask. I just know when I do soldering that's when it turns bad for me. Practice first for me.

    Cheers,

    Alkay

  8. #8
    Ok so I should have done this before I posted those pics. I would be interested in everyone's input on here with the number of choice. It's a personal preference but I would be interested to know.

    Click image for larger version. 

Name:	headstock1.png 
Views:	361 
Size:	29.1 KB 
ID:	12437

    Click image for larger version. 

Name:	headstock2.png 
Views:	343 
Size:	72.3 KB 
ID:	12438

    Click image for larger version. 

Name:	headstock3.png 
Views:	355 
Size:	76.9 KB 
ID:	12439

    Click image for larger version. 

Name:	headstock4.png 
Views:	353 
Size:	75.1 KB 
ID:	12440

    Cheers,

    Alkay.

  9. #9
    GAStronomist wazkelly's Avatar
    Join Date
    Aug 2015
    Location
    Caloundra West, Sunshine Coast Qld
    Posts
    6,631
    9 & 2 as mentioned before.

    Here area couple of shots of the neck after using CA and micro mesh to 12,000 but no polish just yet. You can see the touch up eats away a lot around the affected area and to clean up I will start very lightly with 2,000 wet and then move on to 6,000 then 8,000 up 12,000 micro mesh pads. Requires a lot of patience.
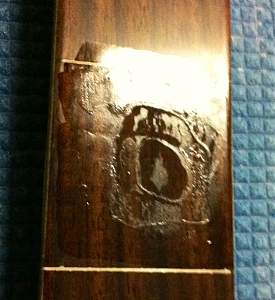
    Click image for larger version. 

Name:	neck.jpg 
Views:	344 
Size:	162.6 KB 
ID:	12441Click image for larger version. 

Name:	Neck close-up.jpg 
Views:	343 
Size:	250.1 KB 
ID:	12442

  10. #10
    Overlord of Music Andy40's Avatar
    Join Date
    Oct 2015
    Posts
    3,913
    I think 5 looks good and is unique
    Build #1 - ST-1 - Completed
    Build #2 - LP-1SS - Completed
    Build #3 - TLA-1R - Completed
    Build #4 - SGD-612 - Completed
    Build #5 - ES-1G - Completed
    Build #6 - STA-1HT | Completed
    Build #7 - ST1JR - Completed
    Current Build #8 - JBA-4
    Build #9 - Semi-scratch build Tele x 2 - Completed
    Current Build #10 - PRS-1H
    Current Build #11 - AGJR-1 - Completed
    Current Build #12 - ATL-1SB
    Current Build #13 - GST-1
    Current Build #14 - FBM-1

Page 15 of 26 FirstFirst ... 5 13 14 15 16 17 25 ... LastLast

Tags for this Thread

Posting Permissions

  • You may not post new threads
  • You may not post replies
  • You may not post attachments
  • You may not edit your posts
  •