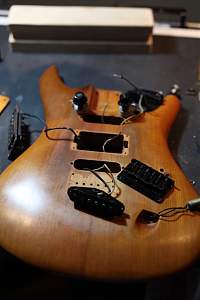
The majority of me is saying 'that is one lovely looking guitar' The slightly OCD part of me is saying 'cut those loose string ends off NOW!'![]()
Have to agree, negative points for not trimming string ends Zandit.
# 1 - EX-5 https://goo.gl/fQJMqh
# 2 - EX-1 https://goo.gl/KSY9W9
# 3 - Non PBG Tele https://goo.gl/W14G5g
# 4 - Non PBG J Bass https://goo.gl/FbBaFy
# 5 - TL-1AR GOTM Aug 2017 https://goo.gl/sUh14s
# 6 - MMB-4 Runner-up GOTM Oct 2018https://goo.gl/gvrPkp
# 7 - ES-1 Runner-up GOTM Aug 2018https://goo.gl/T9BEY8
Damn, harsh criticism from the gallery!!! Haha, yes they have been trimmed, that photo is one of the originals after I put it all together.
It still has the original Chinese strings on it, as the Ernie balls that came with the kit had some surface rust on the G-string, and no-one likes a rusty G-string!!!
Edit: Apparently I'm a Mentor now..........I don't think I'm ready for that responsibility!!!![]()
Last edited by Zandit75; 15-11-2016 at 03:32 AM.
Acoustics:
1995 Maton EM725C - Solid 'A' Spruce Top, QLD Walnut B&S, AP5 Pickup
2015 Ibanez AEL108MD-NT - Laminated Spruce top, Laminated Mahogany B&S, Fishman Sonicore Pickup
Electrics:
Pitbull LP-1S - http://www.buildyourownguitar.com.au...ead.php?t=5745
Carsen Superstrat Rebuild - http://www.buildyourownguitar.com.au...ead.php?t=6284
Builds in Progress:
Silent Guitar Semi-Scratch Build - http://www.buildyourownguitar.com.au...ead.php?t=6809
MMM so it appears they were Famous last words.
x
After giving the Resin a week or so to sure, I have found that there are a couple of issues.
#1. Part of the curing process is an exothermic reaction, as the resin sets up it heats, and the resultant heat caused distortion in my moulding blank. To be fair to the resin, the blanking sheet was just a fairly thin piece of takeaway container. This in turn led to an uneven surface as illustrated below:
The more eagle eyed among you will also spot that the resin has also retreated slightly from the left hand edge of the mould leaving a low spot. As you can see from the test sanding, there is a significant well in the centre form the distortion and the shrinkage.
#2. Also a normal occurrence from the resin is shrinkage on cooling. As the Resin sets up its normal exothermic reaction causes some minor expansion the flip of this being as it cools and finally cures, it experiences a bit of shrinkage (and we've all been there before, its not the end of the world and things expand again with a raise in temperature), not so for the resin. The shrinkage in my test blocks was accommodated by the open top of the respective moulds, the pour in those was somewhat more generous in depth than in my wooden mould so I ended up with this:
Once again those with eagle eyes will observe the nice dark line of adhesion stops right at the upper end of the photo and you have a clear section of resin cracked away from the edge.
So, what to do? I can get around the surface shrinkage, buy simply building a dam around the edge of the pour hole and pouring a bit deeper. This would mean a lot more work to scrape and sand back, and it wouldn't necessarily fix the shrinkage at the edges issue.
Given that there was a lots of rough surface for the resin to bind to in my little ply mould, the resin actually cracked through itself, rather than simply pull away from the mould. Given that both the Matai and the Merbau that border the pour area are quite smooth and close pored, this may cause the resin to simply let go.
A bit stuck at the moment, so if anyone has any clever ideas or alternative fill methods I'd welcome the input.
FrankenLab
Hand crafting guitars, because Death Rays are expensive.
good old fashioned car bog as a final filler. Bog! the prop makers friend!
Build 19 PSH-1 Kustom
Build 18 HB-4S Kustom
Build 17 WL-1 Kustom
Build 16 TL-1TB Kustom
Build 15 PBG-2-
Build 14 FTD-1
Build 13 RD-1 Kustom
Build 12 DM-1S
Build 11 MKA-2 -
Build 10 Basic strat
Build 9 JM Kustom
Build 8 FV-1G
Build 7 ES-2V
Build 6- Community prototype
Build 5 LP-1LQ
Build 4 ES-5V
Build 3 JR-1
Build 2 GD-1
Build 1 TLA-1
I've got two ideas.
1) Make a mould of the cavity, resin fill that, then glue the resin in place with epoxy. But first I'd see how well the resin takes to being drilled and screwed, The pressure from the screws could cause it to crack.
2) Work on a piece of wood until it fits as well as you can get it into the cavity. Glue it in place, and then fill and remaining cracks with filler.