You got the year right, but nope, they're for a 100 series V8 Landcruiser - the Double Island Point Express!
You got the year right, but nope, they're for a 100 series V8 Landcruiser - the Double Island Point Express!
first build PRS-1TS in progress...
http://www.buildyourownguitar.com.au...ead.php?t=4937
second build PRS-1Q in progress...
http://www.buildyourownguitar.com.au...ead.php?t=4956
Toyota keys of that era all looked pretty much the same before they migrated to central locking buttons in the key rather than on a fob.
I like having them separately. I can put the key in my boardshorts or wettie when I go for a surf. Can't do that with my missus' Subaru.
first build PRS-1TS in progress...
http://www.buildyourownguitar.com.au...ead.php?t=4937
second build PRS-1Q in progress...
http://www.buildyourownguitar.com.au...ead.php?t=4956
So true, poor design strategy for lifestyle vehicles where chance of keys getting wet or drowned is quite probable.
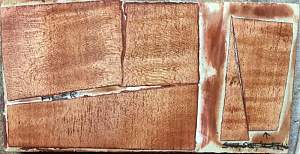
Here are the test results. Grain going up/down in all photos. I used FW 'Jarrah' proof tint stain as I'm almost out of DT stain coat.
On the samples with multiple coats, I sanded back with 400 between applications and after the final application.
First one; sanding sealer only. OK, but not ideal.
Left half, timbermate only. Right half, sanding sealer base with timbermate on top.
I reckon the timbermate sucks in too much stain and enhances the grain faults.
Timbermate base, sanding sealer on top. Better... but geez that timbermate sucks in the stain.
This one, the winner, has a base of sanding sealer, covered in thinned down natural timbermate, and another coat of sanding sealer on top.
In the following photo, I sanded everything back with 240 and applied some Nullarbor Ochre DT Intensifier, because I can't afford to waste a single drop of stain coat. The 'winning' sample is the one in the middle at the top.

Last edited by Muzza; 06-04-2016 at 09:16 PM.
first build PRS-1TS in progress...
http://www.buildyourownguitar.com.au...ead.php?t=4937
second build PRS-1Q in progress...
http://www.buildyourownguitar.com.au...ead.php?t=4956
Really, Tweaks? I have been doing business with them since they started and never had any issues..
Be interested to hear your experience with them via PM.
I assure you it will stay between you and I.
Yep. That's them. I won't be buying any veneer from them again in the near or distant future.
UNLESS... this works.
first build PRS-1TS in progress...
http://www.buildyourownguitar.com.au...ead.php?t=4937
second build PRS-1Q in progress...
http://www.buildyourownguitar.com.au...ead.php?t=4956
I thought so when I saw the results you were getting.
I haven't bothered trying to use the veneer I received from them as I could pretty much see the same thing happening to me, just by looking at quality of the 4 pieces of striped maple veneer at $9.90 a piece I received, and that was months ago, way before you posted.
You can't make a silk purse out of a sows ear.
Seems we both have both made the same mistake.
The two pieces of quilted maple veneer I also purchased were better, but still way over priced.
Have a look at their prices for inlay material, let's take Aus Green Lipped Abalone shell for example.... $7 a piece.
https://www.guitaraust.com.au/headst...-greenlip.html
Where you can buy 1 Oz of the same [10-12 pieces] for around $12
http://orders.mopsupplies.com/c/1785...p-abalone.html
Thats bad news Muzza about the veneer. Nice experiment though
Build #1 - ST-1 - Completed
Build #2 - LP-1SS - Completed
Build #3 - TLA-1R - Completed
Build #4 - SGD-612 - Completed
Build #5 - ES-1G - Completed
Build #6 - STA-1HT | Completed
Build #7 - ST1JR - Completed
Current Build #8 - JBA-4
Build #9 - Semi-scratch build Tele x 2 - Completed
Current Build #10 - PRS-1H
Current Build #11 - AGJR-1 - Completed
Current Build #12 - ATL-1SB
Current Build #13 - GST-1
Current Build #14 - FBM-1
I still haven't worked up the courage to attempt the headstock veneer again.
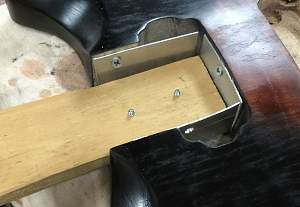
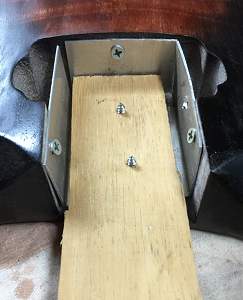
BUT... I've had one minor breakthrough... I've been envious of all the people with bolt on necks (on their guitars...) being able to screw a lump of wood into the neck socket - enabling them to work on both sides of the guitar at the same time. I have come up with a solution for us poor set-neck cousins.
I shaped a bit of scrap aluminium into a box shape, screwed that to the lump of wood (neck substitute) and then screwed through the aluminium box's sides into the guitar body's neck socket sides and one at the pickup end.


Last edited by Muzza; 13-04-2016 at 06:38 PM.
first build PRS-1TS in progress...
http://www.buildyourownguitar.com.au...ead.php?t=4937
second build PRS-1Q in progress...
http://www.buildyourownguitar.com.au...ead.php?t=4956