Page 11 of 15 FirstFirst ... 9 10 11 12 13 ... LastLast
Results 101 to 110 of 156

Thread: The Frankencaster

Hybrid View

Previous Post Previous Post   Next Post Next Post
  1. #1
    Member
    Join Date
    Jan 2021
    Location
    North Perth, Western Australia
    Posts
    96
    And a few more

    Click image for larger version. 

Name:	CED062F5-E13F-44C4-AD6A-9CDAA2ED0CF8.jpeg 
Views:	149 
Size:	295.8 KB 
ID:	39666


    Click image for larger version. 

Name:	52585C84-0E96-4C0B-B1B3-582FFDB45B6C.jpeg 
Views:	183 
Size:	199.3 KB 
ID:	39667

  2. #2
    Member
    Join Date
    Jan 2021
    Location
    North Perth, Western Australia
    Posts
    96
    Well. The colour change works. Not sure whether to get another can and do a few more coats.

    Not exactly how I envisaged it but still a pretty good result.

  3. #3
    Member Groovyman32's Avatar
    Join Date
    Feb 2021
    Location
    Reading, UK
    Posts
    256
    Wowsers - that is an awesome result! Great work. Love it

    John Mayer is on the phone - he wants his guitar back.


    Sent from my iPhone using Tapatalk

  4. Liked by: OliSam

  5. #4
    Member
    Join Date
    Jan 2021
    Location
    North Perth, Western Australia
    Posts
    96
    Quote Originally Posted by Groovyman32 View Post
    Wowsers - that is an awesome result! Great work. Love it

    John Mayer is on the phone - he wants his guitar back.


    Sent from my iPhone using Tapatalk

    It’ll cost him!!!!

    Thanks, groovyman!

  6. Liked by: Groovyman32

  7. #5
    Overlord of Music McCreed's Avatar
    Join Date
    Oct 2018
    Location
    AUS
    Posts
    3,552
    Very cool! Nice effect.

    Not sure whether to get another can and do a few more coats.
    If you're happy with the coverage you have now, and there's no runs, spatter or anything that needs fixing, I'd just start your clear coat.
    Making the world a better place; one guitar at a time...

  8. #6
    Member
    Join Date
    Jan 2021
    Location
    North Perth, Western Australia
    Posts
    96
    Quote Originally Posted by McCreed View Post
    Very cool! Nice effect.


    If you're happy with the coverage you have now, and there's no runs, spatter or anything that needs fixing, I'd just start your clear coat.

    I did respray and had a minor hiccup near the input jack hole. I think it will be easily fixable. As my son reminded me last weekend...don’t let the perfect be the enemy of the good.

    Clear coat in a week or so when this has had a chance to completely outgas and cure/dry.

  9. #7
    Mentor dozymuppet's Avatar
    Join Date
    Jun 2020
    Location
    Perth, WA
    Posts
    842
    That's very on the rad side, Eponymous.

    When I zoomed in and saw a couple of the areas that you're probably thinking need more work, I was thinking "woah, that looks like some sort of retro synthwave relic". Do with that what you will...

    Sent from my Pixel 4 using Tapatalk

  10. Liked by: Eponymous

  11. #8
    Member
    Join Date
    Jan 2021
    Location
    North Perth, Western Australia
    Posts
    96

    The second spray can

    Thanks for the feedback, everyone. It was looking pretty good, when it dried but I had decided to do another can’s worth of paint over the top to try and get a deeper, richer colour. Delay in updates is because the paint takes a while to get here. It duly arrived during the week and this morning was putting much heavier (medium to wet coats, as the instructions say) on.

    The end result looks like this.

    Click image for larger version. 

Name:	E50C7128-43C0-4E8F-884F-DFAF0DABB023.jpeg 
Views:	179 
Size:	352.0 KB 
ID:	39853

    Click image for larger version. 

Name:	DE5345AE-0B5D-4587-BC23-800C5E3037B7.jpeg 
Views:	229 
Size:	348.5 KB 
ID:	39854

    Click image for larger version. 

Name:	CC426F95-0D24-4C4C-BD6A-8A278C2B0389.jpeg 
Views:	200 
Size:	352.1 KB 
ID:	39855

    Click image for larger version. 

Name:	2C8DD95F-D2DA-40DF-9231-310F4DC3A7BB.jpeg 
Views:	252 
Size:	337.1 KB 
ID:	39856

  12. #9
    Member
    Join Date
    Jan 2021
    Location
    North Perth, Western Australia
    Posts
    96

    A little bit of bling.

    And because every guitar deserves some bling.....


    Click image for larger version. 

Name:	EAD88A28-2F8A-4D7C-A06A-8426C1201438.jpeg 
Views:	212 
Size:	288.5 KB 
ID:	39861
    Last edited by Eponymous; 27-03-2021 at 06:16 PM.

  13. #10
    Member
    Join Date
    Jan 2021
    Location
    North Perth, Western Australia
    Posts
    96

    The ups and downs of making stuff

    While I haven’t put anything up for a while, I have been doing things. I had been waiting for some things to come in..namely, my topcoat and some retarder and the spray gun kit I ordered. The spray kit is apparently in Australia but tracking doesn’t seem to be working properly, so I’m hoping it will turn up next week.

    In the meantime, I have worked on the neck, fitting my bling, which is epoxied at the front and screwed in from the back. It won’t be going anywhere. I’ve also installed the tuners. I haven’t set the heights properly yet (they are variable height) to get my break angle over the neck properly done.

    The neck is looking like this.

    Click image for larger version. 

Name:	34DC7039-8FD4-4F00-9024-1DFD5378A259.jpeg 
Views:	540 
Size:	291.8 KB 
ID:	40060

    And the tuners specifically like this

    Click image for larger version. 

Name:	DA6C9045-8D6F-4FEE-B137-187F7370778F.jpeg 
Views:	553 
Size:	303.3 KB 
ID:	40061

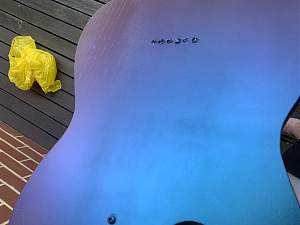
    In the meantime, I had another can of the colourshift paint, so I decided to give it another coat to do a richer finish.

    It now looks like this.

    Click image for larger version. 

Name:	1A32D3EA-01C4-4411-825C-712EC66E0F3F.jpeg 
Views:	518 
Size:	313.3 KB 
ID:	40062

    Except for the tiny detail that, it dropped onto the floor (and some pedals stored on the floor, conveniently directly under the drying guitar).

    The result was this.

    Click image for larger version. 

Name:	6DD58E2D-012C-4421-BDDB-E9EFE364B5A7.jpeg 
Views:	540 
Size:	243.0 KB 
ID:	40063

    Soo.....damn.

    I have more of the base coat and will order another can of the colourshift. That will take 10 days or so to get here, so...when the body is properly dry, I will sand back the affected areas and reapply the black base coat....then spray and spray again to go back to what it should look like.

    I’m pretty happy with the colour now though, so I have something to aim for.

    Still upside down photos. I keep rotating and rotating them in edit mode and they still come out upside down! Wtf is going wrong.

    Anyway, I guess that is the least of my problems today.

    I guess it is another chance to get things right.....

Page 11 of 15 FirstFirst ... 9 10 11 12 13 ... LastLast

Posting Permissions

  • You may not post new threads
  • You may not post replies
  • You may not post attachments
  • You may not edit your posts
  •