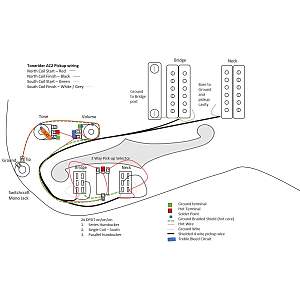
One more question. I did a test applying my water slide decals after 4 layers of tru-oil and getting the headstock nice and smooth with a 2000 wet and try sand. Applied the decal which went on nice and smooth but the clear bits of the decal are slightly cloudy hence I could never bury.
Could it be sloppy application on my part or the truoil is not smooth enough yet or possible not cured enough ???
Sent from my iPhone using Tapatalk
Cloudiness is usually a sign of moisture. That's why if you spray lacquer or poly when the humidity is too high, you'll get what's called "blushing".
I haven't done waterslide decals on headstocks for a long time, but when I use to, I would allow it to dry for 24 hours. Sometimes under a 60w desk lamp depending on ambient temperature/humidity.
Making the world a better place; one guitar at a time...
Good tip Trev!A quick test to check if cloth is lint free is to add some clear tape, press it down hard and then remove it. If very few fibres are removed it is Good cloth.
I'll put that one in "The Book"!
Making the world a better place; one guitar at a time...
Sorry, I thought you meant the decal was cloudy after having Tru Oil applied over it. It could still be a moisture issue reacting with the TO under the decal.Thanks for confirming ! Heading off on holiday for a week so it will have a good 4-5 days to cure
TBH, I'd peel it off and start again. 4 coats of TO is bugger-all really. I would apply as many coats as it takes to start to develop a level of gloss and then re-apply the decal.
Making the world a better place; one guitar at a time...
I normally apply my decals onto a glossy surface. If you have a 2000 grit flat finish, then the sanded finish will be trapped under the decal. TruOil over the top will make the surrounding area shiny again, but light passing through the clear decal will be diffused and it won’t look the same. If you can sand it flat to 2000, then apply a 50/50 thinned with turps layer on top which should give a decent gloss coat to apply a decal on. Alternatively wait a few days and just polish the area under the decal to a shine.
Also check that your decal printing method isn’t causing the issue. I tried converting my design from my graphics program to a pdf as it was easier to scale, but in converting, the clear area became covered in a layer of very fine dark dots, so I had to stop doing that.
And put a couple of layers of TruOil on the decal first before applying it. Then cut around the outline of the decal as closely as possible. It makes it so much easier to put on without the decal folding or creasing.
Thanks Simon - all makes sense. Will spend the next couple of days building up my base with a gloss coat then leave whilst going on holiday. I like the idea of coating the decal to hold its shape as experimented with cutting around the shapes and found they just folded on themselves so hope your trick works for me.
When printing i went back and fwd with the printer as I had to supply vector / illustrator files with no background and fonts outlined etc.
Sent from my iPhone using Tapatalk
My first build is certainly a learning process. Whilst sanding back try-oil blemishes I have managed to sand through both my headstock finish and body back creating a lighter spot. Luckily it is quick sand back, restrain and start tru-oil process again.
Also discovered how thin the binding is on the horns which needed to be touched up with some satin white model enamel.
Off on holiday for a few days which will let the tru-oil harden up nicely ready for applying decals and smoothing the body finish ready for the next 15 or so tru-oil coats. There is quite a bit of grain to file on the front where I (tried to ) remove glue marks that would appear to gave soaked through the veneer and was not removable in the end.
Sent from my iPhone using Tapatalk