
Hanging for an update dude, I really want to see how this neck is going to set up with your mods.


Hanging for an update dude, I really want to see how this neck is going to set up with your mods.

Great work on the inlays and the neck fix, some great tips there.
Stan's LP Build for my Sister: http://www.buildyourownguitar.com.au...ead.php?t=3146
Benson Pickup Strat mod: http://www.buildyourownguitar.com.au...ead.php?t=5229
Epiphone LP headstock fix: http://www.buildyourownguitar.com.au...ead.php?t=3410
Martin Backpacker Repair: http://www.buildyourownguitar.com.au...?t=5038&page=3
'57 Harmony Jazz guitar project: http://www.buildyourownguitar.com.au...ead.php?t=2972

Well if I didn't mention it in this build diary, I would have done in my Es-1 diary,..... lot's of experimentation, and far from small mod's to both builds....actually some new huge mod's contemplated for this ES-3 build ATM.Originally Posted by FrankenWashie

I'm not going to go with a stud bridge mount, which is standard with this build ...
As well as the new binding supplies received it the post yesterday were two new new hardware changes, one for each build.
The change for the ES-3 build is a Ebony Archtop bridge, for the Tunematic bridge piece I have used from the ES-1G kit.
I'll plug the existing bridge plug holes with some Maple headstock veneer I have over from extending the heel stock, on both guitars.
Weekend ahead ...guitar progress planned , if it eventuates as planned, who knows.
OK, since you are hanging, Ill work on the ES-3 neck ...it will be my weekend project.
Last edited by Tweaky; 26-02-2016 at 02:55 PM.

nice tutorial Tweaky and love the new fret inlays can't wait to see how they look.
I've had one of these kits for over a year, trying to clear the backlog and may start one day !
Current Builds and status
scratch end grain pine tele - first clear coat on !
JBA-4 - assembled - final tweaks
Telemonster double scale tele - finish tobacco burst on body and sand neck
Completed builds
scratch oak.rose gum Jazzmaster - assembled needs setup
MK-2 Mosrite - assembled - play in
Ash tele with Baritone neck - neck pup wiring tweaks and play in
Sweet, I have that arrangement on my Eastman, has given good service.
I'm not 100% happy with this bridge..... to put it bluntly ... it's a wuss , it has little mass...which is needed.
Seems I'm going to have to mod this as well... sorry, I'm a OLD pedantic fart that actually knows why this bridge ATM won't cut it.
I also know how to fix it.
OK, what's happened since my last update.
Well I added mass to that floating bridge by cutting some 2mm veneer to shape and filled in the underneath of the bridge, it's a lot more solid know.
I put some sandpaper on the top of the guitar and shaped the underneath of the bridge so it followed the contour of the guitars top.
While I was doing this filly stuff, and cutting the pearl inlay for the neck, I decided to tryout making some wood string trees for the Gibson style Tune o matic bridge.
It worked out quite well, problem was as I found out later, that the kit supplied tune o matic had different mounting hole diameter and spacing to the floating bridge, so I had to replace that for the proper type, a Gotoh one, which upon trying to remove the screws to put the wood string trees on, I found I couldn't remove as Gotoh has put some for of Loctite on the nuts, not wanting to ruin the bridge I've left it standard.
Here's a photo of the neck in it's original Rosewood, but with the standard plastic inlays now replaced with mother of pearl.
As reported earlier, my body had developed some veneer cracking on the top bout of the body where it meets the neck.
I tried gluing this down, with limited success, so I made a small peice of wood to cover this craking, which would also cover the gap left when gluing the neck to body at that point.....unfortunately, when I glued this small bit on, it must of moved slightly when clamping, it wasn't perceptible at the time, and I continued on and started to put the Blonde shellac finish over it, thankfully only one coat before I discovered it out of whack when seeing what the build was looking like with the neck on.
Anyway, having used Titebond, I just hit it with a heat gun to remove it and re glue it....MISTAKE
Shellac doesn't like heat guns, and burns.....it turn the small bit of wood dark brown and burn part of the top......to cut a long story short, I had to make a large piece to cover [checking fit with neck on first ], this is what you see in the photo below.
I sanded the whole body back, and re did the finish, which was easy to do, and turned out well in the end.
only 3 photos per post allowed...to be continued
looking good Tweaky. The pearl fret marker inlays look good. You can upload 5 photos per post, once you upload the first 3 pics it allows you to upload 2 more pics.
Current Builds and status
scratch end grain pine tele - first clear coat on !
JBA-4 - assembled - final tweaks
Telemonster double scale tele - finish tobacco burst on body and sand neck
Completed builds
scratch oak.rose gum Jazzmaster - assembled needs setup
MK-2 Mosrite - assembled - play in
Ash tele with Baritone neck - neck pup wiring tweaks and play in
So the body turned out fine.
Here's a picture of the back, it's just straight Blonde shellac....you can also partially see to the right of the body the neck, now with it's frets removed, and it's fingerboard dyed Black with Indian Ink.
Here is a mock up of the guitar as it stand now.
As you can see I had plugged the bridge post holes with some 2mm wood veneer and some wood filler to level it out, as this build was having a floating bridge.
The pickup's are kit supplied ones from my ES-1 build, they aren't the ones going to be fitted to this [Kinman humbuckers in Gold], it's just to see the overall look so far..... I think I'll change the colour of the pickup rings to either Black or Gold.
I bought the Gold finger tailpiece after finding the other Gold replacement one I bought not really to my liking [same as one that comes with ES-3 kit, but in Gold]
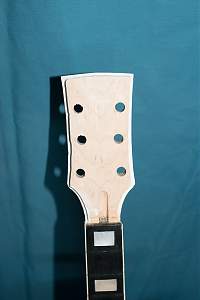
All was looking good with this build [apart from me taking so long with it] that was until the headstock binding router mess up.
Here's what it looks like ATM, I'm hoping it can be salvaged and made to look decent.
Going to try removing the current wod filler and placing stripes of 2mm wood veneer in it's place.....stuff happens.
If it doesn't turn out this build might as well be scrapped, and another of the same kit order to start over again....no point putting a lot of expensive replacement hardware on it.
the mock build is coming along nicely Tweaky, so I presume you removed the frets to do the pearl inlay work ? Are you re-fretting with the same gauge frets ?
wow that headstock needs some work, hope the strips of veneer can save it !
I like the finger trapeze looks cool
Current Builds and status
scratch end grain pine tele - first clear coat on !
JBA-4 - assembled - final tweaks
Telemonster double scale tele - finish tobacco burst on body and sand neck
Completed builds
scratch oak.rose gum Jazzmaster - assembled needs setup
MK-2 Mosrite - assembled - play in
Ash tele with Baritone neck - neck pup wiring tweaks and play in
 Posting Permissions

 Reply With Quote

