
This arrived yesterday. Something about the simplicity of a slab of wood with P90s.


This arrived yesterday. Something about the simplicity of a slab of wood with P90s.

Yes agree Blueshound, I'm also rather partial to the simplicity of this style guitar. Nice looking kit!
How snug is the neck joint?
Sent from my GT-I9506 using Tapatalk
Current Projects
#Planning 5 String Bass
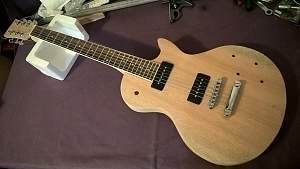
Finished the Guitar


Looks great Emily, so that looks like a flame maple veneer ? How does it sound and did you use the stock hardware ?
Current Builds and status
scratch end grain pine tele - first clear coat on !
JBA-4 - assembled - final tweaks
Telemonster double scale tele - finish tobacco burst on body and sand neck
Completed builds
scratch oak.rose gum Jazzmaster - assembled needs setup
MK-2 Mosrite - assembled - play in
Ash tele with Baritone neck - neck pup wiring tweaks and play in
It sounds great. I need to do a fret levelling though there are a couple of high frets.
The Tuners and the bridge is stock (Although I think the tuners will get an upgrade), the pickguard, control plate, knobs, pickups and electronics are not.
It is a flame maple veneer.

Hi Emily, looks great.
I bought one of these kits too and yet to get started and wondered if you encountered any glue spots or issues on the flame maple top?
How was the pickup route as most PBG forumites have mentioned the need to move about 5mm closer to neck for intonation purposes?
Cheers, Waz.
It had heaps of glue spots which I didn't notice till my first coat of stain. Goof off took most of the glue off. I found the cavity position fine.
The pickup routing and the control panel routing is fine if you use the stock pickups and electronics. I upgraded both and had to enlarge them slightly.
Thanks Emily. I suspected a few shinier spots I saw on first inspection of mine may end up being the dreaded glue and have bought some Goof Off in getting ready for that part of the build process. Good to hear standard positioning for bridge and controls was ok however I bought the Wilkinson PUP upgrade and yet to fully dry fit everything.
Just wondering what you used in your upgrades?
If it was off i wouldn't have noticed tbh. When I enlarged the cavities I made them bigger than I intended so if they were off I wouldn't have realised.
The upgrades were Tonerider Vintage Plus pickups and The electronics upgrades were this wiring kit here http://www.realparts.com.au/wiring-k...e-guitars.html.
The pick guard, knobs and control plate i just ordered from eBay.
Cool. How does it sound?
 Posting Permissions

 Reply With Quote