
Some wonderful grain in that body Andy! Great stuff.
cheers,
Gav.


Some wonderful grain in that body Andy! Great stuff.
cheers,
Gav.
--
Build #01: BC-1
Build #02: ST-1
Build #03: JR-1DC
Build #04: ES-2V
Build #05: ESB-4 (GOTM July 2014)
Build #06: RC-1
Build #07: MK-2
Build #08: TLA-1
Build #09: JR-1DC
Build #0A: LPA-1
Build #0B: STA-1 (GOTM April 2015)
Build #0C: MKA-2
Build #0D: LP-1M
Build #0E: JB-1
Build #0F: FS-1
Find me:
https://www.facebook.com/firescreek.guitars/
http://www.guitarkitbuilder.blogspot.com.au/

Thanks Gav, yeah i'm pretty stokedOriginally Posted by gavinturner

Build #1 - ST-1 - Completed
Build #2 - LP-1SS - Completed
Build #3 - TLA-1R - Completed
Build #4 - SGD-612 - Completed
Build #5 - ES-1G - Completed
Build #6 - STA-1HT | Completed
Build #7 - ST1JR - Completed
Current Build #8 - JBA-4
Build #9 - Semi-scratch build Tele x 2 - Completed
Current Build #10 - PRS-1H
Current Build #11 - AGJR-1 - Completed
Current Build #12 - ATL-1SB
Current Build #13 - GST-1
Current Build #14 - FBM-1
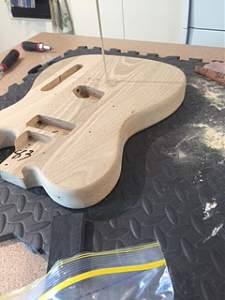
OK, bought a drill guide for about $30 on Ebay. Its ok I suppose for the $30, the reach of the arm is not long enough to drill the string through unless I pivot the base around and clamp it on the the body. Which is fine but I'm still going through beta testing on a thick scrap bit of wood.
My current plan is to attach the Wilkinson bridge, align the top E hole, punch it, clamp the press (when aligned), test then drill. repeat the same process for the bottom e hole, then for each string through.
Like I said thats the rough plan for my scrap bit of wood, I guess if I come up with any difficulties it will show up. If anyone has a better suggestion/tactic, please let me know.
Build #1 - ST-1 - Completed
Build #2 - LP-1SS - Completed
Build #3 - TLA-1R - Completed
Build #4 - SGD-612 - Completed
Build #5 - ES-1G - Completed
Build #6 - STA-1HT | Completed
Build #7 - ST1JR - Completed
Current Build #8 - JBA-4
Build #9 - Semi-scratch build Tele x 2 - Completed
Current Build #10 - PRS-1H
Current Build #11 - AGJR-1 - Completed
Current Build #12 - ATL-1SB
Current Build #13 - GST-1
Current Build #14 - FBM-1
I have also measured the scale length with the Wilkinson bridge on the body, squared it, and marked. Similar to Bungee, I have had to replace the adjustment screws that came with the Wilkinson with the PBG ones to get a bit more length.
I plugged the previous PBG bridge holes with Oak doweling and have sanded flat. (the smallest dowling I could get I think was 4mm and I still had to sand it a bit to get it to fit in the holes. I now have oodles of the Oak doweling so if you live in Brissy and you need some, just let me know.
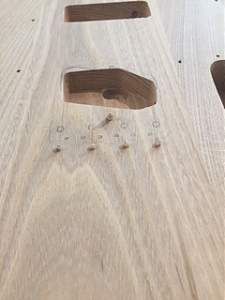
Anyhoo, I have a decision to make.
Where I have positioned the Wilkinson bridge (in the photo) is best for intonation of the guitar (ie a few mm play for intonation using the PBG adjustment screws).
However, it leaves the oak plugs well in view.
Alternatively, I could position the Wilkinson bridge so I just covers the holes, just like Bungee did http://www.buildyourownguitar.com.au...?t=4675&page=5
I am not sure if I need to though because I intend to stain the guitar a rosewood colour which may cover up the visibility of the plugs?
Any tips would be appreciated.
Build #1 - ST-1 - Completed
Build #2 - LP-1SS - Completed
Build #3 - TLA-1R - Completed
Build #4 - SGD-612 - Completed
Build #5 - ES-1G - Completed
Build #6 - STA-1HT | Completed
Build #7 - ST1JR - Completed
Current Build #8 - JBA-4
Build #9 - Semi-scratch build Tele x 2 - Completed
Current Build #10 - PRS-1H
Current Build #11 - AGJR-1 - Completed
Current Build #12 - ATL-1SB
Current Build #13 - GST-1
Current Build #14 - FBM-1
Hey Andy, in my experience no matter what colour the stain, the plugs will be highly visible. The plugs are all end grain and they soak up the dye really well. Might be worth pushing the bridge back but there doesn't look like there's much play left in the adjustment screws..
cheers,
Gav.
Last edited by gavinturner; 31-01-2016 at 05:45 AM.
--
Build #01: BC-1
Build #02: ST-1
Build #03: JR-1DC
Build #04: ES-2V
Build #05: ESB-4 (GOTM July 2014)
Build #06: RC-1
Build #07: MK-2
Build #08: TLA-1
Build #09: JR-1DC
Build #0A: LPA-1
Build #0B: STA-1 (GOTM April 2015)
Build #0C: MKA-2
Build #0D: LP-1M
Build #0E: JB-1
Build #0F: FS-1
Find me:
https://www.facebook.com/firescreek.guitars/
http://www.guitarkitbuilder.blogspot.com.au/
Thanks Gav, thats good advice. you're right there is not much left in the adjustment screws and I cant get longer screws as they are already too close to the pickup for my liking anyway. I would actually much prefer not to use the PBG screws given how close they are but that would require a big shift in bridge position.
I've ordered a custom colour from DB, rosewood (or as close as possible). I was going to drill and position everything while I was waiting for the "mad scientist" to work his magic, after what you said Gav, I am thinking maybe I should wait, stain it and see how visible the plugs are at that time. If they are visible, I drop the bridge back, if they aren't I'll just remeasure and position the bridge.
Build #1 - ST-1 - Completed
Build #2 - LP-1SS - Completed
Build #3 - TLA-1R - Completed
Build #4 - SGD-612 - Completed
Build #5 - ES-1G - Completed
Build #6 - STA-1HT | Completed
Build #7 - ST1JR - Completed
Current Build #8 - JBA-4
Build #9 - Semi-scratch build Tele x 2 - Completed
Current Build #10 - PRS-1H
Current Build #11 - AGJR-1 - Completed
Current Build #12 - ATL-1SB
Current Build #13 - GST-1
Current Build #14 - FBM-1

G'day Andy,
I used a Wilkinson bridge on this one and the screw holes were within a gnats nasty of the holes for the original bridge, are you absolutely sure you have yours in the correct spot
( disclaimer - this was not a PBG kit but probably came out of different door of the same factory )
@ Dave, Woah what a great tele! is that veneer on the headstock or stain (I cant tell from the photo). I was thinking of putting a veneer on mine but wasn't sure how it would come up with a natural colour maple neck. I think it looks awesome! You don't happen to have a build diary on that one?
I'm pretty sure on the measurements. I've also seen this issue on others' build diaries with the PBG kit. But double checking never hurt anyone.
Wokks mentioned once that even the PBG stock brigde (which is not string through and also longer) should be moved about 5 mm toward the neck to get it within range of good intonation and scale length.
Build #1 - ST-1 - Completed
Build #2 - LP-1SS - Completed
Build #3 - TLA-1R - Completed
Build #4 - SGD-612 - Completed
Build #5 - ES-1G - Completed
Build #6 - STA-1HT | Completed
Build #7 - ST1JR - Completed
Current Build #8 - JBA-4
Build #9 - Semi-scratch build Tele x 2 - Completed
Current Build #10 - PRS-1H
Current Build #11 - AGJR-1 - Completed
Current Build #12 - ATL-1SB
Current Build #13 - GST-1
Current Build #14 - FBM-1
For future reference, the original bridge setup, string holes are set similar to the American standard telecaster i.e forward of the mounting bolts, the latter also only having 3 anchor points not 4, this is the replacement bridge i use on the American standard Tele. it lined up perfect with the string holes and outer mount holes, you just need to drill 2 inner ones. The kit has 4 mounting holes it just may line up perfect.


Another part of the equation is the bridge pup rout, as it looks like you'll have to modify it a fair bit to fit the pup if you use the forward bridge position. And once you do that they'll be no going back, literally.
As Gav said, the end grain of plugs is pretty tough to hide. I'd recommend putting a few plugs into some scrap wood, something close'ish to body's wood colour, and testing the effect of the DT colour on the plugs vs surrounding wood before making a decision. It may be that embedding a bit of coloured Timbermate (coloured with DT stain, or actual rosewood dust) into the end grain of the plugs could help them to blend/match. Experiment before committing to irreversible changes to the body.
Edit: Also, with that type of 'drill press' frame the tensioning bolts tend to strip and slip, so beware. There can also be a fair amount of play and wander with the drill tip once you start drilling. Practice first on thick scrap wood, as accurate string-through holes are not easy. One thing that can sometimes work if you have an overhanging bench is to clamp the press to the overhang and have the workpiece/body on another bench under it, so you're not restricted by the press' throat depth. You would need a long drill bit and may even need to reverse the press by removing and inverting the press' handle/body on the shaft/pillar so the base is at the top of the shaft. If you can wrangle it into a useable position it could overcome some of its limitations. Another alternative is to mark the string through holes onto the body and then sit the press on the body but drill down through the hole in the centre of the press' base. Hard to do, but may be more stable.
Last edited by WeirdBits; 31-01-2016 at 12:50 PM.
Scott.
 Posting Permissions

 Reply With Quote