
Said with two fingers held up in the air...Originally Posted by wazkelly


Said with two fingers held up in the air...

yeah Waz and Swanny I remember the Hey Charger advert. Here's a reminder https://www.youtube.com/watch?v=50BJ9dTBGBw
I also remember a sticker on the later Chrysler models saying "Chrysler, don't follow the leader, drive it"
Last edited by wokkaboy; 18-01-2016 at 09:05 PM.
Current Builds and status
scratch end grain pine tele - first clear coat on !
JBA-4 - assembled - final tweaks
Telemonster double scale tele - finish tobacco burst on body and sand neck
Completed builds
scratch oak.rose gum Jazzmaster - assembled needs setup
MK-2 Mosrite - assembled - play in
Ash tele with Baritone neck - neck pup wiring tweaks and play in

Update
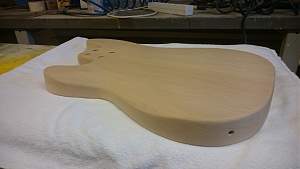
Got the pups aligned couple of days ago and then sanded and shaped the body with 60-120-180-240-320 grits. Now it would seem that the sanding part is mostly over.
The pups have a quite short string spacing - mainly the DM Model One since it's meant for the short scale narrow neck SG-type of bass. Therefore can't be perfectly aligned with the strings but that won't matter. What puzzles me is the DiMarzio's attachment - It's so high even when on top of scratchplate that adjusting it to match string volume is quite challenging. Not so sure it's even meant to be adjusted or what type of screws it usually comes with (bought it used and just received the pup). Could not find any pics online about the matter. The SD would seem to be ok.
Now it's scratchplate time (black plastic) and cutting a control plate out of a sheet of stainless steel (polishing afterwards). Placing these on the body and then on to finding a blend for the color.
Here's some pics so far:
looks excellent Arzi
can't wait to see some colour on. Will the orange and black be stained or solid paint ?
Hopefully you can work out the height of the DM pup. Best sort it out before you start staining/painting. Maybe the cavity needs to be deeper ?
Current Builds and status
scratch end grain pine tele - first clear coat on !
JBA-4 - assembled - final tweaks
Telemonster double scale tele - finish tobacco burst on body and sand neck
Completed builds
scratch oak.rose gum Jazzmaster - assembled needs setup
MK-2 Mosrite - assembled - play in
Ash tele with Baritone neck - neck pup wiring tweaks and play in
Hi
It will be stain. Still not sure if I'll do the burst - might be sweeter without just grain popped. That way the scratch plate would pop too and more orange would show as well as grain.
The cavity is deep enough but I was hoping I wouldn't have to make a cavity as big as the wider edges so that it would look cleaner around. Maybe if I just make the hole on the scratchplate bigger then it will be about 2mm lower and still quite clean looking. The edges are so much wider than the coils that it will look stupid if raised too much. We'll see...

Nice scratch build Arzi , looking forward to seeing this with colour.
Tony
Ok...
Today I got to make the scratchplate. Pencil and oven paper and on with it...
First I made a raw template, then few screw holes and attached it to the body. Then tidied the neck pocket area, drew lines for the neck pup with it screwed on the body and made the hole for it. tidied the edges all around to almost finished ( still have some to do). Now the neck pup is flush enough so it has just enough space for adjusting the height.
Here it is:
Next is the control plate for the pots and positioning it with the scratchplate. The plate is a little different shape than the original P51 cause the bridge pup is 1cm closer to the bridge than original and the control plate will be 1cm longer cause it's gonna hold 3 pots in stead of 2. Then again - it's not a perfect copy of the original and never was gonna be.
The control plate will be made from 2mm stainless steel plate and I'm gonna have to get some decent drill bits to be able to make holes on it. At the moment I don't have any. Will be back in a few days.
Looking good mate!!
one of my pet hates it cutting out scratch plates, i usually use a coping saw and files, but it can be a tedious job.

Good job Arzi. This is going to be great.
Current:
GTH-1
Completed:
AST-1FB
First Act ME276 (resurrected curb-side find)
ES-5V
Scratchie lapsteel
Custom ST-1 12 String
JBA-4
TL-1TB
Scratch Lapsteel
Meinl DIY Cajon
Cigar Box lap steel
Wishing:
Baritone
Open D/Standard Double 6 twin neck

Wow, looking good so far and really impressed with your skills shown on this scratchie.
 Posting Permissions

 Reply With Quote