
run your hand over it, and feel for bumps , divots and rougher spots. If it feels smooooth then you are probably there


run your hand over it, and feel for bumps , divots and rougher spots. If it feels smooooth then you are probably there
Stan's LP Build for my Sister: http://www.buildyourownguitar.com.au...ead.php?t=3146
Benson Pickup Strat mod: http://www.buildyourownguitar.com.au...ead.php?t=5229
Epiphone LP headstock fix: http://www.buildyourownguitar.com.au...ead.php?t=3410
Martin Backpacker Repair: http://www.buildyourownguitar.com.au...?t=5038&page=3
'57 Harmony Jazz guitar project: http://www.buildyourownguitar.com.au...ead.php?t=2972

Also check from all angles in daylight. Often small dents that can be easily sanded out only show up this way.
Current:
GTH-1
Completed:
AST-1FB
First Act ME276 (resurrected curb-side find)
ES-5V
Scratchie lapsteel
Custom ST-1 12 String
JBA-4
TL-1TB
Scratch Lapsteel
Meinl DIY Cajon
Cigar Box lap steel
Wishing:
Baritone
Open D/Standard Double 6 twin neck
Hey Ceasar welcome to the Gr1sf club! I built one a few months ago and had great results with the kit. Here is a few tips I picked up that would have been good for me to have in the back of my head as I built mine; one, have a clear plan from the get go. It is fun to take on the kit with a loose idea of what you want and then let it develop as it goes but that method is guaranteed to make it take twice as long. I know we enjoy the process but it can be frustrating to have some momentum going and then have to wait for a upgraded part wires tool etc. this plan should include your wiring schematic, for instance most forum users recommend braided push pull wire to help with the potential buzzing in the long wire runs, thats something you would have to upgrade from whats included with the kit. Also on that note if you are new to soldering try and spend 15 minutes with someone who is experienced just that amount of time could save you hours and help keep your sanity. (It took me a few tries to get my setup all wired correctly!) Two the forum is your guide. There is a ton of experience in here and everyone is helpful so don't hesitate to post questions you will get an answer back guaranteed! My last tip is pinch your output jack a little before you install to make it nice and tight. Mine is a little lose (I use a 90 degree cord and wrap it around the strap button so it stays in). last thing you want is to have it all working and then have to take it apart to tighten the jack! Have fun!
Aloha, Jeff

Welcome Ceasar! Great kit you have there and should be a great build. Keep us all up to date on progress. The forum is a great bunch of folks with friendly advice on tap. Hope to read about all your experiences and hear the final product.
cheers,
Gav.
--
Build #01: BC-1
Build #02: ST-1
Build #03: JR-1DC
Build #04: ES-2V
Build #05: ESB-4 (GOTM July 2014)
Build #06: RC-1
Build #07: MK-2
Build #08: TLA-1
Build #09: JR-1DC
Build #0A: LPA-1
Build #0B: STA-1 (GOTM April 2015)
Build #0C: MKA-2
Build #0D: LP-1M
Build #0E: JB-1
Build #0F: FS-1
Find me:
https://www.facebook.com/firescreek.guitars/
http://www.guitarkitbuilder.blogspot.com.au/
Looking forward to the build Caeser. Love the GR kits!

Cant wait to see how you go.
I'm hoping to get some time this weekend to put the neck and hardware on.


good stuff Beef always an exciting and rewarding part of the build to see how it looks with bling and neck in place.
Current Builds and status
scratch end grain pine tele - first clear coat on !
JBA-4 - assembled - final tweaks
Telemonster double scale tele - finish tobacco burst on body and sand neck
Completed builds
scratch oak.rose gum Jazzmaster - assembled needs setup
MK-2 Mosrite - assembled - play in
Ash tele with Baritone neck - neck pup wiring tweaks and play in
One more thing I wanted to mention about the Gr-1sf kit was the intonation and the placement of the bridge. I used the stock location and bridge and it was able to intonate correctly at the 12th fret. Perfect actually, until I put a thicker gage set of strings on. Then I was able to correctly intonate again at the 12th fret but the adjustment is basically maxed out. if you prefer thicker strings you might want to check the lengths or consider a floating bridge, which might mean plugging the existing holes. (just in case you wanted one more thing to sand)
Aloha, Jeff
Hi all, thanks for the feedback and just to keep everyone in the loop, coats done, next a bit disappointed when I ran the first final coat but I'll wait till is completely dry and use the steel wool supplied by Dingotone kit (Fantastic) so I'll try to upload some pics and any Ideas would be great.. So while I'll wait for the neck to dry (since Friday the 31st of last month) I've started with the electrical, and yep again stuck, worked out the tones and volumes pots, little I didn't realized there's a master volume pot, any diagrams that can help?
I'm also waiting for the Intensifying coat to dry and is looking good as far as smooth feels and not many or close to none grain spots, happy about that, I will post some pics soon.
So I hope I can upload those pics and get as much help as possible, both neck final coat and wiring.
Thanks in advance.
Hi again, I meant to say that I've applied the Intensifying coat to the back of the guitar body and happy so far, I haven't applied any to the front of the body yet so the front will be next soon when the back is dry, so here I have some picks, if anyone spots something not right please let me know.
Thanks in advance again everyone.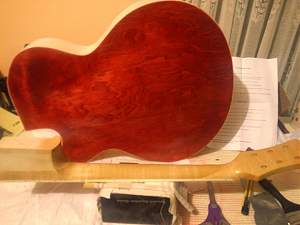
 Posting Permissions

 Reply With Quote