Page 3 of 13 FirstFirst 1 2 3 4 5 ... LastLast
Results 21 to 30 of 123

Thread: GR-1SF Stage Guitar

  1. #21
    Looking at wiring the insides got me seeing the insides of a lot of acoustic and semi-acoustic instruments.
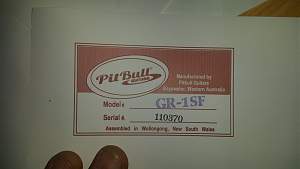
    I liked the way they keep the body clean of serial numbers and the like by using an internal sticker.
    The headstock has a different logo planned.
    So, other than another coat of stain, that I havent photographed, thats pretty much my progress for the week.
    Hopefully build the wiring harness this weekend.
    Click image for larger version. 

Name:	inner.jpg 
Views:	318 
Size:	20.8 KB 
ID:	3421

  2. #22
    Mentor kells80aus's Avatar
    Join Date
    Jan 2014
    Location
    Wyndham Vale, Vic
    Posts
    775
    SB,
    This thing is Far Are King HOT. I love the way the colour has come out. I love the way it has brought out the subtle grain in the Neck.
    For the Wiring, I'd go with Weirdies loom with the tone balance set up. It means you will have to spend %25 or so on a doulbe gang pot But I reckon it would be worth it.

    I am using a a different bridge set up to standard, but this is because I have already built the PIG(335 copy). so I already have the experience of the fixed post bridges and tremlos(Whammy bars, I am a little older than most on here).

    When you get to glueing the neck in just take care that it lines up. The PIG was about 15 mm out. this means the pickups aren't quite under the strings where they should be. That was due to inexperience with set necks. I've now done a few, unglued and reglued a few.


    Cheers PK
    Kellza
    (PK)
    "Jack of all trades, Master of None"
    "You'll never ever know if you don't have a go"

    https://www.facebook.com/PaulWKelly

    Avatar Image is a "The headstock of my first scratchy"

  3. #23
    I got some of the wiring one today, put the inner sticker in (my lady hands sometimes come in useful! I could get one arm fully inside the box through the neck hole), and the third coat of DT is on.
    Click image for larger version. 

Name:	suntan 1.jpg 
Views:	288 
Size:	70.4 KB 
ID:	3444
    Click image for larger version. 

Name:	suntan 2.jpg 
Views:	318 
Size:	79.4 KB 
ID:	3445
    Click image for larger version. 

Name:	suntan 3.jpg 
Views:	299 
Size:	75.7 KB 
ID:	3446
    Click image for larger version. 

Name:	inner label 2.jpg 
Views:	280 
Size:	33.6 KB 
ID:	3447

    Thanks for the heads up PK.. I will check the pick ups before going glue mad.
    I popped the neck in and checked the machine heads to bridge and the cotton threads sat nicely with about a 4mm gap from the edge of the neck all along, but I didnt think to check p/u placement.

    Too late on the wiring, Im half in!

  4. #24
    Mentor Nickosaurus's Avatar
    Join Date
    Mar 2014
    Location
    Adelaide
    Posts
    1,077
    Far out that neck is looking so pretty. Love the fade

  5. #25
    Overlord of Music kimball492's Avatar
    Join Date
    Feb 2013
    Posts
    2,079
    Looks really nice well done look forward to seeing her completed

  6. #26
    GAStronomist stan's Avatar
    Join Date
    Aug 2013
    Location
    Geelong, Vic
    Posts
    5,290
    nice work Beefy, this is looking really good

  7. #27
    Lurv that sticker, awesome touch.
    Scott.

  8. #28
    Overlord of Music Fretworn's Avatar
    Join Date
    May 2013
    Location
    Hornsby Area, Sydney, NSW
    Posts
    3,951
    Looking really good. Especially like how the back has turned out.
    Current:
    GTH-1

    Completed:
    AST-1FB
    First Act ME276 (resurrected curb-side find)
    ES-5V
    Scratchie lapsteel
    Custom ST-1 12 String
    JBA-4
    TL-1TB
    Scratch Lapsteel
    Meinl DIY Cajon
    Cigar Box lap steel

    Wishing:
    Baritone
    Open D/Standard Double 6 twin neck

  9. #29
    Overlord of Music gavinturner's Avatar
    Join Date
    May 2013
    Location
    HOLGATE NSW
    Posts
    3,057
    Looking great. Looking forward to seeing it assembled!

    cheers,
    Gav.
    --
    Build #01: BC-1
    Build #02: ST-1
    Build #03: JR-1DC
    Build #04: ES-2V
    Build #05: ESB-4 (GOTM July 2014)
    Build #06: RC-1
    Build #07: MK-2
    Build #08: TLA-1
    Build #09: JR-1DC
    Build #0A: LPA-1
    Build #0B: STA-1 (GOTM April 2015)
    Build #0C: MKA-2
    Build #0D: LP-1M
    Build #0E: JB-1
    Build #0F: FS-1

    Find me:
    https://www.facebook.com/firescreek.guitars/
    http://www.guitarkitbuilder.blogspot.com.au/

  10. #30
    GAStronomist wokkaboy's Avatar
    Join Date
    Dec 2012
    Location
    Perth WA
    Posts
    13,555
    that uluru red is looking sweet Beef. coming along really nicely.
    Did you make up the sticker yourself ? nice touch !
    Current Builds and status
    scratch end grain pine tele - first clear coat on !
    JBA-4 - assembled - final tweaks
    Telemonster double scale tele - finish tobacco burst on body and sand neck

    Completed builds
    scratch oak.rose gum Jazzmaster - assembled needs setup
    MK-2 Mosrite - assembled - play in
    Ash tele with Baritone neck - neck pup wiring tweaks and play in

Page 3 of 13 FirstFirst 1 2 3 4 5 ... LastLast

Posting Permissions

  • You may not post new threads
  • You may not post replies
  • You may not post attachments
  • You may not edit your posts
  •