
Thanks guys. I'll post up some new pics soon... just need to get the ok first *cough*


Thanks guys. I'll post up some new pics soon... just need to get the ok first *cough*
Scott.
Time for some colour, and by colour I mean Dingotone. And by Dingotone, I mean I was lucky enough to get to test an early version of DB's orange, which is what prompted this build in the first place. Unfortunately for DB it took me a whole lot longer than planned to get to the actual testing stage… but on the bright side, I can confirm Dingotone has an unopened shelf-life of at least 6 monthsPoor DB also had to suffer through my emails of excruciating testing detail hehe, but I won't inflict all of that on you guys.
Be aware that this is an earlier version of Dingotone from well before it was released, and DB has constantly refined and improved the formula since this version to make it even better and more usable (and continues to do so). But, I have to say, even this early version looks pretty amazing, the photos just don't do it justice.
So, with the body and neck final sanded and prep'd I was ready to try out this Dingotone stuff. I started with the stain coat on a couple of scrap pieces of wood, including two types of maple veneer, just to get a feel for how it went on and I would also use the scrap pieces as my drying guide… better to rub them to test how dry it is rather than risk hurting your possibly not-quite-dry body finish.
First stain coat on the body:
I also carefully taped up the headstock sides and stained the veneer… flamey goodness. Dingotone is pretty good at seeping under tape so you have to be careful around the edges.
DB's latest formulation of Dingotone doesn't stain binding, but this version will stain binding and MOP without batting an eyelid.
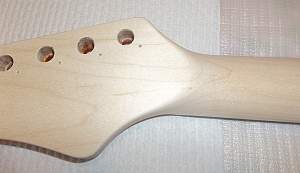
Although I spent a lot of time and effort getting all the glue and fingerprints off the cap at the start of the build, it seems that one spot just didn't clean up as well as the others and it just wouldn't take the stain.
I tried some more wire-brushing and light sanding, but I just couldn't get it to take any more Dingotone… and I knew it would really bug me if I couldn't fix it. In the end I had to resort to a 'tattoo' like method - I used a sharp fine-tipped sewing needle to lightly and repeatedly prick all across the glue area in the hope of opening up the surface enough to allow the stain to penetrate. You have to be careful doing this as too much in one spot will break up the surface and if you press too hard it will leave visible pits and pock marks, but too little and too light and it won't pierce the glue. It worked reasonably well and I was able to get the colour to match a lot better. However, it was a last resort method and it will leave some marks, so be warned. You can also see in this pic just how stained the binding is.

Last edited by WeirdBits; 14-11-2014 at 08:54 AM. Reason: Because I'm me.
Scott.
I also touched up a few other spots to even out the colour and get a bit more stain on the bridge plug repairs.
After 5 days of drying I did a bit of steel wool'ing to blend a few spots and even out some darker areas, these seemed to occur in places where there had been some damage or marks on the cap.
I was happy with the depth of colour after just the one Stain coat so it was time for the Intensifying coat.
The back of the body and headstock veneer really popped with the intensifying coat, but it took a day or so of drying before the cap really looked its best.
Scott.
The day after I applied the first stain coat I noticed a small orange blotch on the back of the headstock, but it just looked like I had somehow brushed it with a stained glove. I wasn't sure how it could have happened, but once it was dry I just sanded it off and thought nothing of it. However, after the intensifying coat I noticed it had appeared again and this time there could be no doubt… it must be bleed through from the truss rod access hole. With both the stain coat and intensifying coat I had coloured the inside of the truss rod access with just the minimum of Dingotone to cover it, so I was really surprised that it had somehow bleed through to the back of the headstock. I inspected the body and noticed a similar bleed through of colour inside the control cavity, particularly where I had deepened it (there was about 7mm of wood through to the back).
If it was a bleed through on the headstock then just sanding wasn't really going to work, so I did some tests on the scrap pieces and acetone seemed to be the best at removing Dingotone. So, after a couple of passes with acetone on a cloth and then some light sanding I was able to get the bleed through cleaned up pretty well.
Interestingly, there has been no bleed through at all from veneer at the edges of the headstock. I think the Titebond layer between the veneer and the headstock must act as a barrier and prevent the stain from seeping though.
Last edited by WeirdBits; 12-11-2014 at 09:22 AM.
Scott.
After 5 days of drying it was time for the second application of the intensifying coat:
With this coat I was very careful to not put any Dingotone in the truss rod access hole at all, and yet somehow it still bled through.
Dingotone penetrates the wood really well, but I think it's a combination of things in this case. Successive coats building up in the wood and pushing the colour further in, the small amount of wood from the truss rod hole to the back of the headstock, the direction of the grain in that area and the stain able to bleed with the grain rather than across it. DB also thinks that the oil used in the manufacture of the truss rod facilitates the flow of colour through the wood in that area. So, just be wary if you are ever staining the truss rod access.
I again used acetone to clean up the area and then lightly sanded to finish it up.
Scott.
I was happy with the depth of colour after just the two applications of the Dingotone intensifying coat, so it was time to get some colour on the back of the neck. I would be using a Dingotone clear neck kit but I wanted an old, smokey, vintage style yellow/amber to contrast with the orange so I would be first staining the neck with a SM Colortone mix in metho. I wanted to see how the DT would go over the Colortone, and I used alcohol rather than water to minimise grain raising and reduce the chance of it messing with the edge of the headstock veneer.
Nice and smokey the grain makes it look like it has a light and dark half.
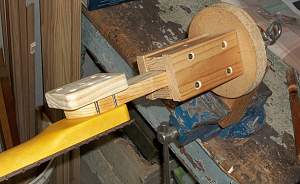
My neck mount contraption, using the neck mount screws, allowing full access and slots into my rotating painting rig.
Scott.
I wanted to ensure a good base for the neck top coats so I gave the neck a light steel wool and then applied the Dingotone neck kit's clear 'stain' coat. This really enhanced the colour and has given it a nice burnt gold aged look. Very pleased.
Three days drying and then the second application of the clear 'stain' coat.
A couple more days drying and I'll start on the neck top coats. I'm hoping the yellow stain and clear Dingotone stain coats on the back of the neck combined with the three weeks since the last intensifying coat on the headstock veneer will minimise the chance of any more bleed through of colour from the truss rod access when the top coats go on.
Scott.
Time to prep the body for the top coats scraping the binding. This early version of Dingotone really likes to cling to binding, so it took a lot of time and effort to scrape it clean. Places where the binding had been most stressed, like the tip of the horn and the tight curves of the f-hole, were the most difficult to clean as that seems to open the pores of the plastic making it more vulnerable to staining. Overall, it cleaned up ok but lucky for everyone else the new DT formula doesn't stain binding.
The MOP on the headstock wasn't too bad to clean, just had to be careful.
But, the body was a long slow careful process
The scraping the f-hole was very awkward but turned out to be easier than I expected once I found a tool that was small enough to work. In this case, one particular blade from a hobby knife set as well as some others at different times.
Binding scraped, cleaned and polished ready for the top coats. I love how the white looks with the orange.
Scott.
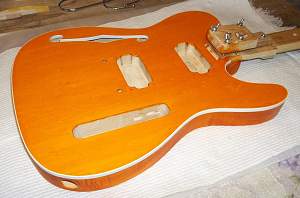
First top coat on the back of the body kapow!
It's really hard to get a photo of the cap that accurately shows what it looks like in person, the colour is really hard to photograph, it either looks too red/orange or too pale and washed out. These pics were taken about 30mins after application and the top coat made it look a lot lighter than it normally does, but by the next day it looked *amazing*. Really, really, pleased. The actual colour is sort of in between the first two pics, but with the grain detail of the 2nd and 3rd pics, if you get what I mean. Can't wait to get some good natural light pics once there's a few more coats on.
You may notice that the top edge of the binding has picked up a bit of colour again, this is transfer from the body colour onto the application cloth. I couldn't avoid it, but it should be an easy clean up and will hopefully diminish with each subsequent top coat.
Thank you DB!
Scott.

Great detail as always Wierdy. She looks amazing dude! This is one beautiful axe you are creating - love it!
cheers,
Gav.
--
Build #01: BC-1
Build #02: ST-1
Build #03: JR-1DC
Build #04: ES-2V
Build #05: ESB-4 (GOTM July 2014)
Build #06: RC-1
Build #07: MK-2
Build #08: TLA-1
Build #09: JR-1DC
Build #0A: LPA-1
Build #0B: STA-1 (GOTM April 2015)
Build #0C: MKA-2
Build #0D: LP-1M
Build #0E: JB-1
Build #0F: FS-1
Find me:
https://www.facebook.com/firescreek.guitars/
http://www.guitarkitbuilder.blogspot.com.au/
 Posting Permissions

 Reply With Quote