Results 1 to 10 of 233

Thread: Astracaster First Build FS-1

Hybrid View

Previous Post Previous Post   Next Post Next Post
  1. #1
    Moderator fender3x's Avatar
    Join Date
    Jan 2016
    Location
    Miami, FL, USA
    Posts
    3,004
    Dent video...


    Some people do small dents with a soldering iron...I have only done it like this guy does.

    I think all of the PB archtops are plywood. Back and sides have a basswood veneer as the top. Tops have a figured maple veneer. The latter is super thin. The back and sides are not quite as thin, but I have managed to sand through one of mine anyway. I don't know if they iron trick will work on plywood. It might, but the risk would be compromising the laminations. I have only tried it on solid woods, so am not sure...maybe someone will chime in who has?

    I have never tried the stain you are using, but some prefer to go on before grain filling and others after.

    You can certainly fill to get the spot flat, but with some stains it might look similar to a glue spot. I'd definitely try it on scrap first. I had some tear-out on one of the holes I drilled for a string through bass. I filled the gouge with small pieces of wood that I shaved off a similar colored wood. I am not sure I recommend this, but I filled the hole with AquaCoat clear filler mixed with some stain. I then put the pieces in place, and then sanded it flat after it dried, and added a bit more stain. It worked reasonably well.

    If the hole is not too big, even if it's a mm deep, you could use clear filler. I have a few small dents that I have repaired this way and you can't tell they are there once the clear coat is on. I have even used AquaCoat clear to after starting the clear coat by sanding, filling and then adding more clear coat. AquaCoat is not cheap, but it makes up for it by being pretty versatile.

  2. Liked by: Trevor Davies

  3. #2
    Quote Originally Posted by fender3x View Post
    Dent video...


    Some people do small dents with a soldering iron...I have only done it like this guy does.

    I think all of the PB archtops are plywood. Back and sides have a basswood veneer as the top. Tops have a figured maple veneer. The latter is super thin. The back and sides are not quite as thin, but I have managed to sand through one of mine anyway. I don't know if they iron trick will work on plywood. It might, but the risk would be compromising the laminations. I have only tried it on solid woods, so am not sure...maybe someone will chime in who has?

    I have never tried the stain you are using, but some prefer to go on before grain filling and others after.

    You can certainly fill to get the spot flat, but with some stains it might look similar to a glue spot. I'd definitely try it on scrap first. I had some tear-out on one of the holes I drilled for a string through bass. I filled the gouge with small pieces of wood that I shaved off a similar colored wood. I am not sure I recommend this, but I filled the hole with AquaCoat clear filler mixed with some stain. I then put the pieces in place, and then sanded it flat after it dried, and added a bit more stain. It worked reasonably well.

    If the hole is not too big, even if it's a mm deep, you could use clear filler. I have a few small dents that I have repaired this way and you can't tell they are there once the clear coat is on. I have even used AquaCoat clear to after starting the clear coat by sanding, filling and then adding more clear coat. AquaCoat is not cheap, but it makes up for it by being pretty versatile.
    It is definitely not a dent. It is some sort of a scratch which wouldn't go with sanding. Could it be a small knot or mismatched grain in wood?. In that case I may have to accept it and start staining

    I also wanted to know how do u choose the colour of the back & sides of your guitar build and back of the neck?

    I tried a few stains yesterday which i though could go well at back. These were all natural wood colours like teak, Rosewood and Redbrown.


    Redbrown turned out to be as same as red stain. The other two are sort of OK.
    I also have this problem. There is colour seepage despite me using a fineline tape. You can see it in above pic if you zoom.

    Is there a way to get a fine line or workaround for it?

    I may choose rosewood if I stain the top orange and the teak one if I choose the olive green.


    Top could be one of these


    I have finally masked the top and sides of the body and neck. So that i can start staining the back of the body and neck. Is this OK?


    I have gone ahead and ordered this fret crowning file from amazon as my friend is willing to bring it on 20th when he is coming back to India

    https://t.ly/2gO_P

    I hope this is good too.

    One last thing before staining is I am trying to find a couple of slabs of similar colour wood as the veneer and back just to see how the colour would actually look on the veneer and back as the scrap woods I stained were light coloured yellowish wood and my kit is pinkish brown ish wood.


    Sent from my NE2211 using Tapatalk
    Last edited by Drashkum; 15-06-2023 at 04:43 PM.

  4. #3
    Quote Originally Posted by Drashkum View Post
    I also wanted to know how do u choose the colour of the back & sides of your guitar build and back of the neck?
    Basically, I generally start the thought process with "what don't I already have?" and go from there. But I think my most favourite colour combination I've done was my build #13 - thinline ST with spalted maple veneer. (Build diary here - https://www.buildyourownguitar.com.a...ad.php?t=11695)

    I went with tobacco brown on the back and vintage amber on the veneer. I also hit the neck and headstock with a single coat of vintage amber and while still wet, wiped over it with a wet cloth to thin it out and smooth out the finish - the purpose of this was to give it a bit of an aged look. Coated the whole thing with many (40) layers of Tru Oil which darkened everything to some very nice tones and made it shine.

    Click image for larger version. 

Name:	PXL_20230410_021417911(1).jpg 
Views:	573 
Size:	311.0 KB 
ID:	44432
    Click image for larger version. 

Name:	PXL_20230410_021443402(1).jpg 
Views:	546 
Size:	243.1 KB 
ID:	44433
    Click image for larger version. 

Name:	PXL_20230410_021359610(1).jpg 
Views:	578 
Size:	245.7 KB 
ID:	44434
    Last edited by m0j0; 17-06-2023 at 10:00 AM.

  5. #4
    Quote Originally Posted by fender3x View Post
    If you do your staining in a conventional way, it think it's near impossible to make a good line. Most stains are designed to penetrate, so no matter how well you have things taped off the stain will leach under it. IIRC there was someone on the forum who was able to make a good line but I don't remember how they did it. The binding should help make the line however, unless it has some cracks. If you have the binding well taped the stain should not go under the fine-line tape on the binding. You might try a small section by the heel to check first...

    That crowning file should work well. I have the three sided version from them which I have been pretty happy with.

    FWIW You may not want to leave the masking tape on the guitar too long. I try not to leave regular masking tape on wood or paint. It's generally OK for short periods, but the adhesive is stronger than blue or green painter's tape and can pull paint off, or even veneer off, if you are not careful. Also the adhesive can leave a residue, particularly if your climate is hot, humid or you leave it on for too long. I actually don't like to leave any sort of tape on for very long... Here's the way I did my last one. I had already painted the top and was doing the sides at this stage.

    Click image for larger version. 

Name:	IMG20230320172353.jpg 
Views:	568 
Size:	240.2 KB 
ID:	44401

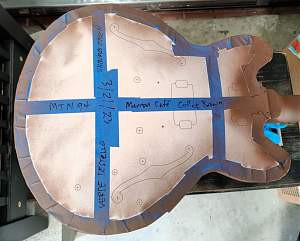
    You can't see it in the pic, but the binding has blue 1/4" (6mm) fine line vinyl tap on the binding. I found a to-scale PDF of an ES 335 body which a printed, cut out and used as a cover. The blue painter's tape is stuck mostly to the vinyl fine line tape and the paper. I tried to have as little as possible of the tape stuck to the paint. Even then I only left the tape in place for a few days. Long enough for the paint on the sides to dry, but not long enough for it to cure.
    The sides of the FS-1 kit is sandwiched between binding on either side. I really hope it doesn't seep through that. I have been reading from forum and other groups telling me to apply a thin quote of clear over the binding before staining so that it resists stain. I will have to try to do that. I am staining the back first and then the sides and I am keeping the top for the last. The tape I have used is low tack. I really hope I don't have to keep it much longer. I shall try to remove it as soon as Possible

    I went to the timber shop the other day. In india they don't have basswood samples. Seems They are not native to India. So they gave me 3 slabs of Steam Beech wood which looks similar in Colour to the veneer and back. Now I have something to try my colours on to see how exactly the shade may look.


    Edit: I did try the colours now. Tried Pinks and Purples and couple of them are pink and purple mixed in different ratios. Tried Green, Green and yellow on top, Orange and Blue.

    I am still unable to make up my mind on which shade to stain. I like the blue but I have 3 blue guitars already. Orange and olive green and pinks too look good. I may try to dilute the purple today and stain again today.

    What do u guys think?

    Quote Originally Posted by m0j0 View Post
    Basically, I generally start the thought process with "what don't I already have?" and go from there. But I think my most favourite colour combination I've done was my build #13 - thinline ST with spalted maple veneer. (Build diary here - https://www.buildyourownguitar.com.a...ad.php?t=11695)

    I went with tobacco brown on the back and vintage amber on the veneer. I also hit the neck and headstock with a single coat of vintage amber and while still wet, wiped over it with a wet cloth to thin it out and smooth out the finish - the purpose of this was to give it a bit of an aged look. Coated the whole thing with many (40) layers of Tru Oil which darkened everything to some very nice tones and made it shine.

    Click image for larger version. 

Name:	PXL_20230410_021417911(1).jpg 
Views:	573 
Size:	311.0 KB 
ID:	44432
    Click image for larger version. 

Name:	PXL_20230410_021443402(1).jpg 
Views:	546 
Size:	243.1 KB 
ID:	44433
    Click image for larger version. 

Name:	PXL_20230410_021359610(1).jpg 
Views:	578 
Size:	245.7 KB 
ID:	44434
    I have a lot of blue guitars. I have been inching away from Blue. But from what I see from trial in the above scrap wood the blue looks brilliant

    Sent from my NE2211 using Tapatalk

Tags for this Thread

Posting Permissions

  • You may not post new threads
  • You may not post replies
  • You may not post attachments
  • You may not edit your posts
  •