
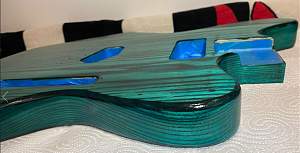
I have finally had some time to get back to the build on my offset Tele so I have moved my build diary here. I have been adding coats of Poly to the body and neck. I think I am at 6 or 7 - have lost track a little.


I have finally had some time to get back to the build on my offset Tele so I have moved my build diary here. I have been adding coats of Poly to the body and neck. I think I am at 6 or 7 - have lost track a little.
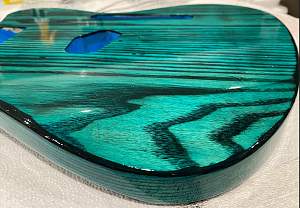
After the dye I have sprayed two thin coats of Cabothane Clear Spray on Poly Gloss. I did not pay enough attention to the first and there was a run on the front but I hit it with Mineral Turps and it came off clean.
Then I started to wipe on coats using Feast Watson Wipe on Poly Gloss. I am having to work in the house as it is cold and humid in the shed most days. When I have time off work I do two coats a day with about 6 or 7 hours in between. Other days I try to get one done in the evening.
After the second or third coat of wipe on (can't remember) I started to do a light rub of OOOO Steel wool and then paper towel on the surfaces. I use some old pickups in a freezer back to pick up the bits of steel wool left behind. Then I give it a quick wipe with Metho on a rag to clean off the dust and any fingerprints before I apply the wipe on.
It seems to be going OK at the moment. Some dust and marks in a few places but not too many.
I have learned a lot in the process. Especially about the early prep. I needed to sand back a lot more before I started with the grain filler and the dye. There are still machine marks in parts of the body. Also I knew where there were a couple of glue marks as I had seen them earlier and got a discount on the kit because of it. Once the dye went on I could see a number of glue marks on the back of the body as well. Next time I will need to look out for them before the dye and try to get rid of them. Any suggestions will be appreciated.
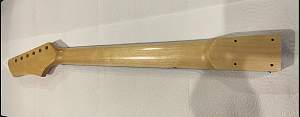
I am looking at two Bridge options. Both Wilkinson - chrome or Black. I am leaning towards the black but then I might need to think about shaping another pick guard which is another think I have not done. If I do I am thinking matt black. I was hoping to go without any big pickguard but the holes were already drilled when I got the Guitar. I will also need to file the front pickup hole as the Yosemite Pup is a bit longer.
I had to move the bridge screws for the Wilkinson Bridge. I made some hardwood rounds to fill the old holes. If I did this again I would fill the old holes with epoxy.
One question for those more experienced. Should I drill out the neck holes in the body so the neck screws can pass through them without having to turn them?

Youre certainly getting stuck in to the build.
Several people here would advise against using steel wool if possible. As well as shedding all those metal fragments on the surface that youve picked up, youll find that some of the fragments can embed themselves in the finish. Hard to see now, but they will oxidise over time and become visible small dots. So Id recommend investing in some 3M Scotch Brite pads. I use the dark red/maroon ones, the dark grey ones and the white ones. These are equivalent to 0, 00 and 0000 steel wool. These may leave a very fine powder behind, but it doesn't poke itself into the finish. The pads also last for a very long time and can be washed out and used wet or dry.
One issue with black hardware is that if the finish is painted on or an epoxy one, then its normally insulating, so getting electrical continuity from the bridge ground wire to the strings involves scraping off the finish in relevant areas until you get continuity between ground and each string. It can be done, but its a bit more work.
Definitely enlarge the neck mounting holes in the body so a screw can just pass through without catching the wood. It allows the screw to pull the neck flat to the wood. Having to screw into both the body and neck means that you can end up with the screw tight against the body without having fully pulled the neck down to the pocket floor. This can mess with the neck angle and its obviously not the best neck joint.
If youve got two makes of pickup available, be aware that if you mix them up and fit a bridge pup from make A and a neck pup from make B, there is no guarantee that by using the manufacturers recommended wiring colours as to ground and hot outputs, that the outputs will have the same signal polarity. So in the middle position, you may find the sound thin and nasal-sounding. This can be cured by swapping the hot and ground wires round on one of the pickups. However, with Tele pickups, the neck pickup cover needs to be grounded and if the bridge pickup has a metal base plate, then this also needs to be grounded. So on whichever pickup you decide to swap the connections over, either the cover or plate needs to be connected to the other output wire otherwise youll have a very noisy pickup.
Some manufacturers (including Tonerider) either provide as standard or have an option for a separate ground wire for the bridge base plate or neck cover. A separate ground wire for one or other (or both) of the pickups is also necessary if you go for a four position selector switch with a both pickups in series position (a useful extra sound).
If you ever need to mod a pickup like this, then I think the bridge is the easier one to modify as the link from the base plate to the ground wire output is directly accessible and you can just cut the existing one and either solder a new link to the other output solder pad, or solder on a separate ground wire and run that back to the control cavity.
I too have been plagued by tooling marks or even self-imposed coarse sandpaper scratches that havent shown themselves up before a finish started being applied. Ive often had to sand right back a couple of times before Ive found and removed them all. Dampening the wood with metho, turps or white spirit can help show up these marks, but you still may not see them until you have at least some finish or sanded back the grain filler. If you do this, you need to let the wetting agent evaporate fully before applying any finish. Holding up the body to a bright light can help, and look at it from all angles, as Ive found some marks only show up far when looking from a particular direction.
Glue marks on a non-veneer body are rare, but they can happen. But you can often get the same effect if youve sanded the wood with too fine a grit or pressed too hard in areas, so the surface becomes burnished and the wood doesnt take up the stain in those areas very well. Note that the wood itself can sometimes just be awkward and have patches with awkward grain patterns that dont take up stain as well as others. Scuffing the surface with a fairly coarse sandpaper and re-staining can sometimes help here.
Again, dampening the wood normally shows up these areas. You can use water, but it will raise a lot of grain and will require more sanding once its fully dry,
The front and back body surfaces need to be sanded flat but the surface doesnt want to be sanded too smooth or stain wont take well. You can have a very smooth surface thats curved or undulating, but its not flat. For a good factory quality glossy finish, you dont want to have dips in the surface. So sand it flat. A light mist coat of spray paint before you sand can help show the dips and pits remaining. Youll sand all the paint off if you do the job properly. After that, I rarely sand above 180 grit on the body. Maybe 240 on a maple neck thats just being lacquered. All the really fine sanding happens on the finish.
Thanks again for all the information Simon. I have seen the plastic pads used to finish necks before. I do suspect there are one or two bits in the finish so it will be interesting to see how they go over time.
I had thought I went to high with the sandpaper on the body. I did the bulk at 220 and then a fine sand at 360. I am happy with the colour so it is not a huge problem. I am not going for a super smooth surface. I am after a hint of the wood grain surface through the finish. This seems to be working out well. I only used the grain filler once to get the colour.
I had not thought about the black hardware. Good to know as my next build has all black. I am not planning on mixing the pup sets so hopefully I can work out a good wiring plan.

Hi juz.I had thought I went to high with the sandpaper on the body. I did the bulk at 220 and then a fine sand at 360.
Don't know where you're located, but sandpaper grades are different depending on country/region.
Not sure if you're referring to P220 vs 220, or P360 vs 360. HERE is a link to a chart showing the difference in abrasive.
The differences can be minimal, but I think worth knowing.
Making the world a better place; one guitar at a time...
Hi McCreed
I did not know that. The wet/dry sheets I just checked and they all have the P. Will need to check the sheets for the orbital.
I am in OZ.
Took a while to find some locally but found it in the end. Much easier than chasing all the metal files. It will be interesting to see how the coats go using it. Thanks for the tip Simon.
So I think I have enough coats to let the body sit for now. I can still see a bit of the grain pattern in the surface so I am working on the idea that I can do a very light wet sand and then polish once it is cured. I estimate somewhere around 15 coats? I see everything from 1 to 4 weeks for curing wipe on poly so I will give it some time.
 Posting Permissions

 Reply With Quote