Page 7 of 8 FirstFirst ... 5 6 7 8 LastLast
Results 61 to 70 of 80

Thread: DTL-1SB First build

  1. #61
    Member
    Join Date
    Oct 2021
    Location
    Sydney
    Posts
    34
    Thanks again Mccreed really appreciated.

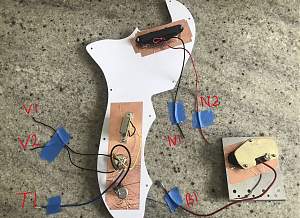
    While I wait for the additional copper tape to finish the control cavity I have been looking at the wiring - and am somewhat confused (it may be me or is the PB tstyle wiring missing some wires)

    My understanding of the following wiring is that they are wired as follows - my google reference also below:
    • T1 to Jack - white insulated wire to the and silver earth wire to the sleeve
    • N1 to Volume pot and is a ground wire
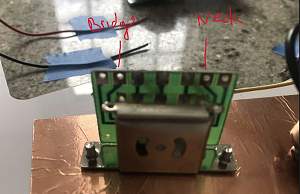
    • N2 to Neck slot second from right end on switch (toward the rear of guitar)
    • B1 to Bridge slot second from left on switch (toward the front of guitar)
    • V1 to ??
    • V2 to ??

    Are V1 and V2 meant to connect to the PUP earth wires or indeed back to the PUP cavities to earth them?

    Thanks again!

    Click image for larger version. 

Name:	Wire1.jpg 
Views:	950 
Size:	342.9 KB 
ID:	42701 Click image for larger version. 

Name:	Wire2.jpg 
Views:	944 
Size:	153.7 KB 
ID:	42702

    Click image for larger version. 

Name:	Wire3.jpg 
Views:	940 
Size:	124.3 KB 
ID:	42703 Click image for larger version. 

Name:	Wirediag.jpg 
Views:	940 
Size:	32.9 KB 
ID:	42704

  2. #62
    For your ground wires you need to avoid a ground loop. ie. Only earth every component once. The simplest way to do this is with a star pattern where you run all your earth wires from the back of one of your pots. You should have an earth wire going to each pickup (eg N1), a wire to your output jack from the back of the pot, a wire to your bridge, a wire to earth your tone pot and make sure something is connecting your coppper shielding tape to your earth circuit.

    Your pick hot wires from the pickup should connect to the pickup selector switch. The switch should have one hot output wire that connects to your volume pot which then routes to the Tone Pot and Capacitor and another output wire which runs to the output jack.

    I hope this makes sense.

  3. #63
    Member
    Join Date
    Oct 2021
    Location
    Sydney
    Posts
    34
    Thanks it does but still not sure how to use the V1 and V2 wires from the volume pot?

  4. #64
    Overlord of Music McCreed's Avatar
    Join Date
    Oct 2018
    Location
    AUS
    Posts
    3,552
    Quote Originally Posted by DeanCraig View Post
    Thanks it does but still not sure how to use the V1 and V2 wires from the volume pot?
    I would like to see more detail of the wiring of the pots and switch. I think you got the pots right but the switch is wrong. That jumper wire shouldn't be there.

    There are multiple ways to skin the proverbial cat here, but using your labelling system and existing configuration, I would do the following:

    V1 solder to ground lug of switch (casing).
    V2 use as bridge plate ground.
    N1 and the outer braided wire from B1 to the back of volume pot.
    N2 and centre wire (white insulated) from B1 to relative lugs on switch.
    T1 outer braided wire to sleeve lug of output jack.
    T1 centre wire (white insulated) to tip lug of output jack.

    See if this helps:
    Click image for larger version. 

Name:	PBG TL wiring 7 Lug reszd.jpg 
Views:	636 
Size:	340.7 KB 
ID:	42705
    Note this photo shows single core wire used, not coaxial, but the signal paths are the same.
    Making the world a better place; one guitar at a time...

  5. #65
    they are ground wires if connected back to the pot. You should have 1 wire running to the ground wire on each pickup. I can see the neck ground wire (N1 - connect this to V1) but struggling to see the bridge pickup ground wire unless it is the bare wire that is earthed to the back of the pickup that would complete the the earth circuit through the shield tape on the bridge. If this is the case you will need to connect V2 to the bridge to ground this which would in turn ground your bridge pickup.

    Have you got a multi-metre? if not get one so you can get all the elements of your harness grounded correctly.

  6. #66
    what @mcreed said!

  7. #67
    Member
    Join Date
    Oct 2021
    Location
    Sydney
    Posts
    34
    Thanks MrPearson and McCreed

    I have added additional images of the pots and switch below for clarity.

    I did not add any wires to this so the jumper wire short black one connection two contacts on switch was how it came from PB.
    FYI I was shipped a second set of pots/switch pictured below and it does not have the short black wire between 2 contacts. (jumper wire?)
    • My spare switch/pots matchs McCreeds image in the latest post in terms of layout including earthing the volume pot to the ground lug of switch (casing).
    • On the switch there are 8 contact points. Should I swap in this wiring which contacts do I use to connect the PUPs


    Thanks again for the help its invaluable!

    Closeup of current switch and pots
    Click image for larger version. 

Name:	Wire4.jpg 
Views:	637 
Size:	68.4 KB 
ID:	42706 Click image for larger version. 

Name:	Wire5.jpg 
Views:	631 
Size:	152.9 KB 
ID:	42707 Click image for larger version. 

Name:	Wire6.jpg 
Views:	621 
Size:	143.3 KB 
ID:	42708

    The alternate switch and pots I have also from PB:
    Click image for larger version. 

Name:	Wire7.jpg 
Views:	624 
Size:	101.1 KB 
ID:	42709 Click image for larger version. 

Name:	Wire8.jpg 
Views:	631 
Size:	67.7 KB 
ID:	42710
    Last edited by DeanCraig; 10-03-2022 at 02:45 PM.

  8. #68
    in your first diagram you look like you have 7 contacts. In your first image you have written in red which contracts you are planning on connecting your pickup hot wires to (position 2 and 6) which correspond with McCreed drawing assuming the jumper wire is doing the same job. I am assuming the 8th contact will be the ground which you have a spare wire for.

    Worst case scenario is do a tap test. Solder everything and plug into amp at low volume and tap your pickups with a screwdriver and experiment with the switch. Bridge, Neck, Together. If you have a ground problem then you will hear nothing when you tap the pickup.

  9. #69
    Member
    Join Date
    Oct 2021
    Location
    Sydney
    Posts
    34
    Thanks MrPearson

    In the first images is the 7 tab switch with the jumper wire from tab 3 to 5 that McCreed suggested should not be there.

    The bottom two pics are a second switch assemble sent from PB with 8 tabs. I am happy to use the 8 tab version as its more like McCreeds diagram. I am just not sure:

    • Which tabs I use on an 8 tab switch?
    • If I use the 7 tab switch I assume I can desolder and remove the bypass wire?

    Thanks
    Last edited by DeanCraig; 14-03-2022 at 04:16 PM.

  10. #70
    Overlord of Music McCreed's Avatar
    Join Date
    Oct 2018
    Location
    AUS
    Posts
    3,552
    Quote Originally Posted by DeanCraig View Post
    Thanks MrPearson

    In the first images is the 7 tab switch with the jumper wire from tab 3 to 5 that McCreed suggested should not be there.

    The bottom two pics are a second switch assemble sent from PB with 8 tabs. I am happy to use the 8 tab version as its more like McCreeds diagram. I am just not sure:

    • Which tabs I use on an 8 tab switch?
    • If I use the 7 tab switch I assume I can desolder and remove the bypass wire?

    Thanks
    Sorry I thought I posted this already, but must have closed the page without submitting... D'oh!!
    That jumper wire on the 7-lug switch should be fine. Just a different way of achieving the same thing as in my photo.

    The 8-lug switch will be the same with the exception that the two middle-most lugs (the "common") must be jumpered.

    LIKE THIS:
    Click image for larger version. 

Name:	Tele 8 lug imp sw.jpeg 
Views:	635 
Size:	103.2 KB 
ID:	42733
    Making the world a better place; one guitar at a time...

Page 7 of 8 FirstFirst ... 5 6 7 8 LastLast

Tags for this Thread

Posting Permissions

  • You may not post new threads
  • You may not post replies
  • You may not post attachments
  • You may not edit your posts
  •