Page 10 of 19 FirstFirst ... 8 9 10 11 12 ... LastLast
Results 91 to 100 of 187

Thread: Hello World! My first guitar project

  1. #91
    Member ross.pearson's Avatar
    Join Date
    May 2021
    Location
    Lower Upper Woop Woop, WA
    Posts
    211
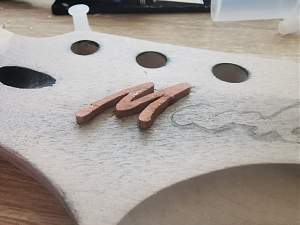
    Welp, that seems to work. A bit of a mess up close, but have happily embedded the M. It broke again, of course, but that's okay. So the plan now is to complete the "routing" for the inlays and then CA glue them in. Then I'll pare off the excess and fill all the tiny chipouts and mistakes with maple wood filler.

    Click image for larger version. 

Name:	IMG_20210815_161540.jpg 
Views:	407 
Size:	457.7 KB 
ID:	41291

  2. #92
    GAStronomist Simon Barden's Avatar
    Join Date
    Oct 2016
    Location
    Reading, UK
    Posts
    10,547
    Maybe use a less brittle backing for the abalone, like a sheet of plastic (like model-making polystyrene sheet). You can get it thinner as well, so the inlay cut-out doesn't need to be so deep. The abalone/MOP/whatever you use needs to be reasonable thick, as it's hard to get it level with the surface, so you'll need to sand it down.

    I always ended up sanding it too thin in places so I could see the backing, so I gave up and went to decals.

  3. #93
    Member ross.pearson's Avatar
    Join Date
    May 2021
    Location
    Lower Upper Woop Woop, WA
    Posts
    211
    Heyo, that's a fantastic idea, I wish I'd have thought of it! The inlay material I'm using is Jarrah, so if it breaks I can easily glue it back together without it looking too obvious thanks to the breaks occuring across the grain. But yeah, adhering the material to something sturdier would be great.

    As I'm hand carving the inlay route it's only pretty shallow anyway. Next time I do this I might use powertools. I played around on some scrap with the dremel and a tiny ball burr, and the results were decent for hogging out, but not so great for finer edges. I also slipped a couple of times and marred the edges. Probably a combination of scalpels and the dremel.

    Another option I've been considering is colouring some 5-minute epoxy and filling the inlay if the jarrah doesn't work out. I would have to do a lot of prep work to get cleaner edges first though. But it's an option for next time.

  4. #94
    GAStronomist Simon Barden's Avatar
    Join Date
    Oct 2016
    Location
    Reading, UK
    Posts
    10,547
    I bought some very thin router bits that would fit the Dremel (meant for CNC engraving) with the intent of using them to do the fine detail inlay routing, but never got round to using them before I went over to decal-only. Here they are: https://smile.amazon.co.uk/gp/produc...?ie=UTF8&psc=1

  5. #95
    GAStronomist Simon Barden's Avatar
    Join Date
    Oct 2016
    Location
    Reading, UK
    Posts
    10,547
    Of course you'd also need something like the StewMac router base to go with the Dremel, as Dremel's own router bases aren't much good by all accounts.

  6. #96
    Member ross.pearson's Avatar
    Join Date
    May 2021
    Location
    Lower Upper Woop Woop, WA
    Posts
    211
    Yeah I have the dremel router base and there's no way it would work on a headstock, not enough flat surface to work with. I have loads of bits collected over the years, but might check out some smaller router bits and the stewmac base, that sounds pretty good

  7. #97
    Mentor
    Join Date
    Aug 2018
    Location
    Perth, Australia
    Posts
    537
    Great job so far Ross. Back at the beginning of the thread when you were having burning issues and tear out it may not necessarily be something that you did, Tassie Oak/Vic Ash is renowned for that. I had the same issue on my tele thinline. The comfort contours were a good idea for weight relief as well I would expect.

  8. #98
    Member ross.pearson's Avatar
    Join Date
    May 2021
    Location
    Lower Upper Woop Woop, WA
    Posts
    211
    Quote Originally Posted by Woltz View Post
    Great job so far Ross. Back at the beginning of the thread when you were having burning issues and tear out it may not necessarily be something that you did, Tassie Oak/Vic Ash is renowned for that. I had the same issue on my tele thinline. The comfort contours were a good idea for weight relief as well I would expect.
    Oh right, I did no know that. Definitely something to remember. I'm really loving the look of this wood with the paint and finish I've applied, so I'm considering doing a second one. I'm thinking about doing a complete "hand tools only" build, but I'm still missing some key tools. I'd want a router plane, spokeshave, brace and bits. If I went down that route at least I won't need to worry about tools burning and blowing out the wood!

  9. #99
    Member ross.pearson's Avatar
    Join Date
    May 2021
    Location
    Lower Upper Woop Woop, WA
    Posts
    211
    It took a while but I successfully hand routed the cavities with scalpels. Overly successful in fact as you'll see. I glued them down with CA glue and clamped with a cork sanding block under the headstock. The CA didn't take successfully in a bunch of spots, so I had to run more in. I was hoping not to get any CA along the edges so I could fill the gaps properly, so this might mean more work in the future.

    I have a backup plan if this all ends up looking awful.

    Click image for larger version. 

Name:	IMG_20210817_124934.jpg 
Views:	362 
Size:	451.6 KB 
ID:	41311

    Everything is glued in now and my chisel is pretty sharp. I started paring away the top to level it all down. You can see how badly the hand routing came out. With way more practise and time I think this is entirely possible, but I'll never be doing it again. I've ordered a set of 0.6 - 1.5mm dremel end mill bits and a precision router base.

    Click image for larger version. 

Name:	IMG_20210817_133913.jpg 
Views:	351 
Size:	518.6 KB 
ID:	41312

    Pared pretty flat here. Loads of gaps on the edges. Not really very happy with it to be honest, but I have a couple of contingency plans available.

    Click image for larger version. 

Name:	IMG_20210817_135427.jpg 
Views:	372 
Size:	609.7 KB 
ID:	41313

    I've gap filled and washed the entire headstock with a very watered down cedartone wood putty to try and get some colour consistency with the gaps.

    Click image for larger version. 

Name:	IMG_20210817_141136.jpg 
Views:	362 
Size:	614.8 KB 
ID:	41314

    There are some issues that will need to be addressed, I still need to sand flush and likely stain with the putty again to see how it looks.

    The main contingency at this stage is to impress a small channel around the lettering to embed brass wire or thin sheet into.

    At the end of the day I'm planning to paint the headstock, so it might not look too bad when all is said and done.
    Last edited by ross.pearson; 17-08-2021 at 03:12 PM.

  10. #100
    Member ross.pearson's Avatar
    Join Date
    May 2021
    Location
    Lower Upper Woop Woop, WA
    Posts
    211
    Welp, I may have stuffed up slightly. Yes the dark wood is a good contrast to the bright maple. But it's a crappy contrast to the paint which matches the body. I tried various combinations and strengths of the paint, including even sanding the inlay with a fret eraser, and no bueno. Me no gusta.

    Click image for larger version. 

Name:	IMG_20210817_154200.jpg 
Views:	366 
Size:	823.6 KB 
ID:	41315

    Click image for larger version. 

Name:	IMG_20210817_154210.jpg 
Views:	366 
Size:	670.9 KB 
ID:	41316

    Click image for larger version. 

Name:	IMG_20210817_163510.jpg 
Views:	378 
Size:	624.5 KB 
ID:	41317

    So, I'm down to two options. The first thing I'll try is a brass wire outline for the lettering. If that doesn't work I might veneer the headstock.

    Option three is to get/make another neck I suppose =) I was considering making one anyway, just so it could be a "complete" scratch build...

Page 10 of 19 FirstFirst ... 8 9 10 11 12 ... LastLast

Posting Permissions

  • You may not post new threads
  • You may not post replies
  • You may not post attachments
  • You may not edit your posts
  •