
Really nice work nice and clean, very tastefully done. Between this one and the GoTM runner up I want to build another Tele!


Really nice work nice and clean, very tastefully done. Between this one and the GoTM runner up I want to build another Tele!
FrankenLab:
Turning tone wood into expensive sawdust since 2016!

I normally just break those pot lugs off with pliers. You could drill a small indent hole for them if you want (some pickguards have a hole by each pot hole location for this purpose), but if the pot is loose enough to rotate when you turn it, then it's too loose anyway and will need tightening.
They are useful if fitting a pot in a tight location (for the pot body) so it's hard to grip to stop it turning when doing up the external nut, as the lug stops the pot rotating so it can be tightened just from the top. But it really is redundant in most guitar-based applications.
They snap off easily with a couple of back-and-forth movements.

I always snap the lugs off pots. In all my tinkering I haven't encountered anything that had the alignment hole for them. As well as holding the pot in place, they can also make sure the pot is in the right orientation. This is most helpful with chamfered pot shafts (the ones with the D profile) as the knobs only fit in one orientation and you need the knob marking to be in the right place.
Edit: I know I said "this is most helpful", but I should have said "I imagine this is most helpful", 'cause I haven't had anything with the holes. But I have used those types of knobs and it is a minor nuisance to get them to stay lined up right, so I imagine the alignment lug might help with that.
Last edited by jugglindan; 12-06-2020 at 09:13 PM.
Mantra: No more pedals, must finish BlueyCaster...
Disclaimer: I haven't done woodwork since high school, and wasn't really paying attention at the time ...
Thanks all that is really helpful and nice feedback.
The lugs are getting the chop then!
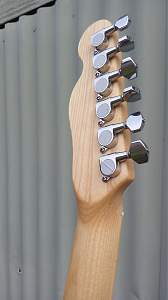
OK first thing today was to remove those little lugs from the pots, trying not to break anything else in the process.
Got that done, then fitted and screwed the pickguard and intput jack.
Then realised I hadn't removed the plastic film (there are 2 layers!) so carefully undid the switch and each controler then did them all back up again.
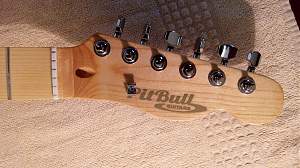
Happy with that. Then onto the headstock decal. I decided to stay honest to the guitar's heritage and I think it came up nice.
Short-lived though because I only want a single string tree and it was always going to go right over my logo. Function before fashion. Still looks pretty sharp I reckon. This time I remembered to get a photo of how I marked the position relative to strings.
Next was to add strap knobs and string it up. And before I knew it I was done!
Looks really really good!
Sent from my moto g(7) using Tapatalk
Mantra: No more pedals, must finish BlueyCaster...
Disclaimer: I haven't done woodwork since high school, and wasn't really paying attention at the time ...
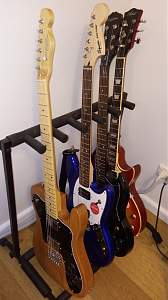
Some final glamour shots. I also tuned it up and played it. I'm absolutely gobsmacked just how nice it feels and sounds. No hum, not fret buzz, and the response from the volume and tone controllers all works as expected.
I think the thing that makes it so special is that I did it myself. OK... with a bit of help from the forum and Adam's wonderful videos!
FIN

Nicely done! Congratulations on your first build, and thanks for sharing your info on the DIY tru oil. I may have to revisit the idea.
How do you like that Artist LP? I've been tempted a few times to try some of their other models.
Making the world a better place; one guitar at a time...
Hi McCreed - decent for the money. I got mine several years ago when I was first getting back into guitar. I'm a bit of an Ace Frehley fan so wanted a cherry burst LP but just couldn't spring for an Epiphone or Tokai (let alone the real thing). Other than the binding and plastics yellowing a little over time, it's a great guitar and I've never had any issues with it. Sounds great too! Yet to wire some pyro into the neck pup cavity, but you don't rush these things.
 Posting Permissions

 Reply With Quote