
Do you know of a diagram like the one on this page explaining what different the parts of the guitar are called in Portuguese? I suspect that if I refer to "a fruta seca da minha guitarra", people will think that I'm mad...Originally Posted by rjmc


Do you know of a diagram like the one on this page explaining what different the parts of the guitar are called in Portuguese? I suspect that if I refer to "a fruta seca da minha guitarra", people will think that I'm mad...
Excellent -- thanks!
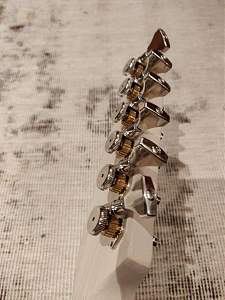
Back in the UK to find that the Hipshot tuners have arrived. Test fit:
As expected, the screw holes don't line up with the factory-drilled ones:
...so tomorrow I'll drill two holes the same size in the headstock offcut and plug one with a toothpick and fill another with light wood filler, and see which is least conspicuous when some of my finish is put on top.
It might be hard to see here, but the top two tuners in this (staggered) set have the string hole (technical term) only just accessible:
Are PBG headstocks unusually thick? Shouldn't matter, anyway, as the tuners are locking ones so there's no need for multiple turns around the peg. And anyway it's the thin top two strings.
Anyway, I love the way the open gears look.

Genuine strats & teles are in the range of about 15mm.Are PBG headstocks unusually thick?
If the headstock is thicker than 15mm and it's an issue for you, either practically or aesthetically, it wouldn't take much with an electric sander to thin it. Work 80-120 grit down to 240.
Now would be the time before you get any finish on there. (which is going to make it marginally thicker again)
Making the world a better place; one guitar at a time...

As long as you can fit the string through the hole, you'll be OK. You want the B and E string holes to be as low as practically possible so you don't need to use string trees.
I fitted some of the Hipshots (enclosed versions) to a friend's Fret King, where the original height-adjustable Gotohs just weren't locking properly. I used the backing pieces and that covered up the holes without needing to do any filling-in.
Last edited by Simon Barden; 29-02-2020 at 05:39 PM.
Headstock is between 14.7 and 14.9mm thick according to my shiny new digital caliper (can't remember who recommended getting one, but it's an excellent toy :-) so it looks like all is well.
Thanks, makes sense!
That's certainly my plan if I can't fill the holes in a reasonably invisible way -- but to my mind it looks better without the backing piece:
...than it does with:
If it was a vintage instrument where I wanted to avoid drilling new holes then everything would be different, though!
[edit] The backing piece doesn't actually quite cover the pre-drilled holes in this case, now that I look closely -- about half of each one is visible:

Last edited by gpjt; 01-03-2020 at 10:13 AM.

I LOVE those tuners man. Yeah clearance is fine since the locking tuners don't require wire wraps around the post.
Build #1 - ST-1 - Completed
Build #2 - LP-1SS - Completed
Build #3 - TLA-1R - Completed
Build #4 - SGD-612 - Completed
Build #5 - ES-1G - Completed
Build #6 - STA-1HT | Completed
Build #7 - ST1JR - Completed
Current Build #8 - JBA-4
Build #9 - Semi-scratch build Tele x 2 - Completed
Current Build #10 - PRS-1H
Current Build #11 - AGJR-1 - Completed
Current Build #12 - ATL-1SB
Current Build #13 - GST-1
Current Build #14 - FBM-1
Yup, when I saw the design I almost bought them on the looks alone, but the reviews were great and now that they've arrived I can say that they seem very well put together -- very solid feeling. Looking forward to trying them out
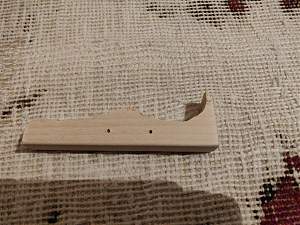
So, time to try the different methods for filling the existing tuner screw holes. I want the test I do on the offcut to be as similar to the reality as possible, so first step is to measure how deep the holes are with a toothpick and masking tape:
Next, measure the diameter -- the easiest way turned out to be to break off the tip of a toothpick, stick it into the hole, and then measure its diameter at the point it entered:
Double-check the width of my 2mm drill bit:
All good, so masking tape as a depth stop on the bit:
...and drill the holes in the offcut:
 Posting Permissions

 Reply With Quote