


Here's my actual routing jig. I don't have one of those nice router bits that follows a template directly with a ball bearing, so I need to restrain the router itself. So a bit of 3mm ply as a base - just one of these for both pickups - and more 3mm ply carefully measured from the router plate.
First I routed through the 3mm ply backing. Then relocated some of the ply strips to resolve the errors I made locating them in spite of my careful measurements.
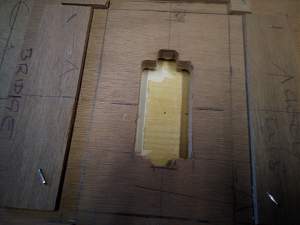
Next its time to turn the jig over. Need to draw on the back the centre line of the instrument, and and 90 degrees the centreline of each pickup. Drill a small hole through the top exactly in the centre of the pickup route. I put the guitar body in the jig and checked the pickup centres on the body exactly matched those above. Now I took the body out again, located the pickup jig in position for the first pickup, stapled it down and routed through the top of the jig. I didn't take a photo showing it clearly, but here you can see that there's a bottom plate for the jig, which screws onto the 4 padded verticals. The body just rested on thick padding on this bottom piece lightly pushed down by the plate screws, I din't see a need to lock it in place vertically more firmly than that.
Having done that the body goes back in the jig and check again that the route through the top is exactly placed. Then I could start routing the actual body.


 Reply With Quote