Results 1 to 9 of 9

Thread: First Build -> RC-4 Bass kit

  1. #1
    Member
    Join Date
    Jul 2019
    Location
    Sydney
    Posts
    4

    First Build -> RC-4 Bass kit

    Just got my first kit, the last of the RC-4's, and am excited to get started!
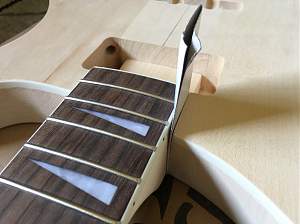
    I'm pretty sure the first thing I should do is the neck and bridge positioning, so I have drawn a centreline and found the scale length to position the bridge, but the neck has quite a bit of slop in the joint. This can be remedied by a folded piece of cardboard, but not sure what I should do.
    Click image for larger version. 

Name:	IMG_1498.JPG 
Views:	324 
Size:	406.6 KB 
ID:	31716

  2. #2
    Member
    Join Date
    Jul 2019
    Location
    Sydney
    Posts
    4
    Here are some more pictures of each side of the joint.
    Click image for larger version. 

Name:	IMG_1502.JPG 
Views:	313 
Size:	339.6 KB 
ID:	31717
    Click image for larger version. 

Name:	IMG_1501.JPG 
Views:	307 
Size:	378.6 KB 
ID:	31718

  3. #3
    GAStronomist FrankenWashie's Avatar
    Join Date
    Jan 2016
    Location
    Glebe, NSW
    Posts
    5,666
    Hi CS and welcome to the show!

    Its a common issue for bolt ons and set necks. You've done the tough bit by aligning your neck to the body.

    From the photos it looks like there is only a gap on the top side of the neck, and it appears to taper out into the bottom of the pocket? Is that correct?

    What i'd do is see in you can get some plain maple or light coloured veneer and layer that into the pocket sides to take up that gap. You then adjust your shim with sand paper until you get a good snug neck fit all the way up that top side of the pocket.

    How is your scale length with the neck in that position? On some of these kits the neck actually needs to go out a bit to get the scale length right as well, and that may have an influence on that gap.
    FrankenLab
    Hand crafting guitars, because Death Rays are expensive.


  4. #4
    Member
    Join Date
    Jul 2019
    Location
    Sydney
    Posts
    4
    Thank you!

    Yes, the gap seems to only be on the top as you described, and the strings line up ok when butted up against the bottom.
    There aren't any holes for the bridge, I just clamped it down like the neck to put the strings on, so I don't think I will have to move the neck out as I can just move the bridge.
    The join does get tighter as I move the neck out, but I have to move it pretty much all the way out.

  5. #5
    GAStronomist FrankenWashie's Avatar
    Join Date
    Jan 2016
    Location
    Glebe, NSW
    Posts
    5,666
    Quote Originally Posted by CSmith View Post
    Thank you!

    Yes, the gap seems to only be on the top as you described, and the strings line up ok when butted up against the bottom.
    There aren't any holes for the bridge, I just clamped it down like the neck to put the strings on, so I don't think I will have to move the neck out as I can just move the bridge.
    The join does get tighter as I move the neck out, but I have to move it pretty much all the way out.
    Good stuff, the only other thing you'll nee to check with that is whether the fretboard end will interfere with the placement of your neck pickup mounting ring.

    i.e; https://www.buildyourownguitar.com.a...ght=Igor+blues

    post #76 is where i had to "Adjust" the body end of the fretboard and neck heel to correct for the interference issue.
    FrankenLab
    Hand crafting guitars, because Death Rays are expensive.


  6. #6
    Member
    Join Date
    Jul 2019
    Location
    Sydney
    Posts
    4
    I don't think that will be an issue on this kit as the pickup has to be installed on the pickguard, the route in the body is bigger than the holes on the pickup ring. The pickguard lines up just fine with neck all the way in as well.

  7. #7
    GAStronomist FrankenWashie's Avatar
    Join Date
    Jan 2016
    Location
    Glebe, NSW
    Posts
    5,666
    Quote Originally Posted by CSmith View Post
    I don't think that will be an issue on this kit as the pickup has to be installed on the pickguard, the route in the body is bigger than the holes on the pickup ring. The pickguard lines up just fine with neck all the way in as well.
    Sweet, no worries then!
    FrankenLab
    Hand crafting guitars, because Death Rays are expensive.


  8. #8
    Overlord of Music McCreed's Avatar
    Join Date
    Oct 2018
    Location
    AUS
    Posts
    3,552
    Welcome CS.
    Good advice from FW about the veneer. I keep a range of timber veneers in my shop and use it for lots of different repairs and shims. Very handy to have.
    It's great you won't have to stuff around with the neck position and pickup mounting. I learnt that lesson the hard way. I shifted the neck to accommodate the pickup ring and was absolutely positive I would be fine on the scale length. But in the end, the intonation was just a bee's dick out and I just couldn't live with it, so ended up moving the bridge about 3mm. Intonates perfectly NOW!

    Welcome to "Adventures In Guitar Building"!
    Making the world a better place; one guitar at a time...

  9. #9
    Welcome, my RC4 diary is here "RC-4 Stuarts project", it may help. The only issue I had was the poor design of the wiring that can cause no output in certain conditions.
    Last edited by stuzl873213; 11-08-2019 at 01:28 AM.

Posting Permissions

  • You may not post new threads
  • You may not post replies
  • You may not post attachments
  • You may not edit your posts
  •