
So, how did we do Teach?Originally Posted by Loonhaunt


So, how did we do Teach?
FrankenLab:
Turning tone wood into expensive sawdust since 2016!

I used the p90 dog ear pickup in the ES-5V kit. Ive never used a p90 before so dont have anything to compare it to, but I like it for the jazz songs Im playing. Ive been visiting my old guitar teacher once a month playing my ES-5V through a fender hot rod and on both occasions hes told me Ive got good tone.

Well thats good to hear!
My kit arrived 12/24. It did not take long at all!. All was in good shape from the journey.
I began to dry fit everything yesterday and I noticed a few things that are driving some questions. I see that that the neck pocket is cut quite wide thus allowing a lot of side wobble. I am not sure that it would be prudent to shim, as I would have to have extremely thin shims placed either side of the neck. When I glue it up I may have to leave the two E strings on it as I clamp it to assure that I get it on straight? Any suggestions would be helpful. I see that the neck tenon also has been planed with a significant rocker to it so that when clamped I can very the neck angle to the bridge and plane of the body significantly depending on where I place the clamp? I am taking measurements from an Epiphone bolt on Junior to use for rough comparison of potential angles. I am also now aware that I am stuck with the enclosed tuners. I had a set of Replica Kluson classics with nice plastic knobs that I had intended to use but I see that the boring in the headstock is going to be over large for the replica's press-in bushings. I also noticed that there are some voids in the laminate used for the finger board, is there a hardening sealer recommendation for that. When I first looked at it I thought that it was a crack. I don't think it is fatal but it can not be left without filler. I was looking for a project, and now I have one.
DB
Started Doing things today: The Gibson esque headstock went better than I thought. I haven't been doing any wood working for a year so I was worried that what skill I had left me. Some is back:
The kits are so well made that it took and honest five minutes of 220 grit with the orbital to get the body ready for dye.
I am going to use a mix of Transfast Vintage Cherry, and Dark Mahogany mixed in water. I have to wait now for the dye to arrive. I thought the prep was going to take longer. I also need to wait for some tools I ordered to arrive so that I may begin work on the fretts that are pretty rough.
I was able to find some bushings at StewMac so I can get my Vintage Nickel Kluson Clones to work in my over bored headstock. I am super stoked about that.
So I have been a wooden boat builder for nearing 40 years, I have used Lot's of finishes, Man O War, Danish Oil, Tung Oil, Spar Varnish. I really like Tung Oil, I have built hundreds of Canoe and Kayak Paddles and Tung Oil has been my finish of choice. I have read much about using it or not on guitars, some folks say it deadens the tone, others say that on a solid body guitar that that is BS. So If you have the time I would like to hear what the people with guitar experience in this community think.
Later

If you put any finish on thick enough it will effect the tone. The trick is to keep the coats thin and dont do too many. Obviously if you are wanting a highly polished finish you will need more, but a guitar doesnt need the same level of protection as a paddle will.
Current:
GTH-1
Completed:
AST-1FB
First Act ME276 (resurrected curb-side find)
ES-5V
Scratchie lapsteel
Custom ST-1 12 String
JBA-4
TL-1TB
Scratch Lapsteel
Meinl DIY Cajon
Cigar Box lap steel
Wishing:
Baritone
Open D/Standard Double 6 twin neck
New Years Day I put my first Transfast water based dye on the body and neck. Today I rubbed in my second coat of tung oil. I am going to do one more coat of tung oil then I plan on setting the neck. I am nervous about the neck the frets are not set very well and seem to pop back out if I tap them in. I have one of the manufactured fret boards, I am not sure if it holds the fret wire in like a solid wood would? If any one can provide some insight I would appreciate that. I may have gone beyond my pay grade right out the box?
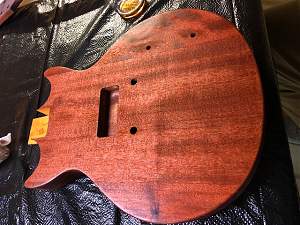
Transfast Light Mahogany I was looking for that SG red, looks pretty close I think?
There have been similar issues from time to time with various kits.
Three steps to rectify:
- Tap em back in (done but not successful)
- (Carefully) Wick some CA glue into the fretslot and then clamp or hold down the errant fret(s)
Both the above should be easily achieved for a first timer
Slightly more involved and you should use some fret board protectors and a proper fret puller if you do it
- Remove loose/popped frets and check radius, if matching or flatter, bend to a slightly tighter radius than your board and re seat.
- check tang depth and groove depth to make sure is not bottoming out, check tang width and slot width also (slot should be slightly skinnier)
You can adjust the frets manually with pliers, or a block with a hole in it that you can then bend the fret against the side of and gradually advance it up or down to get your desired radius. The key is itty bitty adjustments along its length.
Beyond that if you have more than 1 or 2 popped then it might be an email to Pitbull, or a dive headfirst into the wonderful world of fret board re-work! (Not recommended)
Hope this helps,
FrankenLab:
Turning tone wood into expensive sawdust since 2016!
I haven't taken the masking tape from the fret board yet , I am still applying tung oil and steel wooling. I think I am about at coat 8? I am not really counting, just watching the grain begin to drown in the sheen of gloss. Tung oil is pretty wonderful stuff to work with if you are patient. I did switch from Watco to Formsby Oil. Formsby is thinner and dives into the grain much better that Watco.
I bought some headstock decals from Bobsdecals in the UK. They are beautiful...but after reading the instructions, something all good engineers do last,I saw that nitro will eat them. This after I just bought some pretty spendy gloss black and clear for the headstock. Now I have to re-thiink my process to utilize polyurethane. It seems a shame to use a product named "Rustoleum" on a musical instrument. So if any community members can provide some views about a good poly to apply to my headstock that is not a decal eater. I thank you in advance.
I will inject some pictures of the build later today.
Loon
Last edited by Loonhaunt; 11-01-2019 at 09:20 PM.

Nice work on that headstock shape. looks good. That Transfast Light Mahogany dye also looks the business
You could instead finish it with a oil? I know you can't get Tru Oil in California easily buy maybe Tung or Danish Oil? do a rub on finish
If I spray I use acrylic rather than Poly its a little less thick.
Last edited by Andy40; 11-01-2019 at 09:26 PM.
Build #1 - ST-1 - Completed
Build #2 - LP-1SS - Completed
Build #3 - TLA-1R - Completed
Build #4 - SGD-612 - Completed
Build #5 - ES-1G - Completed
Build #6 - STA-1HT | Completed
Build #7 - ST1JR - Completed
Current Build #8 - JBA-4
Build #9 - Semi-scratch build Tele x 2 - Completed
Current Build #10 - PRS-1H
Current Build #11 - AGJR-1 - Completed
Current Build #12 - ATL-1SB
Current Build #13 - GST-1
Current Build #14 - FBM-1
 Posting Permissions

 Reply With Quote