
Just checked out your build, wow this guitar is in the right hands, imagine if a newbie ordered it he/she would be a quivering mess curled up in the corner.Originally Posted by Simon Barden


Just checked out your build, wow this guitar is in the right hands, imagine if a newbie ordered it he/she would be a quivering mess curled up in the corner.
Fender electric Fat Strat mim. (Bought)
Maton Electric Acoustic EM325C
Pitbull Guitars ST-1 ( finished) http://www.buildyourownguitar.com.au...ead.php?t=5970
Pitbull Guitars SG-2 ( Finished) http://www.buildyourownguitar.com.au...ead.php?t=6124
Pitbull Guitars JM-1 (Finished. 2018 June GOTM))http://www.buildyourownguitar.com.au...ead.php?t=7150
Pitbull Guitars TL-1 (In production) [url]https://www.buildyourownguitar.com.au/forum/showthread.php?t=8676

Well. It's harder because it was custom ordered without the pickups routed and the headstock holed drilled, because a) I didn't know what pickups I wanted to fit and b), the normal tuner holes on these are a bit wonky and also I wasn't sure what size of hole I required (they are now larger than the stock tuner holes) or their placement (due to the Hipshot Xtender tuner requirement), and drilling them from scratch was a lot easier than plugging and re-drilling.

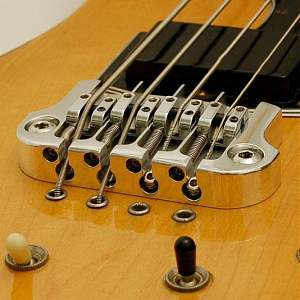
They are notorious for pull out even on mahogany bodies, so I am sure the soft wood does not help. The other thing I just noticed is that the width between the far edges of side holes is 96mm. The center-block is not much wider than that. Maybe just a couple of mm on each side.
On mine that was drilled a little off center and thus, off the center block. I reinforced with a piece of poplar that I glued, and then held in place for 20 min while the tight bond set. Then left it for a couple of days to fully cure. I am not sure how much that would help in your case. I would be inclined to find some sort of a string-through approach to pull the bridge onto the deck.
I just noticed this pic:
Just a photo to show why the original Fender sized Hipshot tuners and Xtender wouldn't fit on the headstock and had to be replaced by Hipshot lite variants.
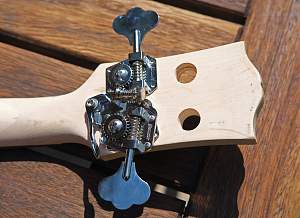

That really is quite a small headstock for a bass isn't it?
First (proper) build: http://www.buildyourownguitar.com.au...ead.php?t=8546
Second build: http://www.buildyourownguitar.com.au...ad.php?t=10229
Well, it's not massive but it was designed for four Fender style tuners. Standard tuners do fit on, it's the large footprint of the Extender key that's the problem here. Also, with the bass being semi-acoustic, the headstock doesn't want to be too large for fear of making it neck-heavy. Probably less of an issue on the original Gibson basses where the bodies were much heavier, but the basswood bodies and centre block wood on the PBG kits are much lighter.
I did consider fitting extra wings to the headstock to make it wider, but then it would have looked almost square and all wrong.
The best part about this model is it's weight. I am getting to like the neck better over time, although it feels wide to me. But I keep picking it up because my back likes it so much better than my solid body basses that weigh in at ~9 lbs. I would guess its around half the weight. Still the long maple neck and full sized tuners (even w/o a hipshot) produce a little neck-dive. Nothing extreme, but the light tuners should help.
I'm still working on the headstock for this as the last attempt was another failure. But yesterday I though I'd check that the neck and bridge all aligned and that the neck angle (height-wise) was correct.
But of course as the great Albert King sang; ' If it wasn't for bad luck, I wouldn't have no luck at all'.
Both of these were wrong. The neck centreline, by the time it got to the bridge position, was about a full saddle out, and the neck angle meant that the strings were about 1cm high.
I first tackled the neck break angle by sanding down the heel until a straight edge along the neck hit the bridge about 2mm below the top of the saddles. I didn't want to have to raise the saddles too much (on the Hipshot bridge I've got, the saddles were at their lowest position so can only be raised), as this would increase the upwards leverage on the bridge post inserts. So I'm happy with that now.
Remember that I'm fitting my own pickups which are a body-mounting soapbar style, so I don't need to worry about the strings clearing pickup rings with a lesser neck angle and the associated drop in string height across the body. The pickups just get lowered until they have enough clearance.
Then on to the neck angle with relation to the bass' centreline. You may remember that the neck pocket was originally too wide, so I glued a strip of maple veneer to each side of it for a snug fit. So the original pocket orientation was kept, which meant that it was just very poorly routed in the first place. So the first step was to sand away at the veneer strips with a small drum sander and a sanding block, to angle the neck back towards the centreline. I did this but it was not enough. So some more sanding was required until I now had enough space to angle the neck correctly. But this left big gaps down the sides of the neck, so it was then time for more bits of veneer, trying to form at least a reasonable filling of the gaps with wood to minimise any actual filler required.
However, this awkward neck join now means that I won't be doing my original single-colour finish idea on it, as it's going to need something fairly solid in colour to hide the mess around the join, so I'm now thinking some sort of sunburst is required.
Glueing the veneer pieces:
And the two sides of the pocket this morning with the clamp and tape removed:
I won't touch it until tomorrow now until the glue's all dried properly. I'll then need to do some more sanding and see what's what after that. I may then fit a full sized piece of veneer along the treble side and sand that back a bit until the neck fits in tightly again. We'll see. After that, it's time to make the routs for the pickups.

Mmmm some delicate work mate, its looking like a tricky fix
FrankenLab:
Turning tone wood into expensive sawdust since 2016!
I am really looking forward to seeing how you do the routs... What sort of rig you make, and tools you use.
When I had a gap on my ESB-4 I used a fillet made of maple that was just short of life-threatening to cut on my small bench saw. It never occurred to me to use veneer, and I really like the idea.
Sorry about the problems with getting things to line up. This seems to be a pretty regular issue with this model. From the way things line up, I think they are using separate jigs for the holes, the neck rout and the pickup routs (I know you don't have the latter)...and they are not getting them to line up perfectly.
So far, by my count, Gavin has been the only one to get a fully transparent finish on the top of one of these. I am getting sort of fatalistic about it.
 Posting Permissions

 Reply With Quote