Page 7 of 10 FirstFirst ... 5 6 7 8 9 ... LastLast
Results 61 to 70 of 94

Thread: trv's Spalted Maple LP-1SS

  1. #61
    Member trv's Avatar
    Join Date
    Apr 2018
    Location
    Winnipeg, Canada
    Posts
    131
    MARCH 2018

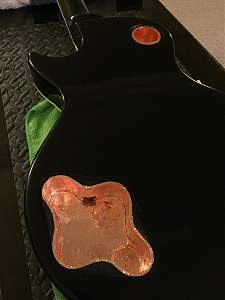
    At this point it seemed like the end was in sight. Now it was time to shield the pickup and control cavities, and the inside of the cavity covers with copper shielding tape. I thought this would be a quick job, but I was able to watch almost all of Godfather Part II in the time it took me to finish... and that's a looong movie
    Click image for larger version. 

Name:	HALC_0630.JPG 
Views:	353 
Size:	442.7 KB 
ID:	25920Click image for larger version. 

Name:	HALC_0640.JPG 
Views:	351 
Size:	332.9 KB 
ID:	25921

  2. #62
    Member trv's Avatar
    Join Date
    Apr 2018
    Location
    Winnipeg, Canada
    Posts
    131
    After seeing a few pictures online of other people's shielding I came back and added a little more around the edges of the pickup cavities
    Click image for larger version. 

Name:	HALC_0650.JPG 
Views:	352 
Size:	421.3 KB 
ID:	25922

    Later on when it was time to install the pickup rings I realized this wasn't necessary and removed it again.

  3. #63
    Member trv's Avatar
    Join Date
    Apr 2018
    Location
    Winnipeg, Canada
    Posts
    131
    Remember that ominous foreshadowing I did earlier? Well here's where I ran into a problem.

    Things were coming together, so now on to installing the bushings.

    ** Here's a tip I found online: put your bushings in the freezer a few days before you plan on installing them. Since they're metal they'll shrink slightly and will be easier to hammer into place. You have to work quickly, but as the warm up they'll expand creating a nice snug fit.


    You'll notice I didn't install the bushing for the tailpiece on the high side yet, that's so I can run a ground wire there later on.

    The bushings were installed and everything was looking good, until I tried to put the bridge on. I'll let the pictures tell the story...
    Click image for larger version. 

Name:	HALC_0660.JPG 
Views:	381 
Size:	462.1 KB 
ID:	25923Click image for larger version. 

Name:	HALC_0670.JPG 
Views:	365 
Size:	451.4 KB 
ID:	25924

    At this point I stopped for the night and contemplated my options.

  4. #64
    GAStronomist FrankenWashie's Avatar
    Join Date
    Jan 2016
    Location
    Glebe, NSW
    Posts
    5,666
    Eeeeeee, not good, not good at all 😵😭
    FrankenLab
    Hand crafting guitars, because Death Rays are expensive.


  5. #65
    Overlord of Music Sonic Mountain's Avatar
    Join Date
    Jul 2017
    Location
    Toowoomba, Qld.
    Posts
    3,261
    Doh! That's annoying. 72mm post spacing bridges are not super expensive (I know this is a posthumous thread, so you sort it out I'm sure &#128578

    I use the freezer trick as well, makes it a lot less scary.
    Build 1 - Shoegazer MK1 JMA-1
    Build 2 - The Relliecaster TL-1
    Build 3 - The Black Cherry SG AG-1
    Build 4 - The Sonicaster TL-1ish
    Build 5 - The Steampunker Bass YB-4
    Build 6 - The Howling Gowing ST-1

    "What I lack in talent I make up for with enthusiasm"

  6. #66
    Member trv's Avatar
    Join Date
    Apr 2018
    Location
    Winnipeg, Canada
    Posts
    131
    2mm doesn't seem like much, but in this case it was a major problem. I had done a test build a few months earlier, but I didn't see the issue because I just held the bridge posts in the holes with some cloth. I didn't install the bushings then out of fear of not being able to get them back out again.

    As far as I could tell my options were:
    A - buy a new bridge with 72mm spacing
    B - remove the bushings, plug and drill new holes

    Keeping in mind that I'd spent about 3 months just on the Tru Oil part of the finish, I wasn't too thrilled with the idea of plugging and drilling.

    After an evening of searching online I found two sites that sold gold 72mm bridges, and like Sonic said one of them wasn't too expensive. But the more I thought about it, I liked the bridge I already had and why make things easy on myself? (also I didn't feel like spending more money or waiting for shipping) So I went and got my old friend Mr Dowel again.

    I was really concerned about getting the bushings out without damaging anything, so if that didn't work I'd be buying a new 72mm bridge. Fortunately there are brilliant videos on YouTube like this one: How to remove Tune-O-Matic Bushings (in 53 seconds)
    I was also concerned about just driving the screw into the body but my screwing was impeccable.

    After the bushings were out I masked up the finish and glued in the dowels
    Click image for larger version. 

Name:	HALC_0680.JPG 
Views:	356 
Size:	409.9 KB 
ID:	25958

    Again using the flush cut pull saw I cut the ends off the dowels. I had a thin piece of cardboard between the body and the saw just to be sure I didn't scratch the finish. Then I sanded them level, found the centre point and marked where the new holes needed to go. I was very careful to maintain the correct angle of the bridge to avoid intonation issues later on
    Click image for larger version. 

Name:	HALC_0690.JPG 
Views:	349 
Size:	410.7 KB 
ID:	25959

  7. #67
    Member trv's Avatar
    Join Date
    Apr 2018
    Location
    Winnipeg, Canada
    Posts
    131
    I drilled the new holes and I'd like to say it worked perfectly, but it didn't quite work perfectly. Even though I was using a drill press the drill bit didn't have a brad point, so despite my best effort the hole on the high side was still off by about 1mm. I repeated the process and tried again, and this time it was exactly where it needed to be. Fortunately the lip of the bushings is large enough to cover about 99.7% of the dowelled holes; making them almost completely unnoticeable unless you know to look there... and now we all know to look there!
    Click image for larger version. 

Name:	HALC_0700.JPG 
Views:	362 
Size:	414.1 KB 
ID:	25960

    With the bridge in place. Dowels, what dowels?
    Click image for larger version. 

Name:	HALC_0710.JPG 
Views:	372 
Size:	394.3 KB 
ID:	25961

    It's funny how overwhelming this seemed when I first discovered the issue. I had just spent a couple weeks repairing and refinishing the tiny areas that were damaged when I removed the old nut; but somehow I got past this over the course of a weekend? Weird.

  8. #68
    Member trv's Avatar
    Join Date
    Apr 2018
    Location
    Winnipeg, Canada
    Posts
    131
    Now it was time to move on to the wiring. It was going to be interesting because I have no experience wiring anything (besides replacing a couple light fixtures) and have never soldered before.

    I wanted to do the same wiring scheme as the guitar this is based on, so I went with modern wiring with coil-splitting push/pull volume pots and no treble bleed. That should be pretty easy for a first-timer, right??

    I did a LOT of research while going through the Tru Oil process. I couldn't find a wiring diagram online that matched what I wanted to do, so I tried to learn enough about how things work and came up with my own
    Click image for larger version. 

Name:	HALC_0725.jpg 
Views:	367 
Size:	279.3 KB 
ID:	25963

    This diagram is heavily based on one I found at toneshapers.com. After I drew it up I emailed George at Tone Shapers to ask if I got anything wrong; right away I got a very detailed response and it turns out that everything looked good.

    **Amazing customer service considering at the time I hadn't ordered anything from them yet. I will definitely keep them in mind when it comes to future builds.
    Last edited by trv; 15-04-2018 at 02:45 AM. Reason: uploaded better picture

  9. #69
    Member trv's Avatar
    Join Date
    Apr 2018
    Location
    Winnipeg, Canada
    Posts
    131
    APRIL 2018

    After watching several videos I felt comfortable enough to try wiring things up, but my first attempt didn't last very long and was unsuccessful. I had mistakenly bought 1/16" 40/60 solder and was having trouble making connections. Once I figured out the issue I got some 1/32" 60/40 solder and tried again.

    This time it worked much better. It took several hours, but I made all the connections and had everything wired up. I felt an incredible sense of accomplishment and didn't even mind that it didn't work.

    The next day I came back and checked everything to see if I could spot the problem(s). There were several. I had a few cases of soldered joints touching the shielding (especially in the 3-way switch cavity) and one of my perimeter ground joints had come apart. After I fixed these issues I plugged it in and tried tapping the pickups with a screwdriver. Everything worked!

    At this point I tightened everything up and it no longer worked. After a couple more hours of resoldering joints that I thought could be the issue and even replacing one of the tone pots, I realized that the jack was making contact with the shielding. Quickly I had it working again. It ain't pretty, but here's how it turned out
    Click image for larger version. 

Name:	HALC_0730.JPG 
Views:	362 
Size:	375.7 KB 
ID:	25964Click image for larger version. 

Name:	HALC_0740.JPG 
Views:	380 
Size:	458.4 KB 
ID:	25965

    If I were to do it again there are definitely things I could do better, but this was probably the most rewarding part of the process so far.

  10. #70
    GAStronomist FrankenWashie's Avatar
    Join Date
    Jan 2016
    Location
    Glebe, NSW
    Posts
    5,666
    One of the threads I have read suggests that if pot contact is likely with the shielding, you could put some insulation tape or some other non conductive material under the pot as an insulator.
    The electrickery stuff is not my favourite task, so well done you!
    FrankenLab
    Hand crafting guitars, because Death Rays are expensive.


Page 7 of 10 FirstFirst ... 5 6 7 8 9 ... LastLast

Posting Permissions

  • You may not post new threads
  • You may not post replies
  • You may not post attachments
  • You may not edit your posts
  •