
Until of course you don't want it to...and then it's like shite to a blanket.Originally Posted by Simon Barden

Well it would be if I was doing it.
Looks like another GOTM in the wings.
cheers, Mark.


Until of course you don't want it to...and then it's like shite to a blanket.
Well it would be if I was doing it.
Looks like another GOTM in the wings.
cheers, Mark.

that is looking really good mate. The quality of wood in these guitars is a cut above eh

Sounds like a tribute band to a Maynard Keenan side project.
Very nice work, even with the apparent dust there is a glorious lustre to that body. Really looking forward to the headstock treatment photos. If you hear a "YOINK" its just the FrankenLab stealing ideas!
FrankenLab:
Turning tone wood into expensive sawdust since 2016!

Didn't quite work. The design is too small for the pattered abalone I was using and the black bits in it confused the design so it wasn't clear what it said. I also routed slightly too deep for the full plan to work. So I've ordered some much lighter pearl sheets. At least I know what I'm doing now, so it won't take long to get another couple of inlays sorted when they arrive. Also going to have a go at doing the outer circle separately to the letters this time. I'll practice on the old abalone sheet over the weekend.
See my bass thread for a picture and more description.
http://www.buildyourownguitar.com.au...l=1#post162046
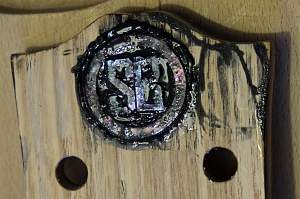
Well, I think I've finally had more luck with the headstock logo inlay (after a lot of failed attempts). Ring and letters all done separately. A 'white abalone' ring and 'white pearl' letters (though you can't tell that from the picture). Looking nice and clear even with black superglue smeared on top. Also the letters are raised up enough this time so I can paint the headstock face with a few coats of black and sand back slightly to leave things level. This black superglue takes a long time to dry, so I can put the neck away for a couple of days.
Awesome! Can't wait to see the finished head stock.
Derek.
Sent from my Moto G (5S) Plus using Tapatalk
Initially, I had this model which I purchased from a company in Utah, USA. I also loved the lightweight quality to it. But when I found a section of binding around the neck broken.......and those 'suspect' Chinese tuning machines, I boxed it up and gave it a ride back to Beijing. So, how is it going with this DIY? I feel you'll appreciate how receptive the wood is to stain. I wanted desperately to keep my Ric copy simple by staining, but after working on it, I had to hide the modifications to the bridge and the humbucker cavities. P.S. The neck for my guitar, if set as is, would have been crooked by at least 7 - 8 degrees right. While trimming the neck-to-body edge, I cut the tuner head at an angle to replicate the Rickenbacker. Good luck, Simon 'ol boy.

thats a real nice bit of staining there Simon you've done that before nice work fella im liking the headstock logo !!
My facebook
126 guitars done so far still going, 34 Starts, 25 Teles, 27 Les Pauls, 11 SGs, 8 Hollow Body, 21 Super Strats

Nice work on the custom inlay Simon. This is shaping up to be quite the nice looking project. Can't wait to see how it turns out.
Completed Projects:
non PBG LP Custom - Hetfield 'Uncle Milty' Iron Cross replica
non PBG Brownstein Stratocaster
Current WIP:
non PBG Stratocaster - Canadian Red Ensign
PBG FV-1G Custom
 Posting Permissions


 Reply With Quote