
Looking great! Scraping the binding is a thankless task, but it's worth it in the end.Originally Posted by Gary B

Did you watch Monday's FA cup match? My neice's husband is Dan Burn, the 6' 7" Wigan captain (whom I've never actually met yet).


Looking great! Scraping the binding is a thankless task, but it's worth it in the end.
Did you watch Monday's FA cup match? My neice's husband is Dan Burn, the 6' 7" Wigan captain (whom I've never actually met yet).
Thanks for the positive comments guys, it is appreciated.
Simon, I didn't see Mondays game as I have an aversion to watching Man City
However, I did enjoy hearing the result! There is a great pic of Dan on the BBC website surrounded by fans on the pitch after the match.
Yes. I'm not a football follower at all, but I keep track of how Dan's doing just to make sure he can keep my niece in the manner to which she's now accustomed.
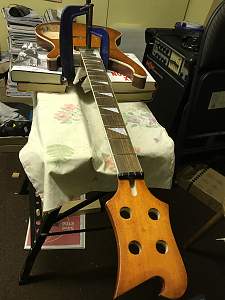
Well, a big moment - the neck is in place.
Not without a moment of drama. I had it clamped up and took these phots then, fortunately, took a closer look to make sure all was well and found a gap of a couple of mm between the heel and the edge of the neck pocket. Major panic but I got it sat properly and re-clamped and all is looking well now.
I think the glue, even though I applied thin layers, was enough to make the snug fit of neck and pocket a bit tighter than it had been.
Anyway, disaster averted hopefully!

Yeah, scraping binding is an...interesting job. Yours is looking really good though
#001 (LP-1S) [finished - co-runner up Nov 2018 GOTM]
#002 (WL-1)
#003 (MPL Megacaster - semi scratch build) [finished]
#004 (ST-1 JR - Arachnoid Superhero build) [finished]
#005 (LP jr)
#006 (TL-1A)
Junk shop acoustic refurbs (various)
'The TGS Special'
Took the bold step of un-clamping the neck and it didn't fall off!
This small gap between the end of the neck and the back of the pocket bothered me.
It must be better for the neck to make contact with the pocket as it is less likely to lift once under string tension is what I am thinking.
So made a shim to fill the gap. Started with a piece as at the rear of the pic and ended up with the piece at the front.
A coating of glue on both sides and in it went. Feeling happier with that.
And couldn't resist fitting a few bits of hardware.
Must admit to feeling a bit down now I am getting towards the end of the build. A little bit of soldering to do then it is just screwing a few bits on. Plenty of setting up to do and hopefully enjoy playing it after that. But then what? How to cure the post guitar kit blues?
I think I know the answer
Dude the grain pops so beautifully on your build. It's like you are seeing into the wood. I love the look.
Current Build: RCA-4 http://www.buildyourownguitar.com.au...ead.php?t=8261

You can do what I do. Take out the sand-paper and start all over again.
BTW I was sure you must have used Ebony Timbermate on that finish but there was no mention of it.
Probably a GOTM winner (unless somebody goes and enters an ES-3).
cheers, Mark
Ha that would be a bit drastic but I did that with the Tele I built previously :-)
I did think about starting with a dark stain to bring out the grain but didn't in the end, just used the Wudtone deep colour coat then base and clear coats
 Posting Permissions

 Reply With Quote