
Hmm yeah I've had a look through Sonic - nice work by the way.
I'll put the question out for general consensus, do I need to expand the pup route? And how far would you go?


Hmm yeah I've had a look through Sonic - nice work by the way.
I'll put the question out for general consensus, do I need to expand the pup route? And how far would you go?

Hey moo,
Yes, chances are you need to a little towards the neck. I would set it up and position the bridge at the right scale length and draw around it to make sure that you done go outside the small tele bridge. if you are replacing the kit bridge you'll need to measure the new one.
Build #1 - ST-1 - Completed
Build #2 - LP-1SS - Completed
Build #3 - TLA-1R - Completed
Build #4 - SGD-612 - Completed
Build #5 - ES-1G - Completed
Build #6 - STA-1HT | Completed
Build #7 - ST1JR - Completed
Current Build #8 - JBA-4
Build #9 - Semi-scratch build Tele x 2 - Completed
Current Build #10 - PRS-1H
Current Build #11 - AGJR-1 - Completed
Current Build #12 - ATL-1SB
Current Build #13 - GST-1
Current Build #14 - FBM-1
Thanks for the reply Adam,
I drilled the new bridge holes (after checking the scale length about 10 times) and marked where the edge of the bridge is. It's actually only about 5mm from the edge of the route, so I don't think I really have any room to expand. I'll see how we go, as the pup fits pretty snugly in at the moment when the bridge is in.
Is it an issue if the pup touches the shielding tape (once I put it in)?
Today was a big day! Having never done so much as a truss rod adjustment on any of my guitars, I dove into some more permanent stuff on the build, after watching many many many Youtube tutorials.
Made myself a notched straight edge (600mm steel ruler for less than $6 at the green shed and filed the grooves), adjusted the truss rod and then jumped into fret work.
Rounded over the edges of the frets, then levelled and re-crowned. Given them a good polish and really stoked with the result, and used only very basic tools:
- notched straight edge made from 600mm ruler from the green shed (less than $6) and filed the grooves
- sanding beam made from a piece of aluminium boxing, sanded perfectly flat over glass, then with sandpaper stuck to the bottom with some spray adhesive
- triangular file ($10 from the green shed) with the edges ground smooth by my dad
- crazy amounts of masking tape
I'm sure it's not the best fret dress that's ever been done, but I'm happy with it given my total lack of experience. Definitely the part of the build I was most nervous about so glad it's done with no hiccups!
Should be right to start assembly in the next few days so I'm sure I'll have lots more questions soon. Pretty keen to be done before I leave for uni on Tuesday
Last edited by Moo; 02-02-2018 at 06:22 PM.
Okay so Ive filed down the bone nut to fit the slot. Its obviously a bit long as well - do I just try and take an even amount off each side until the edges are flush? And should the edges be square, or taper to make nice curved ends on the top?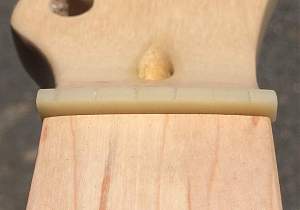

Typically you leave it long and unglued until you finish the build, as string tension will hold it in place once it's strung up. Once you've got everything sorted (intonation, action, string position down the neck etc) then you can mark the ends of the nut with a pencil, loosen the strings to slip it out and then sand/file it down to size. Sand down, test, sand down, test etc. until you get a nice smooth match with the sides of the neck, and then use a drop or two of glue to fix it in place.
I normally do this as the very last step, usually a couple of weeks after assembly and setup, once everything has settled down and I'm certain I don't need to adjust anything else.
Scott.
Thanks Scott, that makes a lot of sense. It's still really quite tight in the slot so I'll have no problems with it staying put.
 Posting Permissions

 Reply With Quote