
one more...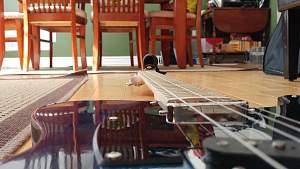


one more...
and for those interested, this is what she looks like so far. Not complete, obviously. missing 2 strings and strap pins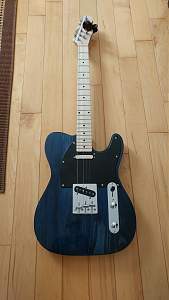

That's better! Thanks.
It's still never as good as actually having it in front of you, but I'd say that the neck could do with a slight amount of straightening out, so maybe 1/8 to 1/4 turn clockwise on the truss rod. However, this will tend to lower the string height over the 1st fret. You certainly haven't got any excess height there - that looks about as low as I'd ever risk going - but you may end up with some string buzz as a result. If it does, the only solution for this is going to be a new nut or live with a high action.
I always recommend setting up the truss rod first, then setting the bridge height (ideally with a capo on the 1st fret). You may need to alternate between truss rod adjustment and bridge height a couple of times. I try and get my necks as flat as I can without having any back (convex) bow in the neck - but sometimes the necks have a slight amount of twist and one edge is straight and the other still a bit convex, so you can't go beyond that. The bridge height should allow each string to play cleanly and the strings bend without choking on the upper frets. I normally lower each string until it just starts to buzz or choke, then raise it up a tiny bit from that.
Because lowering the bridge height slightly changes the angle that the strings exert their pull on the neck, then over a few hours, you might find the neck moving very slightly in response - which is why you may then have to go back and adjust the truss rod slightly - which in turn may involve adjusting the bridge heights slightly.
Once that's settled down, then is the time to do any nut slot/nut height adjustment, as you know the string angles won't be changing significantly after this, so you can then cut your slots as deep as you can without the strings buzzing. The lower the strings are at the nut, the less out of tune the first few fret positions will sound and the lower the final action will be.
Them set up the intonation. It's really not worth doing it before as the amount you have to press the strings down at the 12th fret will vary with string height - and the higher the action is, the greater the extra pressure required to force the string down and the greater the tension increase and the sharper the 12th fret position will sound. So it makes more sense to me to only set it up once you've got the neck relief, bridge height and nut sorted.
If you are struggling to get a low action after all this, then you need to investigate if it's one or more high fret(s) causing the issues. Normally displayed by one area of the fretboard where it's impossible to play a note cleanly but it's generally OK once you get a few frets either side of that area without having to raise the action very high.
It's important that when setting up the guitar, you have all the strings of your normal type and gauge fitted and tuned. Having two strings missing can change the overall string tension by 20-30lbs, which is a lot of extra force on the neck.
This is fantastic information. Thanks Simon! If I read you right, I need to start with the truss rod (I had the neck straight, and tightened it to try to accommodate for the high action), lose the shim that I've put it the neck pocket, and go back to square 1 on the set up. I'll also get a new nut that's higher, and adjust it to fit.
I'll do those things, and get back to you. Thanks for your help here.
No problem at all. The amount of neck bow required will depend on how level the frets are in relation to one another. The more uneven, the greater the amount of relief you'll need in order for the strings to play clearly and the higher the action will be.
I tend to start with looking at setting the action up on the highest frets first. These aren't really affected by the truss rod so if you can set up the bridge height just on them with some bow in the neck, then you've got a good idea of what the minimum string height over the high frets is likely to be. So keep this as a mental reference when adjusting the bridge height. Straightening the neck will pull this upper-neck string height down, so the saddle height needs to come up slightly each time as the neck becomes flatter.
The string height above the very lowest frets is determined mainly by nut/nut slot height, which is why on an initial set-up, using a capo on the 1st frets gives you a better idea of the overall action when the set-up's complete and you've got the nut height down. Your nut is already nice and low, so you can forgo that step.
With a significant bow in the neck, the string height above the upper and lower frets can be a lot less than above the frets in the middle of the neck. As the neck flattens out, the string height in the middle first equals and then drops lower than that at the upper frets.
On a vintage style Fender neck, you'd need quite a high action anyway in order to bend the strings without chocking on a 7.25" radius neck. Though the better set up the frets are, the lower an overall action you can get. I believe the PBG necks are all 12" radius, so you should be able to get the action pretty low and still bend the strings without them choking.
I like the blue colour of your Tele. I do notice from the picture that you've fitted the bridge a bit further forwards than it normally would be (but obviously it still works OK). If you look at pictures of a real Tele, there's around a 3mm (1/8") gap between the end of the bridge and the cut-out in the pickguard. The control plate butts-up to the 'guard, but there's normally that slight gap for the bridge. This can obviously depend on the bridge used as not all Tele-style bridges are the same length, but the kit bridge is around the standard size. Moving the bridge back would have meant the saddles would have to be set further forwards the same amount, which would have reduced the elevation angle of the intonation screws so they weren't poking up quite so high. The saddles still end up at the same height, but the impression given is that the bridge is generally lower.
If you do have trouble moving the low E/A saddle back enough to intonate those strings well, then you could consider removing the bridge plate, plugging the existing mounting screw holes, moving the bridge back very slightly and drilling some new mounting holes. You may find that the bridge pickup cavity needs enlarging to do this - it seems to be a common problem with the TL kits. But a sanding drum on a Dremel is normally all that's needed to make the cavity larger. Just be careful not to go outside the sides of the bridge plate and create a visible hole. But if you can intonate it all as it stands, I'd just leave it as it is.

G'day mate, I have built 2 Tele's and both had the neck sitting too high in the neck pocket by around 7 mm and they looked similar to yours in those photos. No amount of tweaking did much at all and ended up very carefully sanding down the base of the neck pocket to drop the fret board height where neck joins the body. This also made it much easier to intonate and also drop the action to a more comfortable height. Raising the bridge saddles was not the way to go as it ended up with the bridge saddle screw ends sitting above string height and interfering with playing or palm muting.
Cheers, Waz
# 1 - EX-5 https://goo.gl/fQJMqh
# 2 - EX-1 https://goo.gl/KSY9W9
# 3 - Non PBG Tele https://goo.gl/W14G5g
# 4 - Non PBG J Bass https://goo.gl/FbBaFy
# 5 - TL-1AR GOTM Aug 2017 https://goo.gl/sUh14s
# 6 - MMB-4 Runner-up GOTM Oct 2018https://goo.gl/gvrPkp
# 7 - ES-1 Runner-up GOTM Aug 2018https://goo.gl/T9BEY8

That blue is just dreamy!
Waz, is the neck height a subjective thing? I didn't think my TLA-1R was too high at all. I'm researching this as I'm building my semi-scratch tele at the moment and i am onto setting the neck heel rout and adjusting it for height of the neck.
Build #1 - ST-1 - Completed
Build #2 - LP-1SS - Completed
Build #3 - TLA-1R - Completed
Build #4 - SGD-612 - Completed
Build #5 - ES-1G - Completed
Build #6 - STA-1HT | Completed
Build #7 - ST1JR - Completed
Current Build #8 - JBA-4
Build #9 - Semi-scratch build Tele x 2 - Completed
Current Build #10 - PRS-1H
Current Build #11 - AGJR-1 - Completed
Current Build #12 - ATL-1SB
Current Build #13 - GST-1
Current Build #14 - FBM-1
 Posting Permissions

 Reply With Quote