I am having this frustration with wiring. The woody bits I can do, the wiring snots me up a wall!Originally Posted by wokkaboy


I am having this frustration with wiring. The woody bits I can do, the wiring snots me up a wall!
FrankenLab:
Turning tone wood into expensive sawdust since 2016!
Chuck, assuming the bush is hollow all the way through, drop a piece of rod in there that's shorter than the pocket and wind the post back in. You'll effectively use it as a jacking screw to lift the bush out. You might need to chuck a second piece in as it lifts higher, but less risk than drilling new holes.

New logos day! It's taken me forever to get around to going down to Officeworks to get these printed - the drawbacks of currently working from home instead of having an office with a laser printer on call!
Got a couple of extras just in case I decide to build some more guitars!!!
Completed Builds: #1 TL-1 "Telemaster" (GOTM Oct 2016); #2 The "Maplecaster" scratch build; #3 JB-4 "Bass IV" (co-winner GOTM Jan 2017); #4 ST-1M "Surfcaster" (GOTM Apr 2017), #5 JZA-1 "EC Deluxe"
I think Im thinking in circles with the wiring now on this one! Maybe I should go back to simple builds!!
So this is the diagram for the Bill Lawrence 5-way switch. Im using Tonerider Rebel P90s, and they have the single wire coming out of them. I know Weirdy and Simon have talked about this as an issue with the PBG P90s, but Im hopeful I dont have to go to a two-coil wire on the Toneriders. Im hoping that for the neck pickup I can simply split the inner core and the outer ground wrap at the end and put heatshrink along the length of the wire to isolate it a bit. And the points at which they connect to the 5-way are nice and close!
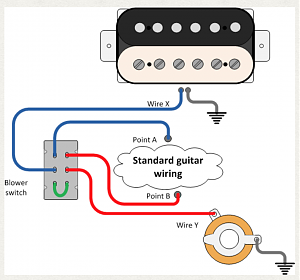
For the bridge pickup Ive finally decided to go with a blower switch, and heres where I get confused. Following the diagram below Im clear with how to wire in wire x to point A on the 5-way. Im then assuming that point B on this diagram is the middle lug of the volume pot? If so, thats cool, but Im still unsure of what to do with the ground shield on the wire from the bridge pickup. Im thinking Ill again have to heatshrink the entire wire again to isolate it. What Im hoping is that I could attach the ground to the top left lug on the 5-way (which is part of the ground loop - and also nice and close to where the hot wire connects). Would this work or am I way off track?
Completed Builds: #1 TL-1 "Telemaster" (GOTM Oct 2016); #2 The "Maplecaster" scratch build; #3 JB-4 "Bass IV" (co-winner GOTM Jan 2017); #4 ST-1M "Surfcaster" (GOTM Apr 2017), #5 JZA-1 "EC Deluxe"

Yep, point A connects to the 5-way where the bridge pup does in the 1st image, and point B is the middle (out) lug on the volume pot.
insulating the braid (ground) on the P90 will stop it from shorting on anything but the poles will still be part of the 'hot' signal path in certain positions, so you may get some noise if your finger tips ever brush them. Also, in those same positions the braid is carrying the 'hot' so while it's now insulated it is not 'screened' from noise as it would be with a ground around it. Good cavity shielding should help to minimise most of this though.i
And, nothing special is needed fthe bridge pup ground, just cnnect it to whatever the closest or most convenient ground point is near your blower switch.
Last edited by WeirdBits; 15-08-2017 at 05:30 PM.
Scott.
No probs, Colin, I picked it up on eBay - here's a link to the stuff - but there are heaps of sellers. It's water-slide transfer paper, and you can get it for laser or inkjet printers. The advantage of the laser stuff is you don't need to seal the print with anything before putting gloss or tru-oil over it.
Completed Builds: #1 TL-1 "Telemaster" (GOTM Oct 2016); #2 The "Maplecaster" scratch build; #3 JB-4 "Bass IV" (co-winner GOTM Jan 2017); #4 ST-1M "Surfcaster" (GOTM Apr 2017), #5 JZA-1 "EC Deluxe"
Thanks Scott, that gives me the confidence to start having a crack at it tomorrow!
Completed Builds: #1 TL-1 "Telemaster" (GOTM Oct 2016); #2 The "Maplecaster" scratch build; #3 JB-4 "Bass IV" (co-winner GOTM Jan 2017); #4 ST-1M "Surfcaster" (GOTM Apr 2017), #5 JZA-1 "EC Deluxe"
Well it's taken a while, but as usual it all comes together in a rush. I finished the wiring but made a couple of mistakes so had to redo it. The rest all worked out pretty well. The name, "EC Deluxe" is a nod to the Elvis Costello Jazzmaster that this was roughly based on.
The pickups are Tonerider Rebel P90s and the wiring is the "Bill Lawrence 5-way telecaster circuit" as described on the first page, which gives me:
· Position 1: neck pickup alone
· Position 2: neck + bridge in parallel
· Position 3: bridge pickup alone
· Position 4: neck + bridge in parallel half out of phase
· Position 5: neck pickup alone with 10 percent less low end than position 1
The top toggle is a blower switch which gives me the bridge pickup direct to the output jack, bypassing everything else.
The only other thing out of the ordinary is the pickguard. made from 1.8mm aluminium sheet that's been brushed and sealed.
Here she is!
Completed Builds: #1 TL-1 "Telemaster" (GOTM Oct 2016); #2 The "Maplecaster" scratch build; #3 JB-4 "Bass IV" (co-winner GOTM Jan 2017); #4 ST-1M "Surfcaster" (GOTM Apr 2017), #5 JZA-1 "EC Deluxe"
'As long as there's, you know, sex and drugs, I can do without the rock and roll.'

Awesome! Great to see a completed offset. Nice mods too *must resist urge*
 Posting Permissions

 Reply With Quote